


(66000025) NEW:
With the slider a colour from the colour
templates can be chosen. This colour
template can be edited using “ProCEd”
software and USB dongle. (Make sure
that the remote control is not in power
saving mode).
The function keys can be set by using the
software and are in the delivery state as-
signed as follows:
• Function key white » P
• Function key blue
» Program -
• Function key green »
• Function key red
» Colour-
By pressing the “Power key” the control-
ler will be turned off. The start program
can be stored by pressing the “Power key”
for more than 5 seconds, after the supply
voltage is attached. In this case the cont-
rollers will be turned off.
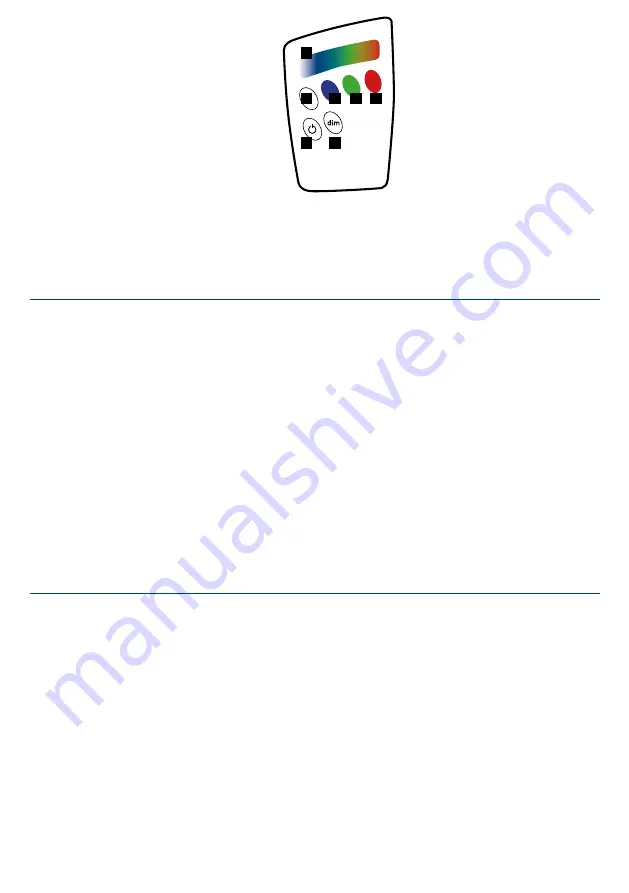
1:
Slider
2:
Power-TKey
3:
Dim
4:
Function key white
5:
Function key blue
6:
Function key green
7:
Function key red
FIG.: 2
1
5
4
2
3
6
7
5.2 KEYPAD CONFIGURATION
There are two ways
(New and Classic)
for
the key assignment, which can be chan-
ged at any time. The necessary files can
be found on our website www.barthelme.
de. The change of firmware works with
the „ProCEd“ software via the „Update
Device Firmware“ button, which is found
in the „Setup“ section of the program. (The
USB-Dongle 66000036 is required!)
CAUTION:
Only use the firmware files for
the specific devices, otherwise the remote
can be damaged!
Keypad configuration as follows:
• Function key white » P
(editable via software)
• Function key blue » Program -
(editable via software)
• Function key green »
(editable via software)
• Function key red
» Colour -
(editable via software)
(66000045) CLASSIC:
When the slider is used, without having
pressed one of the funktion keys, a colour
from the colour templates can be chosen.
This colour template can be edited using
“ProCEd” software and USB dongle.
When a funktion key (e.g. red) is pressed
first, the slider will control the brightness
of this colour. This feature will remain
activated for 3 seconds –status LED is
blinking
A short press on the key and the dim fea-
ture is activated on the slider which can
be noticed by a blinking LED. This dim
value also applies for the colour changes.
A short press of the dim key also activa-
tes the feature keys.
A press on the “Dim key´” switch the
remote control to the second level. This
can be noticed by the blinking LED. By
pressing this key again, the second level
is left. Once after 15 seconds no entry
is made in the second level, the remote
control automatically returns to the first
level.
The key functions in the second level, ch-
ange as follows:
The slider turns to a dimmer. This dim
value also applies for the colour changes.
By previously selecting a colour with the
four function keys, the brightness of this
colour can be controlled. When a function
key (e.g. red) is pressed first, the slider
will control the brightness of this colour.
Pressing the “Power key” pauses the cur-
rent program. By using this combination,
the second level is exited automatically.
Pressing this combination again, the
paused program is continued.
6. NETWORKING
A basic application is using one CHRO-
MOFLEX Pro and either remote control
or USB dongle. Both units have to be set
on the same network. This is also the
default factory setup mode (default: net-
work 10). When using the software “Pro-
CEd”, various groups and a master can
be defined to control several networks
independently.
The remote control responds to all units
within radio range. If the master is out of
this range, it will repeatedly send its set-
tings to the slaves. Therefore, it is import-
ant that the master is within the range of
the remote control.
PROGRAMMS
1. Fixed colours
2. Normal colour change
3. Medium colour change
4. Slow colour change
5. „Blob“- randomly up lighted/dimmed
colours
6. „LSD“- randomly changing colours
7. „Fire“ -Fire simulation
8. Flashes
9. „Bursts“: Randomly selected,
non-synchronised flashes
10. User effect #1
(adjustable via Software ProCEd)
11. User effect #2
(adjustable via Software ProCEd)
12. User effect #3
(adjustable via Software ProCEd)
The running program can be stopped
by pressing the “Power key”. By pressing
the “Power key” again, the program will
continue.
When the “Power key” is pressed for more
than 3 seconds, the controller will be
turned off.
The start program can be stored by pres-
sing the “Power key” for more than 10
seconds, after the supply voltage is atta-
ched. In this case the controllers will be
turned off.


