background image

TAP100/200                                                       User Guide R.5.3                                                                    2019 


12 

|


P a g e


V

EHICLE 

A

UDIT 

S

CREEN


On entry to the audit screen, the Left Front wheel will be flashing, prompting the operator to start at this 

wheel position. Pressing the Enter button will open the tyre audit screen with the arrow pointing on the left 

groove of the tyre.  


The flashlight is now illuminated. Hold/press the pin into the marked groove of the tyre, 

the tool will then beep and take the depth reading. Its depth is measured and saved for 

this position.  The arrow will then automatically move on to the next groove  and 

respectively to the next tyre (Right Front, Right Rear, Left Rear and then Spare Wheel). 

Three readings should be taken for each tyre. 

Tread Depth can be measured and displayed in Millimetres or Inch Fractions 

(these can 

be changed in the setup menu). 


To take the tyre pressure, simply connect the hose to the tool and then the valve of the 

tyre. Complete the process by selecting Tyre Condition and Manufacturer in the menu. Once all data is entered 

click accept for saving the data and returning to the vehicle audit screen. Continue with the remaining tyres. 

Pressure can be measured and displayed in PSI, Bar or kPa 

(these can be changed in the setup menu). 


T

READ 

D

EPTH AND 

P

RESSURE 

R

EAD


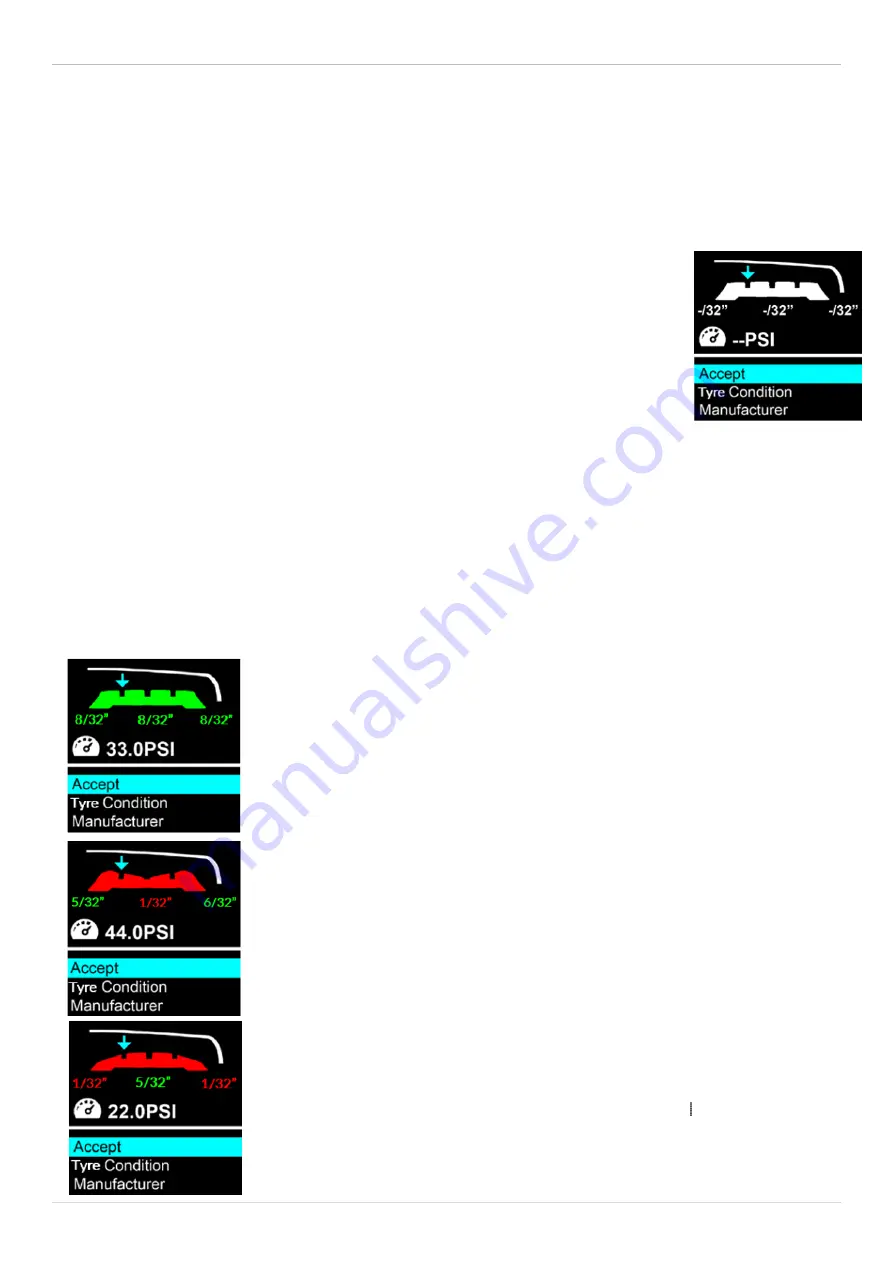
The reading is shown by a colour coding system. Green for okay (over 2.3mm tread available), amber for 

recommended tyre change in the near future (between 1.6-2.2mm tread available) and red for immediate tyre 

change (below 1.5mm). 

These values can all be changed/updated in the settings menu, tyre tread bands.


A flat surface display shows that the tyre is wearing evenly. The image shows even 

tyre wear with a tread depth still within a safe (green) range. 


A display where the tyre surface curves inward indicates that the tyre’s surface is 

wearing faster in the centre than on the sides. This is a common side effect of 

over-inflated tyres. 


A display where the tyre surface curves outward indicates that the tyre’s tread is 

wearing faster on the sides than in the centre. This is a common side effect of 

under-inflated tyres. 


Содержание TAP100

Страница 1: ...on R 5 3 English 2019 TAP100 TAP200 Tread Depth and Pressure Tool User Guide Enter Display Rubber housing Up Down navigation Wireless wall charger Pressure hose connection with protective cap Hose Pin...

Страница 2: ...n a high resolution colour display making them easily presentable for the customer These tools are acceptable for use during statutory test conducted in accordance with Motor Vehicle Tests Regulations...

Страница 3: ...ON 8 TOOL POSITIONING 9 TOOL CONNECTIONS 9 CHARGING TOOL 10 POWER ON OFF SEQUENCE 11 HOME MENU 11 START MEASUREMENTS 11 VEHICLE AUDIT SCREEN 12 TREAD DEPTH AND PRESSURE READ 12 SEND DATA 13 CLEAR VEHI...

Страница 4: ...l are based on the latest information available at the time of publication The right is reserved to make changes at any time without obligation to notify any person or organization of such revisions o...

Страница 5: ...to excessive moisture Do not use the tool near sources of heat or polluting emissions stoves ovens etc Do not drop the tool Do not allow the tool to come into contact with water or other liquids Do no...

Страница 6: ...umber A valid serial number and supplier is required to process your registration which can take up to 24hrs once submitted See page 16 for instructions Update your Tool Once your tool is registered v...

Страница 7: ...and Features The tool is battery operated and measures tread depth with its steel pin and tyre pressure with the included hose Note The major difference between the TAP100 and the TAP200 is the lengt...

Страница 8: ...ected The menu system is navigated by the directional keys Up Arrow Key Navigates up within the current menu selection Down Arrow Key Navigates down within the current menu selection ENTER Key Navigat...

Страница 9: ...e Measurement Tread Depth To check the tyre s tread depth hold the pin on the backside of the tool in each groove press to the bottom and wait for the tool s signal Pressure In order to measure tyre p...

Страница 10: ...n approved power supplies may damage your tool and will void the tool warranty The tool comes with the rechargeable battery already installed Battery replacement must be done at the factory Battery In...

Страница 11: ...off Auto Off can be configured under Setup from the Main menu IMPORTANT NOTE The tool does not store data after being powered off Be sure to send any existing measurements to TPMS Desktop before the t...

Страница 12: ...cting Tyre Condition and Manufacturer in the menu Once all data is entered click accept for saving the data and returning to the vehicle audit screen Continue with the remaining tyres Pressure can be...

Страница 13: ...on one side in comparison to the opposite side This is a common side effect of a tyre or tyres being out of alignment SEND DATA When paired to your PC or tablet the tool will send existing audit data...

Страница 14: ...s Calibration The user can carry out calibration of the tread depth It is recommended this is carried out every month Bluetooth Pair The tool searches Bluetooth capable devices in its reach and displa...

Страница 15: ...he tool itself Tool Info Displays the following information Software version currently installed Build date of the installed Software Serial number of the tool Total number of tread measurements taken...

Страница 16: ...our tool navigate to the Bartec TPMS website at www tools bartecautoid com The first page you will see is the TPMS Tool Support Center page showing the latest software release versions of the respecti...

Страница 17: ...in you are shown your personal settings which can be changed or not as required Selecting Tools gives you the option to register a new tool The serial number is in the Tool Info menu Note that this Se...

Страница 18: ...pmsdesktop to download your free copy now TPMS Desktop features Update Automatically retrieve update files from your current registered account Reports Complete job reports recorded and stored for whe...

Страница 19: ...the tool and connect it to the PC with TPMS Desktop installed Click the Update button on the TPMS Desktop and it will show the picture below This will be shown under Connected Tools if you connect a t...

Страница 20: ...reports to create customer receipts and limit liability Vehicle Lookup Browse our extensive vehicle and sensor database Search by make model and year to quickly find the data you need OBD location TPM...

Страница 21: ...e copy now SETTINGS In order to use your tool with Bluetooth you can either use the Send Data option in the Main Menu or go into Setup and then choose Bluetooth Pair In Windows 7 Click the Windows Sta...

Страница 22: ...will prompt when it has paired successfully TPMS Desktop will also prompt upon a successful Bluetooth connection The tool is now set up to send audit data to TPMS Desktop on your device Display NEW G...

Страница 23: ...ution sunlight readable 1 6 colour graphics display 240 240 pixels Tool Rugged ABS Polycarbonate enclosure resistant to automotive fluids complete with rubber cover Waterproof Rated IP54 for water and...

Страница 24: ...00 TPMS Tool TECH300 Tread Depth and Pressure Tool TAP100 TAP200 ACCESSORIES TPMS Wireless charging PAD Audit Report Mini Printer CUB Adapter programming Fixture Wall mountable wireless charging stati...

Отзывы: