background image

w w w . b a r s k a . c o m

w w w . b a r s k a . c o m

4

5

Biometric Safe

Biometric Safe

B

F

C

D

H

E

A

Unl

ock

L

o

ck

G

H

I

H

N

H

O

P

H

Q

J

M

L

K

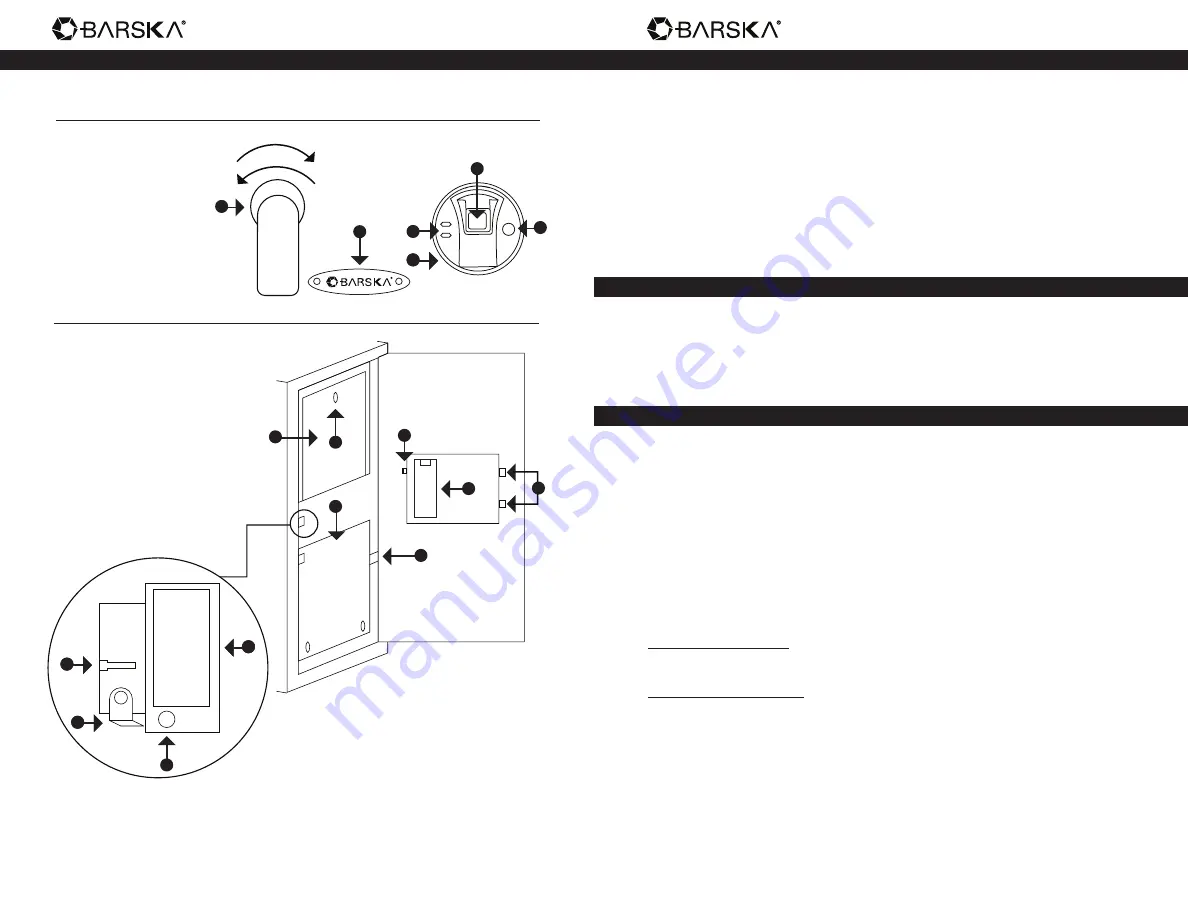
Exterior  


A. Handle

B. Logo Plate and

    Emergency Key Access

C. Fingerprint Scanner

D. Indicator Lights

E. External Battery Access

F. Wake-Up Button

Interior     


G. Initialization Button

H. Battery Compartment

I.  Bolts

J. Interior Compartment

K. Interior Lock

L. Fold-Down Shelf

M. Removable Shelf

N. Interior Light Button

O. Fold-Down Shelf Holder

P. Interior Light

Q. Interior Light Battery

     Compartment

Parts of the Safe

Getting Started


1. Remove Emergency Keys from accessory package


2. To expose the Emergency Key Access (B), remove Logo Plate (B) screws

    with provided tool


3. Check lock number and find correct emergency key, insert into key access, 

    push and turn counter-clockwise


4. Turn Handle (A) clockwise to open the safe 


5. Continue with INSTALL BATTERIES

Install Batteries


1. Remove Battery Compartment (H) cover


2. Insert 4 AA batteries and restore Battery Compartment (H) cover


3. Continue with FINGERPRINT REGISTRATION

Fingerprint Registration


IMPORTANT: The safe is in Factory Default mode, ANY fingerprint(s) can open 

the safe

1. With the safe door open, press and release Initialization Button (G) 


2. Immediately place a finger on the Fingerprint Scanner (C) 

    - Hold finger still

    - 1 beep will be heard recognizing the fingerprint; followed by 2

      consecutive beeps

    - Remove finger

    - Registration is complete


Successful Registration

Registration is successful when a total of 3 beeps are heard


Unsuccessful Registration

2 short beeps will be heard; repeat registration process again


3. To register another fingerprint - repeat steps 1 – 2

4. Continue with TEST (NON) REGISTERED FINGERPRINTS

Содержание Biometric Safe

Страница 1: ...kaging to prevent damage in transit and returned freight pre paid to BARSKA OPTICS Repair Department 855 Towne Center Drive Pomona CA 91767 Please include all of the following when returning BARSKA products for service and or replacement 1 Please write your complete details Name Address Telephone E mail address RMA etc 2 Purchase receipt or Proof of Purchase Original Copy 3 A brief explanation of ...

Страница 2: ...safe test registered fingerprints every 6 months If user resets the safe to Factory Default mode ANY fingerprint can open the safe Test and make sure the safe works properly before mounting Once tested mount safe before use Keep out of reach of children Failure to follow these warnings could result in serious injury or death NOTE BARSKA is not responsible for any damage or lost contents in the saf...

Страница 3: ...insert into key access push and turn counter clockwise 4 Turn Handle A clockwise to open the safe 5 Continue with INSTALL BATTERIES Install Batteries 1 Remove Battery Compartment H cover 2 Insert 4 AA batteries and restore Battery Compartment H cover 3 Continue with FINGERPRINT REGISTRATION Fingerprint Registration IMPORTANT The safe is in Factory Default mode ANY fingerprint s can open the safe 1...

Страница 4: ... open the safe Note The indicator will turn Green and a beep will be heard if the Red indicator light flash and beep three times try again Close Open Interior Compartment Use the key that corresponds to Interior Compartment J Open turn Interior Lock K counter clockwise Close turn Interior Lock K clockwise Beep Sound Options Beep OFF Press and HOLD the Initialization Button G 20 30 seconds until th...

Страница 5: ... electric telephone and cable TV wires heating ducts or plumbing It is important to avoid all such obstructions to prevent damage to your home during installation NOTE Barska is not responsible for any damage incurred during installation 2 Locate two adjacent studs in the wall Various stud finders are available at your local hardware and home improvement stores 3 Measure and cut out the wall to fi...

Отзывы: