background image

7

1

2

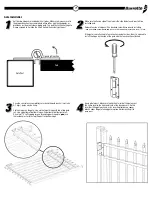
Self closing hinges are included with all gates. Make sure hinges are set in 

the proper direction to accommodate either left or right handed gates or 

provide an inside or outside swinging gate. The post that will have the gate 

hinges screwed to it will be the (thick walled) "heavy-duty gate post".

Make sure the fl ange side of the hinge is the side the gate and post will be 

installed onto. 

Release tension of hinges with a standard screwdriver prior to installing. 

Take a fl athead screwdriver and push in the tension adjuster and turn 1/2 turn.

If the gate is not attached to fence sections on both sides, then it is advised to 

install the hinge on the side of the gate with the fence section attached.

Gate Installation

3

4

Once the concrete has completely set around the gate post(s) (may take 

5-7 days), gates may be hung.

Set the hinges on the gate. Line up the top of hinge with top of top gate 

rail. Line up bottom of bottom hinge with bottom of bottom gate rail. 

Drive two 1

1

11 4

⁄⁄ " self-tapping screws through upper hinge into gate

gate (use 

the inside holes for this step). Repeat for bottom hinge.

Hang gate to post. Make sure the horizontal rails of the gate are at 

the same level as the horizontal rails of the fence panels. Do this 

by either lifting gate by hand, or by inserting temporary spacer 

blocks under the gate to keep gate in place while mounting it to 

gate post.

Gate

Gate Post

Opening Direction

Opening Direction

Содержание Haven series

Страница 1: ...ce Installation Instructions PLEASE READ OWNER S MANUAL COMPLETELY BEFORE ASSEMBLING YOUR FENCE ALL STATED SIZES ARE NOMINAL DIMENSIONS ALUMFENCEA_BOM V1 2 12 For Home Haven Select Premier Series Par Francis Par Espanol www barretteoutdoorliving com ...

Страница 2: ...fy your posts The rails from the fence panels will be inserted into the pre punched holes of the posts Material Checklist String Stakes Tape Measure Post Hole Digger Shovel Level Hacksaw ATTENTION Before you assemble the fence PLEASE TAKE A COMPLETE INVENTORY OF ALL PARTS USING THE KIT CONTENTS DO NOT ATTEMPT TO ASSEMBLE THE FENCE IF PARTS ARE MISSING OR DAMAGED Please do not return the product to...

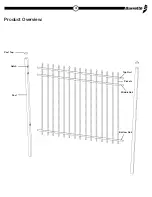
Страница 3: ...3 Product Overview Post Notch Post Top Top Rail Middle Rail Bottom Rail Pickets ...

Страница 4: ...ctual Panel size is 71 Center to Center post distance is 113 13 13 16 16 wider than panel 7213 13 13 16 16 For 8 sections using 21 1 1 2 2 posts posts Actual Panel size is 9411 11 11 16 16 Center to Center post distance is 15 5 5 16 16 wider than panel 96 Aluminum Fence Rail Notcher can be purchased separately 1 1 2 2 Use a rubber mallet to gently drive the post tops onto the posts Be careful not ...

Страница 5: ...tallation should proceed post panel post panel NOTE It is a good idea to have the next post hole in the run already dug when attaching panel to the previous post and have the 6 of gravel inside As the gate post or corner is setting up install the first fence panel Insert the horizontal rails from the panel into the punched holes from the previously installed post Place the rails as far into the po...

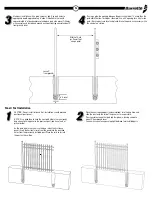
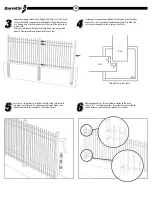
Страница 6: ... of the fence panels The rails of one panel need to be notched 1 1 1 2 2 to allow the rails to nest adequately within a corner installation 3 3 4 4 Rail Post Top view of corner post Rail 1 1 1 1 1 1 2 2 1 1 1 1 1 1 2 2 5 5 6 6 Once four or so panels are installed check to make sure all posts and panels are still level If a correction needs to be made use a rubber mallet while the concrete is still...

Страница 7: ...it is advised to install the hinge on the side of the gate with the fence section attached Gate Installation 3 3 4 4 Once the concrete has completely set around the gate post s may take 5 7 days gates may be hung Set the hinges on the gate Line up the top of hinge with top of top gate rail Line up bottom of bottom hinge with bottom of bottom gate rail Drive two 11 1 1 4 4 self tapping screws throu...

Страница 8: ...ill be assigned a tracking number and an authorized Barrette Outdoor Living representative will contact you to arrange a convenient time to schedule an onsite inspection if need be If after onsite inspection product is deemed to be manufacturer defect we will make arrangements to rectify the issue You must have proof of your purchase in order for the problem to be corrected Transferee Coverage War...

Отзывы: