

Barracuda Spyware Firewall - Quick Start Guide
Update the Firmware
1. Go
to
Advanced
Æ
Firmware Update
.
2. Press
Download Firmware
. Click
OK
to acknowledge the download duration
message. To avoid damaging the Barracuda, do not power OFF during an
update or download. To view download progress, refresh your browser. You
will be notified when the download is complete.
3. On
the
Advanced
Æ
Firmware Update
page, click the
Apply Now
button to
apply the firmware. This will take a few minutes to complete.
4. Click
OK
when prompted to reboot.
5. After applying the firmware, Barracuda Networks recommends logging in to
the Web interface again and reading the Release Notes to learn about
enhancements and new features. It’s also a good practice to verify settings,
as new features may have been included with the firmware update.
Change the Administrator Password
To avoid unauthorized use, we recommend you change the default administrator
password to a more secure password. You can only change the administrator
password for the Web interface. You cannot change the password for the
Administrative Console, but this is only accessible via the keyboard which you
can disconnect at any time.
1. Go
to
Basic
Æ
Administration
and enter your old and new passwords.
2. Press
Save Password
.
Product Activation
Verify that the Energize Updates feature is activated on your Barracuda by going
to the
Basic
Æ
Status
page. Under Subscription Status, make sure the Energize
Updates subscription is Current. If the Energize Updates is Not Activated, click
the corresponding activation link to go to the Barracuda Networks Product
Activation page and complete activation of your subscriptions.
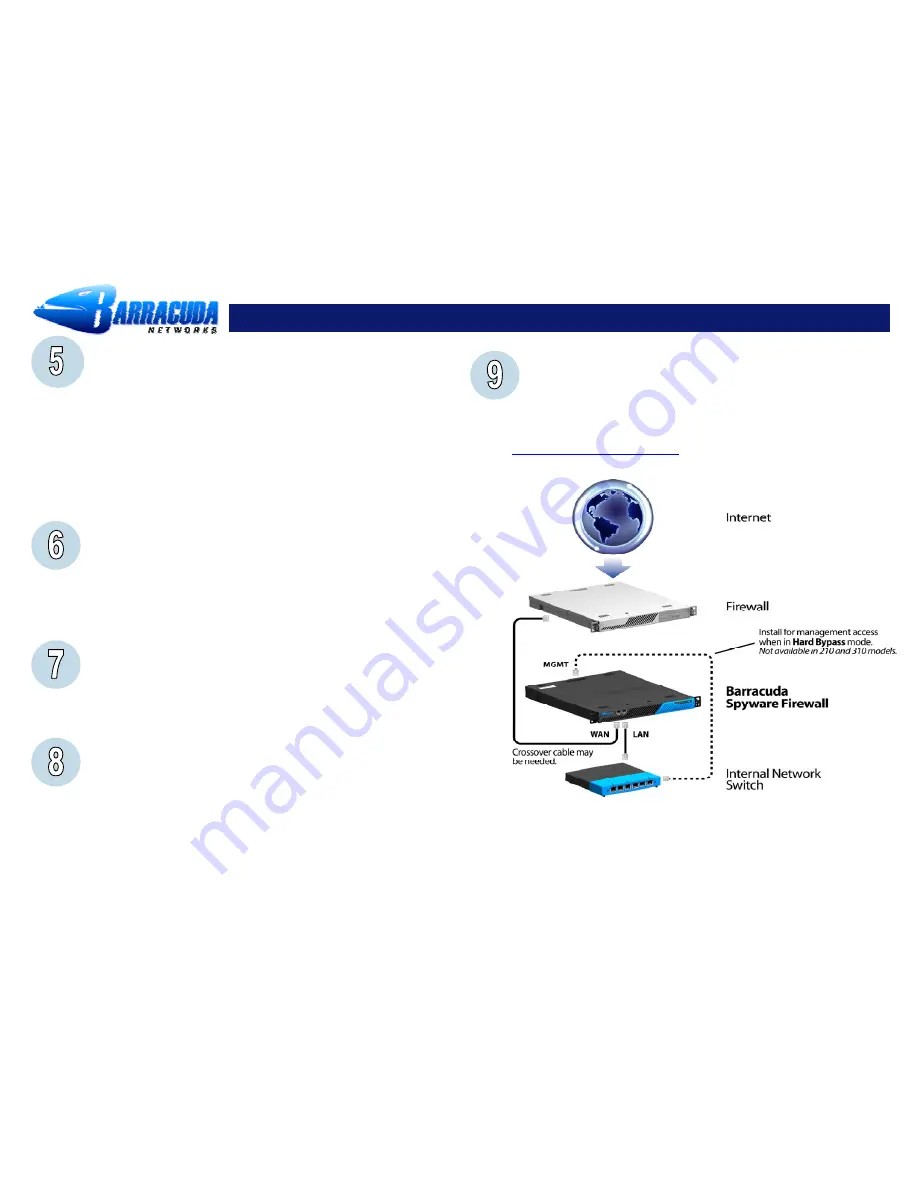
Inline Connection of Ethernet
The Barracuda is now ready for testing. You should disconnect the ethernet
cable that goes between your standard firewall and your internal network switch,
and connect this to the WAN port on the front panel of the Barracuda Spyware
Firewall. You should then connect the cable from the LAN port of the Barracuda
Spyware Firewall to the internal router, hub, or switch that your firewall used to
connect to (see diagram). Once this is complete return to the
Pass Through
Management
tab and set the unit to
Active
.
Test Connectivity
You should verify network connectivity by utilizing a machine in your existing
network to browse the Web. Once successful connectivity has been verified,
you may adjust the settings within the Barracuda Spyware Firewall to better suit
your needs. Your Barracuda Spyware Firewall is now ready to use.
Be sure to check out the Barracuda User’s Forum at:
http://forum.barracudanetworks.com
for Frequently Asked Questions (FAQ’s)
and other helpful tips for setting up and using your Barracuda Spyware Firewall.
**WARNING: On model 410 and higher, when Hard Bypass is enabled, you
will only be able to manage the device from the management ethernet port
on the back of the Barracuda Spyware Firewall.
Contact and Copyright Information
Barracuda Networks, Inc. 10040 Bubb Road, Cupertino, CA 95014 USA
•
phone: 408.342.5400
•
fax: 408.342.1061
•
www.barracudanetworks.com
Copyright 2005
©
Barracuda Networks, Inc. All rights reserved. Use of this product and this manual is subject to license. Information in this document is subject
to change without notice. Barracuda Spam Firewall is a trademark of Barracuda Networks, Inc. All other brand and product names mentioned in this document are
registered trademarks or trademarks of their respective holders.
Version 1.1h


