3. Input & Communication
3. INPUT & COMMUNICATION
3.1
Introduction
General
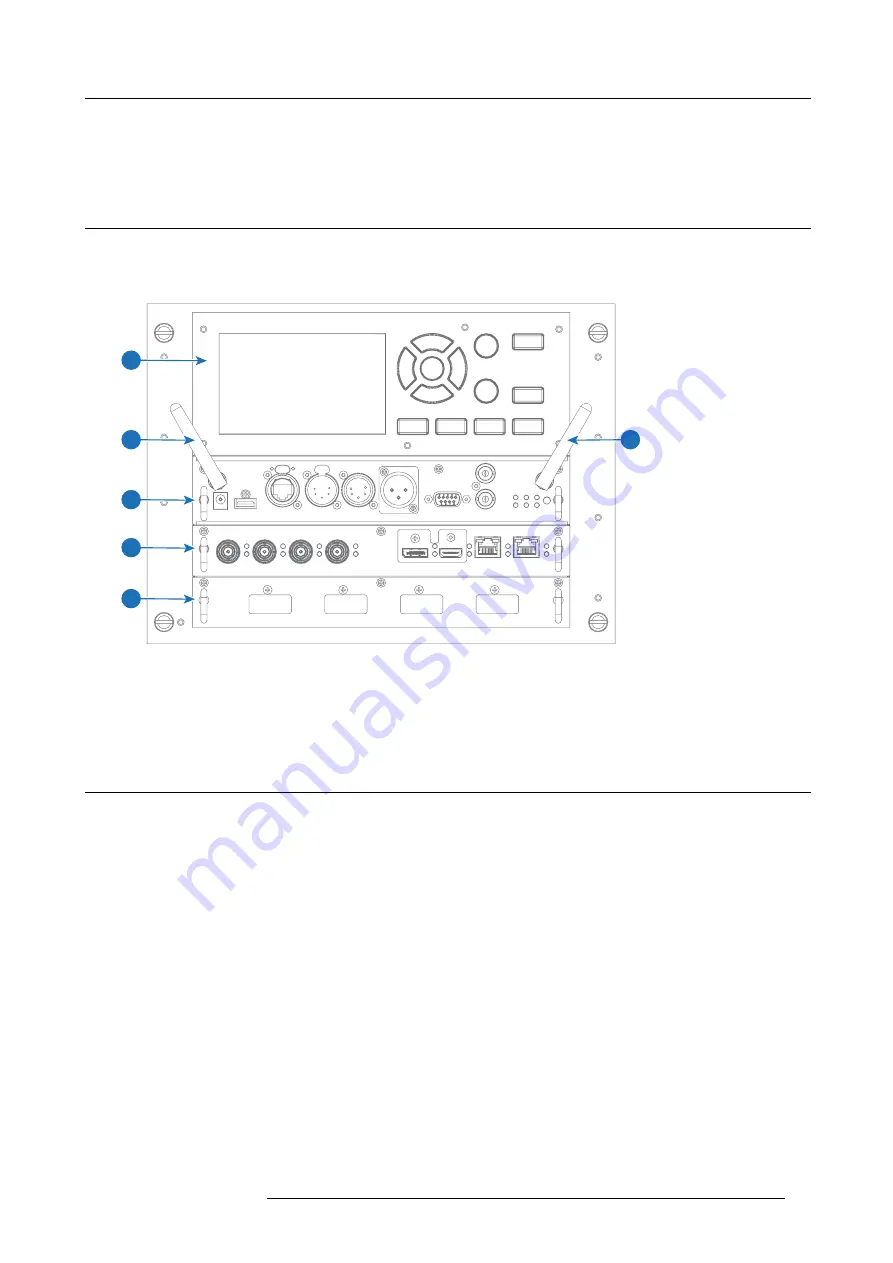
The Input & Communication side of the projector consists of a local keypad (1), a communication panel (4) and a Quad Combo input
board (5). The free input slot can be used for optional modules (e.g. the Quad DP 1.2 input board).
1
2
3
4
5
6
Image 3-1
1
Local Keypad and LCD panel
2
Optional antenna for WiFi connection
3
Optional antenna for GSM
4
Communication Panel
5
Quad Combo Input board
6
Free input slot (here
fi
lled with the Quad DP 1.2 Input board)
3.2
Input source connections – Quad combo input Mark II
About the Quad combo input Mark II
Due to demand from the market, Barco has created a second generation of the Input board to support 12G input and throughput on
the SDI connectors. From the release of this board onward, the Quad combo input will be supported and will be the standard input
board in every Input & Communication Unit, effectively replacing the Mark I variant.
The updates on this new board include the following compared to its predecessor:
•
SDI Input A
now also supports
12G
input signals.
•
SDI Input C
now also functions as a
loop-through output
for any signal placed on
Input A
.
•
SDI Input D
now also functions as a
loop-through output
for any signal placed on
Input B
.
•
HDBaseT Input 1
now also supports
network connectivity
.
SDI Input & output – How does it work?
When connecting an SDI source to the projector and the signal is HD or 3G, you can choose any of the four input connectors.
When connecting multiple projectors with the same signal, you can connect the signal as follows:
•
Connect the source signal to Input A or B of the
fi
rst projector.
•
If the source signal is connected to
Input A
, connect
Input/Output C
to the Input of the following projector.
•
If the source signal is connected to
Input B
, connect
Input/Output D
to the Input of the following projector.
•
Continue in the same fashion until all projectors are connected.
When connecting a 12G SDI source to the projector, you can only connect that source to input A.
R5906102 WODAN 10/04/2018
13
Содержание Wodan
Страница 1: ...Wodan User manual R5906102 06 10 04 2018 ...
Страница 4: ......
Страница 38: ...4 Getting Started 34 R5906102 WODAN 10 04 2018 ...
Страница 42: ...5 Graphic User Interface GUI 38 R5906102 WODAN 10 04 2018 ...
Страница 90: ...8 Maintenance 86 R5906102 WODAN 10 04 2018 ...
Страница 92: ...9 Specifications Image 9 7 CCC mark Image 9 8 FCC label Image 9 9 RCM mark 88 R5906102 WODAN 10 04 2018 ...


