


P= LMN O;=41B=/9PQ M)&+ S&K%
1. RLD (3.0-4.5:1) LENS INFO
1.1 Kit Contents
Parts of the Kit
•
RLD (3.0-4.5:1) Lens.
•
Installation Manual.
•
Toraysee
TM
Cloth.
1.2 Lens installation
The default lens is standard mounted on the projector when it arrives on your location.
How to replace with another lens?
Follow the next procedure:
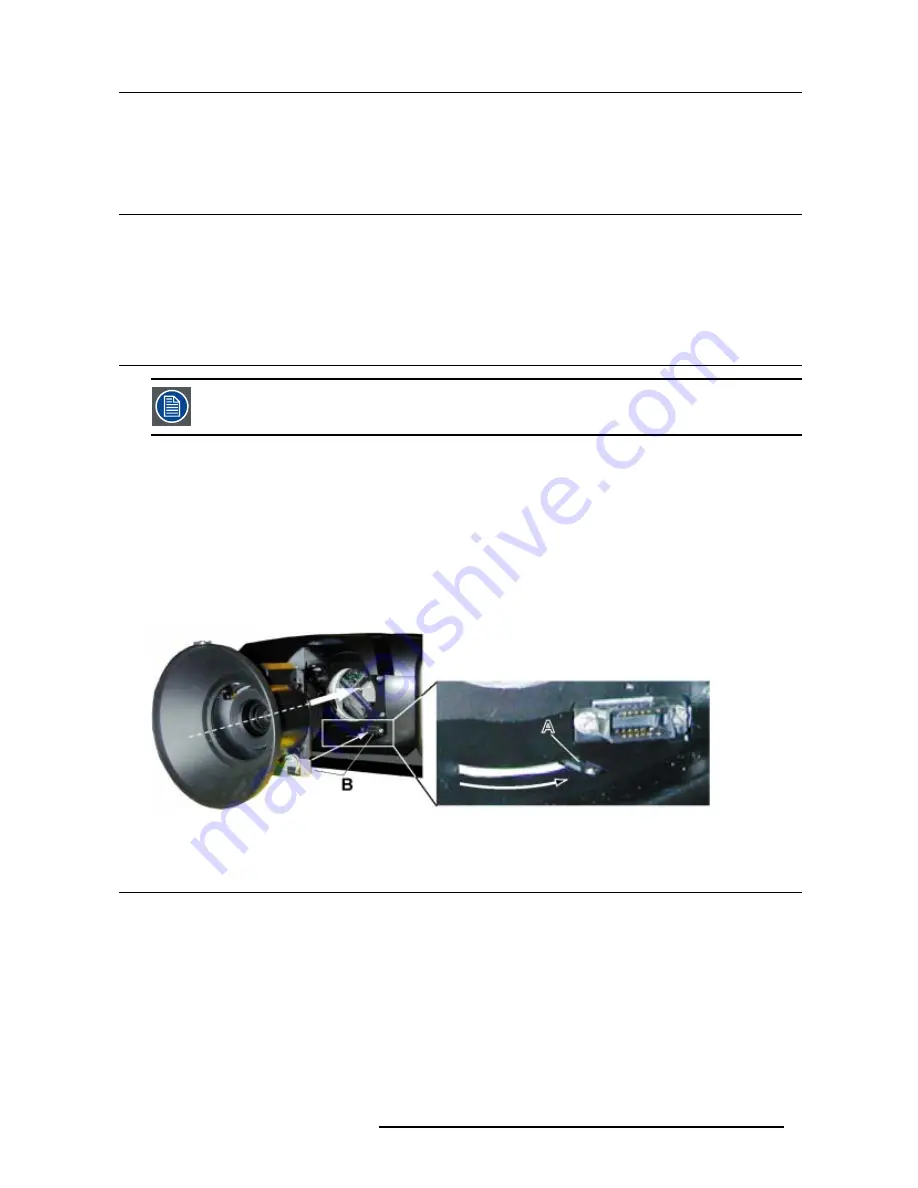
1. Move the handle (A) of the lens anchor system to the left and take out the lens.
2. Take the new lens assembly out of its packing material and remove the lens caps on both sides.
3. Push the lens, motors at the top, in the lens block gap horizontally, lining up the motor connector on the lens with the connector
on the lens block (B). (image 1-1)
Caution:
On a table mounted projector, hold the projector when pushing the lens into the lens block to avoid sliding off from
the table.
4. Move the handle (A) of the lens anchor system to the right (front view, table mount) to lock the lens.
Image 1-1
1.3 Direct Lens Adjustment (RCU)
Lens adjustment button on the Remote Control
On the Remote Control three buttons with double action are provided, allowing direct alignment for lens ZOOM, FOCUS and VER-
TICAL SHIFT. For Horizontal Shift, some projectors use the
VOL
button.
1. Press
LENS ZOOM
button [-] or [+] (A) for correct image size on the screen.
2. Press
LENS FOCUS
button [-] or [+] (C) for an overall focus of the image.
3. Press
LENS SHIFT
button
!
or
"
(B) for correct vertical position of the image on the screen. (image 1-2)
4. Press
VOL
button [-] or [+] (D) for correct horizontal position of the image on the screen.
[-] button = left shift
[+] button = right shift
L/>?<2/< LMN O;=41B=/9PQ M(,R 5SJ 33TP3T344B
;
Содержание RLD (3.0-4.5:1)
Страница 1: ...RLD 3 0 4 5 1 Lens Kit Installation Manual R9832645 R5976856 00 22 12 2004 ...
Страница 2: ... 0 12 34 566 78 9 3 2 4 A9 3 22 3B 1C D 9 EF C GD D 6 8 H F9 HHH F C 7 D D ID6C ...
Страница 4: ...J F K 3 L 2 LMN O 41B 9PQ M R 5SJ 33TP3T344B ...
Страница 8: ...3 L 2 LMN O 41B 9PQ M R 5SJ 33TP3T344B ...


