R5906897 /02
Prometheus III
49
x 3
Image 5-13
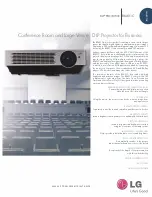
5.
Slide both top plates as indicated into the grooves. Slide until you reach the position plate and the hole
matches the hole in the brackets. Use one screw (M3) on each side of the top plates and tighten them fully
until the brackets are pushed strongly against the ribs in the cover and middle bracket.
Tip:
Put in place the screws, without tightening them, before slide the top plates. It is more easy to
positioning the screws when the top plates are not in place.
Image 5-14
6.
Hook the middle bracket support into the middle bracket.
Turn in the fixation screw (M4).
Содержание Prometheus III
Страница 1: ...ENABLING BRIGHT OUTCOMES Installation manual Prometheus III...
Страница 8: ...R5906897 02 Prometheus III 8...
Страница 32: ...R5906897 02 Prometheus III 32 Installation process...
Страница 62: ...R5906897 02 Prometheus III 62 Physical installation stand alone cooler...
Страница 80: ...R5906897 02 Prometheus III 80 Lenses lens holder...
Страница 98: ...R5906897 02 Prometheus III 98 Input communication...
Страница 100: ...R5906897 02 Prometheus III 100 Installing a HDD into the ICMP ICMP...
Страница 132: ...R5906897 02 Prometheus III 132 Communicator Touch Panel...
Страница 148: ...R5906897 02 Prometheus III 148 Removal and installation of the projector covers...
Страница 152: ...R5906897 02 Prometheus III 152 Preventative maintenance actions...
Страница 170: ...R5906897 02 Prometheus III 170 Convergence...
Страница 176: ...R5906897 02 Prometheus III 176 Color calibration...
Страница 199: ...R5906897 02 Prometheus III 199 Environmental Information...