Acer P1120 Series, User Manual
The Acer P1120 Series is a high-performance projector that delivers crystal-clear visuals with vibrant colors. To get started quickly, make sure to grab the free Quick Start Manual from manualshive.com. This comprehensive manual is available for download, providing step-by-step instructions to ensure effortless setup and operation.
Share
Download


Reviews:
No comments
Related manuals for P1120 Series

ER Series
Brand: Neher Pages: 12

MP622 - XGA DLP Projector
Brand: BenQ Pages: 2

GOBO
Brand: ADJ Pages: 4

LQMWP
Brand: LinQTab Pages: 23

VDL1501RO
Brand: HQ Power Pages: 14

Atlas Series
Brand: EluneVision Pages: 4

CP-X2010 series
Brand: Hitachi Pages: 113

CP-X807 Series
Brand: Hitachi Pages: 1

LG-3355
Brand: Chauvet Pages: 17

DLA-X550R
Brand: JVC Pages: 80

DLA-X35
Brand: JVC Pages: 4

DLA-X55R
Brand: JVC Pages: 2

SPP2307WC
Brand: Philips Pages: 2

SPP2306WC
Brand: Philips Pages: 2

SPP2305WC
Brand: Philips Pages: 2

SPP3038A
Brand: Philips Pages: 10

SPP3038B
Brand: Philips Pages: 10
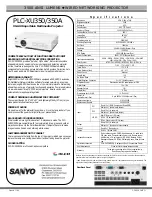
PLC-XU350A
Brand: Sanyo Pages: 1


