background image

Overview

14

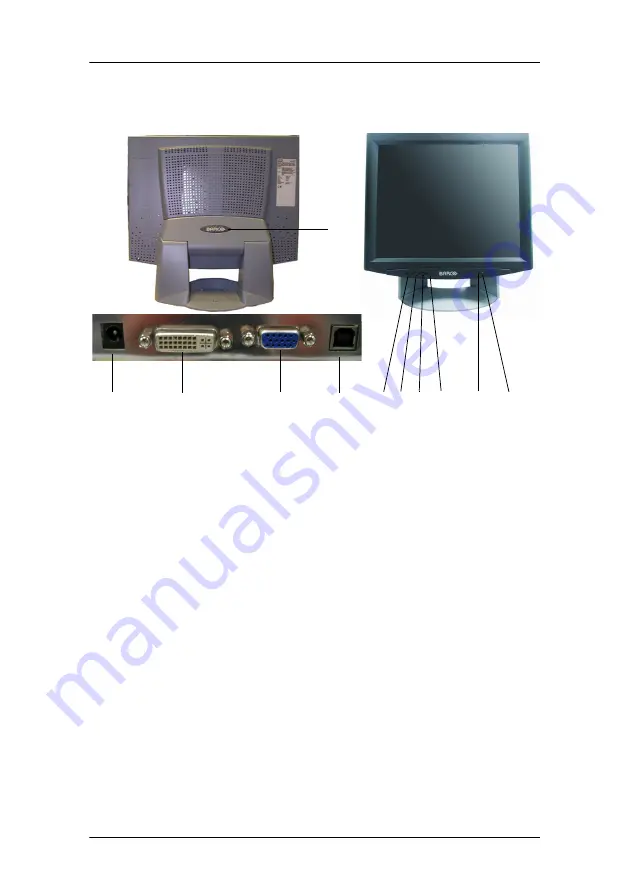
Controls and connectors

1.

12V DC power input

2.

DVI input (DVI-D supported only)

3.

Analog video input

4.

USB port for touch panel connection to PC (MFCD 1219 TS only)

5.

< (left) Key

6.

> (right) Key

7.

Menu key

8.

Auto Key

9.

Power LED

The LED is off when the display is off.

The LED is green when the display is on.

The LED is orange when the display is in power-saving mode 

(stand-by)

10.

Power key

11.

Push-button to release the panel from the foot

1

2

3

4

11

5 6 7

8

9

10

Содержание MFCD 1219 (TS

Страница 1: ...User Manual MFCD 1219 TS ...

Страница 2: ...2 This page intentionally left blank ...

Страница 3: ...Nor this document nor any part of it may be reproduced or copied in any form or by any means graphical electronic or mechanical including photocopying taping or information storage and retrieval systems without written permission of Barco 2010 Barco N V All rights reserved ...

Страница 4: ...view 12 Introduction 12 Package contents 13 Controls and connectors 14 Installation 15 Precautions 15 Wall mounting 15 Connecting the signals 17 Starting up 18 Install the software 20 On screen display OSD 21 How to use the OSD 21 Description of the menu items 22 Maintenance 29 Appendix A Possible resolutions 30 Appendix B Technical specifications 31 ...

Страница 5: ...demarks are property of their respective owners FCC Compliance Information display This device complies with Part 15 of the FCC Rules Operation is subject to the following two conditions 1 this device may not cause harmful interference and 2 this device must accept any interference received including interference that may cause undesired operation NOTE This equipment has been tested and found to c...

Страница 6: ...receiving antenna Increase the separation between the equipment and receiver Connect the equipment into an outlet on a circuit different from that to which the receiver is connected Consult the dealer or an experienced radio TV technician for help Canadian notice This Class B digital apparatus complies with Canadian ICES 003 Cet appareil numérique de la Classe B est conforme à la norme NMB 003 du ...

Страница 7: ... take back systems Those systems will reuse or recycle most of the materials of your end of life equipment in a sound way The crossed out wheeled bin symbol invites you to use those systems If you need more information on the collection reuse and recycling systems please contact your local or regional waste administrator You can also contact us for more information on the environmental performance...

Страница 8: ...rds Power cord with CEE 7 plug The colors of the mains lead are colored in accordance with the following code Green and yellow Earth safety earth Blue Neutral Brown Line Power cord with ANSI 73 11 plug The wires of the power cord are colored in accordance with the following code Green yellow ground White neutral Black line live Do not overload wall outlets and extension cords as this may result in...

Страница 9: ... on the display When adjusting the angle of the display move it slowly so as to prevent the display from moving or slipping off from its stand When display is attached to an arm do not use the display as a handle or grip in order to move the display Please refer to the instruction manual of the arm for instructions on how to move the arm with the display Provide full attention to safety during ins...

Страница 10: ...for a specified period of time By default DPMS is enabled on your display but it also needs to be activated on your workstation To do this go to Power Options Properties in the Control Panel Barco recommends setting DPMS activation after 20 minutes of non usage 2 Use a screen saver to avoid image retention Prolonged operation of an LCD with the same content on the same screen area may result in a ...

Страница 11: ...technology and missing pixels consult the dedicated white paper available at www barcomedical com 4 Enhance user comfort Every Barco multi head display system is color matched with the highest specification in the market Barco recommends keeping color matched displays together Furthermore it is important to use all displays of a multi head configuration at the same rate to preserve color matching ...

Страница 12: ...s of the extended on screen menu system OSD Multi scan capabilities The display accepts the most common display standards However it is limited to the following specifications Analog video The horizontal frequency must be between 31 and 80 kHz the vertical frequency between 56 and 85 Hz Digital video The horizontal frequency must be between 31 47 and 64 kHz the vertical frequency between 60 and 70...

Страница 13: ...e supplied CD ROM Package contents The package should include the following items please check If some of the items are missing please contact the reseller you have purchased the unit from The display with foot 12V DC adapter European power cord American power cord UK power cord Video cables VGA cable and DVI D cable Mounting plate with 4 screws This user manual Calibration software CD ROM USB cab...

Страница 14: ... panel connection to PC MFCD 1219 TS only 5 left Key 6 right Key 7 Menu key 8 Auto Key 9 Power LED The LED is off when the display is off The LED is green when the display is on The LED is orange when the display is in power saving mode stand by 10 Power key 11 Push button to release the panel from the foot 1 2 3 4 11 5 6 7 8 9 10 ...

Страница 15: ... a stylus tip R0 8 or over maximum hardness 3H or with a finger without applying excessive load Sharp edged or hard articles are prohibited The gathering of dew in the panel may occur with abrupt temperature or humidity changes A stable environment condition is recommended Keep the surface clean No adhesives should be applied Avoid high voltage and static charge Wall mounting You can mount the pan...

Страница 16: ...l 1 Screw the mounting plate to the wall with the 4 supplied screws A 2 Slide back the locks at both sides of the mounting plate B In that way you can secure the panel to the mounting plate after placing the panel Step 3 Place the panel on the mounting plate 1 Place the panel on the mounting plate C If you want to secure the panel to the mounting plate place the panel in the frontmost notches A B ...

Страница 17: ...at the four shafts are securely placed in the notches of the mounting plate 2 To secure the panel slide forward the locks on both sides of the mounting plate Lock the panel with one screw at both sides D Connecting the signals C D 1 2 3 ...

Страница 18: ...puter graphics board with digital video output To connect the power 1 Connect one end of the proper power cable to the AC input of the 12V DC adapter 2 Connect the 12V supply of the 12V DC adapter to the DC input 1 of the monitor 3 Connect the other end of the power cord to a grounded power outlet Starting up Proceed as follows 1 Switch on the computer 2 Switch on the display by pushing the Power ...

Страница 19: ...re are 2 possibilities a The video signal has been adjusted and stored in the memory In this case the display switches to this memory location the so called mode and the image will need no further adjustments b The video signal has not been adjusted and stored yet In this case the display will auto size the picture and store the settings in one of the user modes Note For analog video signals we ad...

Страница 20: ... the CD ROM in the CD ROM drive The CD ROM starts automatically Please follow the instructions on the screen The CD ROM contains user instructions about the usage of the MediCal QAWeb Agent Touch panel software Please refer to the TouchKit installation user manual on CD ROM ...

Страница 21: ...may be possible that the OSD menu does not appear If this is the case the front Controls are locked To unlock them please follow the procedure described in 3 2 below 2 There are 6 OSD menus divided by categories Press the left key 1 or right key 2 to scroll to the desired menu item 3 Press the Menu key 3 to activate the selected function or to enter the selected submenu 4 If you have activated a f...

Страница 22: ...ing the Menu key 3 when the Exit symbol is selected 6 The OSD disappears automatically after an inactivity period of 60 seconds default setting The current settings will be saved Description of the menu items Input Selection menu Note The analog video input has priority when both VGA and DVI inputs are used Function Description VGA Selects the VGA analog input signal DVI Selects the DVI digital in...

Страница 23: ...n Brightness To adjust the overall image and background brightness level This function controls the back light drive level Contrast To adjust the image brightness in relation to the background the background is unchanged This function controls the digital gain adjustment ...

Страница 24: ...the LCD panel s native uncorrected color temperature User This is a submenu to manually adjust the image color temperature When you select this item a menu appears where you can manually adjust Red Green and Blue to obtain the desired color temperature 9300 K Set the image color temperature to 9300 K ...

Страница 25: ...k and Phase functions Auto Color performs the Auto Offset and Gain functions Clock Manually adjust the internal clock frequency Increasing this value makes the image wider Decreasing this value makes the image smaller Phase Manually adjusts the internal clock phase When not adjusted correctly vertical bands with alter nate intensity appear in the image H Position Manually adjust the image horizont...

Страница 26: ...on on the LCD panel Function Description OSD Settings submenu Allows to switch the display power management system on off See note below Factory Reset submenu Allows to to reset all display parameters to the factory default settings Language sub menu Allows to change the OSD language DPMS submenu Allows to switch the display power management system on off See note below LED submenu Allows to switc...

Страница 27: ...ars 3 At last release the left right and Power key Function Description OSD Timeout Determine how long in seconds the OSD menu waits before closing automatically when no action is performed H OSD Position Adjust the horizontal position of the OSD window V OSD Position Adjust the vertical position of the OSD window OSD Direction Switch the direction of the OSD from landscape portrait Lock Controls ...

Страница 28: ...isplay serial number FW version Displays the current internal firmware version Display run time Indicates the total time the display has been oper ating including the time in stand by Backlight run time Indicates the total time the display has been oper ating excluding the time in stand by ...

Страница 29: ...ducts benzene toluene xylene or other solvents Clean with a soft cloth dampened with mild detergent and water Repeat this with water only and wipe dry with a dry cloth Touch panel Only for MFCD 1219 TS Use a clean and soft clothe with neutral detergent or with ethanol for cleaning Do not use any chemical solvent acidic or alkali solution Avoid spilling liquid inside the display Apply the liquid to...

Страница 30: ... V 31 50 37 90 72 VESA V 31 50 37 50 75 VESA V 36 00 43 30 83 VESA V 720 x 400 28 321 31 47 70 VGA V V 800 x 600 36 00 35 10 56 VESA V 40 00 37 88 60 VESA V V 50 00 48 10 72 VESA V 49 50 46 88 75 VESA V 56 25 53 70 85 VESA V 832 x 624 57 29 49 80 74 6 Mac V 1024 x 768 65 00 48 36 60 VESA V V 75 00 56 50 70 VESA V 78 80 60 02 75 VESA CRUS V 80 60 24 75 Mac V 94 50 68 70 85 VESA V 1152 x 864 108 67 ...

Страница 31: ...ylus Æ 0 8 mm 50g Resolution 1280 x 1024 native Display area H x V 376 x 301 mm Pixel Pitch 0 294 mm H x 0 294 mm V Display color 16M Luminance 270 cd m2 typ MFCD 1219 TS 220 cd m typ Contrast ratio 800 1 typ Response time 9 ms typ avg Viewing angle Vertical 176º typ Horizontal 176º typ Input signals Analog Hor 31 47 to 80 kHz Vert 56 to 85 Hz Sync types Separate sync composite sync sync on Green ...

Страница 32: ...S MATERIAL Front panel controls Left Right Menu Auto Power Input connectors 15 pin D sub for PC graphic signal input Bus Connector for DC 12V 4 5A input DVI connector supporting DVI D only Power source 100 240 VAC Power consumption 50 W max Less than 5 W in power off mode Power saving VESA DPMS standard PnP compatibility VESA DDC 2B standards compliant Safety standards UL60950 cUL60950 IEC60950 CE...

Страница 33: ...Appendix B Technical specifications 33 This page intentionally left blank ...

Страница 34: ...Appendix B Technical specifications 34 This page intentionally left blank ...

Страница 35: ...Appendix B Technical specifications 35 This page intentionally left blank ...

Страница 36: ...Barco nv Medical Imaging President Kennedypark 35 B 8500 Kortrijk Belgium www barco com K5904239 00 August 2010 ...

Отзывы: