background image

R5914105 /01 MDSC-8532

16

3

2

1

5

4

6

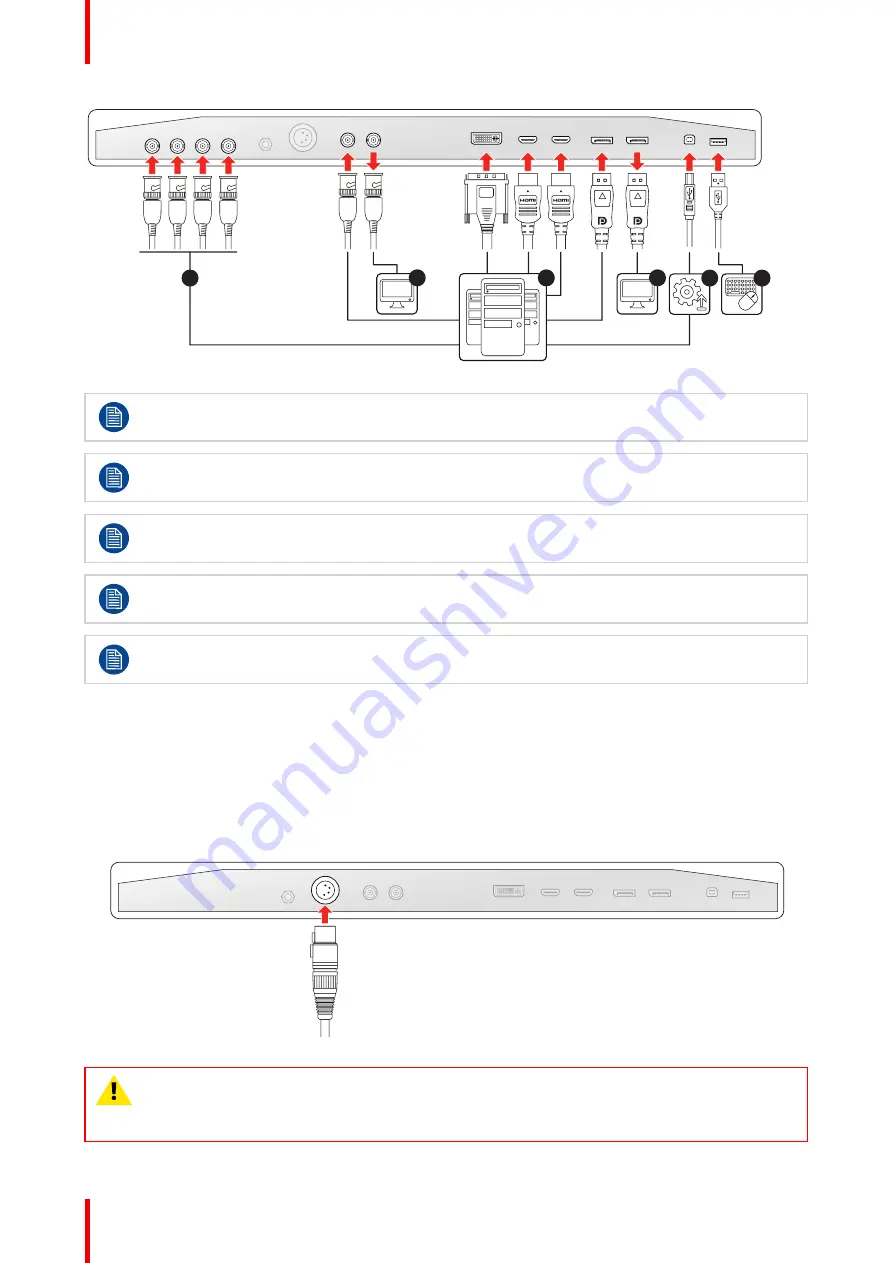
Image 2–3

DisplayPort VESA DP 1.2 certified cables for 5.4 Gbps HBR2 with a length of up to 3 m are
recommended.

Premium certified HDMI 2.0 cables with a length of up to 3 m are recommended.

Use 3G-SDI Belden 1694A cables with a length of up to 50 m.

The video output must be enabled in the OSD menu (see

“Video out”, page 38

).

A subset of the commands of the remote control protocol is also available on a new DDC protocol
on DVI and DisplayPort1 auxiliary channel.

2.3 Power supply connection

To connect the power supply

1. Connect the supplied external DC power supply unit to the +25 VDC power input of your display.
2. Plug the other end of the external DC power supply into a

grounded

power outlet by means of the proper

power cord delivered in the packaging.

Image 2–4

CAUTION:

To avoid risk of electric shock, the external DC power supply must be connected to a

mains with protective earth. The ground connection on the display’s DC power input connector has
no protective earth function. The MDSC-8532 display protective earth connection is provided via a
dedicate pin (see next steps).

Display installation

Содержание MDSC-8532

Страница 1: ...ENABLING BRIGHT OUTCOMES MDSC 8532 SSTP MDSC 8532 12GP User Guide 32 4K UHD surgical display MDSC 8532 ...

Страница 2: ...Registered office Barco NV President Kennedypark 35 8500 Kortrijk Belgium www barco com en support www barco com Barco NV Beneluxpark 21 8500 Kortrijk Belgium www barco com en support www barco com ...

Страница 3: ...llation 13 2 1 Cover removal 14 2 2 Interface connection 14 2 2 1 MDSC 8532 SSTP version 14 2 2 2 MDSC 8532 12GP version 15 2 3 Power supply connection 16 2 4 Cable routing 17 2 5 VESA mount installation 18 3 Daily operation 19 3 1 On off switching 20 3 2 Front keyboard locking unlocking 20 3 3 Power status LED 21 3 4 Front menu 21 3 5 OSD menu 23 3 6 Control lock 24 4 Advanced operation 25 4 1 Pi...

Страница 4: ...4 4 4 2 Language 35 4 4 3 OSD time out 35 4 4 4 Recall Profile 35 4 4 5 Save Profile 35 4 4 6 Front menu user keys 36 4 4 7 Input signal name 36 4 4 8 Display name 37 4 4 9 Profile name 37 4 5 System menu 37 4 5 1 Control lock 37 4 5 2 Power saving 38 4 5 3 Video out 38 4 5 4 Display status 38 5 Troubleshooting 39 5 1 Troubleshooting list 40 6 Important information 41 6 1 Safety information 42 6 2...

Страница 5: ...th VESA 100 interface to allow easy mounting on surgical booms and spring arms Available in different models this surgical display also features a host of connectivity options and remote control User friendly The dual user interface there is one at the front as well as at the back makes it easy to operate the display The touch screen functions at the front can be programmed to meet the personal pr...

Страница 6: ...R5914105 01 MDSC 8532 6 Welcome ...

Страница 7: ...w This manual provides support to the user during the installation set up and utilization of the MDSC 8532 display Depending on the specific version that has been purchased some of the features and options described in this document may not apply to the display in user s hands Warnings cautions notes and tips There are four levels of precautionary or advisory statements that may be used in this us...

Страница 8: ...havior and different colors of the power status LED 3 Connector compartment cover 4 Rear keyboard 5 Cable routing cutout 6 VESA mount screw holes 100 x 100 mm Connections 5 6 7 8 13 14 15 1 2 3 4 12 11 10 9 Image 1 2 1 BNC connector 2 BNC connector 3 BNC connector 4 BNC connector 5 Potential Equalization pin POAG 6 VDC in 7 3G SDI in 8 3G SDI out 9 DVI D in 10 HDMI 2 in 11 HDMI 1 in 12 DisplayPort...

Страница 9: ...pin see Power supply connection page 16 1 4 2 DVI connector DVI D Overview Image 1 4 1 D2_Rx T M D S 2 D2_Rx T M D S 3 GND data 2 shield 4 Not connected 5 Not connected 6 SCL for DDC 7 SDA for DDC 8 Not connected 9 D1_Rx T M D S 10 D1_Rx T M D S 11 GND data 1 shield 12 Not connected 13 Not connected 14 5V output 15 GND cable sense 16 Hot plug detect 17 D0_Rx T M D S 18 D0_Rx T M D S 19 GND data 0 ...

Страница 10: ... Data 4 GND 1 4 5 DisplayPort connector Overview sink side pin out 19 17 15 13 11 9 7 5 3 1 20 18 16 14 12 10 8 6 4 2 Image 1 7 1 ML_Lane 3 n 2 GND 3 ML_Lane 3 p 4 ML_Lane 2 n 5 GND 6 ML_Lane 2 p 7 ML_Lane 1 n 8 GND 9 ML_Lane 1 p 10 ML_Lane 0 n 11 GND 12 ML_Lane 0 p 13 CONFIG1 14 CONFIG2 15 AUX CH p 16 GND 17 AUX CH n 18 Hot Plug 19 Return 20 DP_PWR 3 3 VDC 500 mA max Welcome ...

Страница 11: ...1 T M D S Data2 2 T M D S Data2 Shield 3 T M D S Data2 4 T M D S Data1 5 T M D S Data1 Shield 6 T M D S Data1 7 T M D S Data0 8 T M D S Data0 Shield 9 T M D S Data0 10 T M D S Clock 11 T M D S Clock Shield 12 T M D S Clock 13 CEC 14 Not connected 15 DDC_SCL 16 DDC_SDA 17 DDC CEC GND 18 5VDC POWER in 19 HDP Welcome ...

Страница 12: ...R5914105 01 MDSC 8532 12 Welcome ...

Страница 13: ...13 R5914105 01 MDSC 8532 Display installation 2 ...

Страница 14: ...by Picture PBP page 33 for more information Beside the video input connections the MDSC 8532 also has video output capabilities allowing you to loop through or duplicate all video inputs connected with the MDSC 8532 to another display projector video recorder This chapter describes how to connect the different video interface types to the MDSC 8532 2 2 1 MDSC 8532 SSTP version To connect the inter...

Страница 15: ... To connect the interfaces 1 Connect one or more video source s to the corresponding video inputs of the display For a list of supported video inputs see Technical specifications page 56 2 SDI input loop through When the SDI video input is connected an additional SDI video sink can be connected to the SDI output 3 Video output The entire active image on the screen including OSD can be duplicated t...

Страница 16: ...splayPort1 auxiliary channel 2 3 Power supply connection To connect the power supply 1 Connect the supplied external DC power supply unit to the 25 VDC power input of your display 2 Plug the other end of the external DC power supply into a grounded power outlet by means of the proper power cord delivered in the packaging Image 2 4 CAUTION To avoid risk of electric shock the external DC power suppl...

Страница 17: ...ualization When potential equalization between the display and other devices is required then connect the potential equalization pin POAG to the potential equalization terminal of the equipment Image 2 6 2 4 Cable routing To route the cables Route all cables through the cable routing cutout while reinstalling the connector compartment Image 2 7 CAUTION When the display is assembled in the medical ...

Страница 18: ... the VESA plate thickness T and the thickness of possible washers W a different screw length L should be selected Please respect the following rule to select an appropriate screw length Lmin T W 16 mm Lmax T W 19 mm T W Lmin Lmax Image 2 9 CAUTION Use an arm that is in compliance with VESA requirements CAUTION The monitor VESA interface has been designed for a safety factor 6 to support 6 times th...

Страница 19: ...19 R5914105 01 MDSC 8532 Daily operation 3 ...

Страница 20: ...n the keyboard backlight lights up the power mode LED will turn full green indicating that the display is switching on and the logo will be visible for a few seconds To switch off your display With the front keyboard 1 Unlock the front keyboard see Front keyboard locking unlocking page 20 2 With the keyboard unlocked press and hold 3 4 seconds the key until the entire keyboard starts blinking 3 Wh...

Страница 21: ...light and LCD off Blinking green orange Searching for signal Note When Power save mode is enabled the display will automatically go into power save mode after searching without signal for the period defined by the Power saving time out parameter Steady green Display has a valid input signal 3 4 Front menu About the front menu The MDSC 8532 has a front menu which is used to activate the OSD main me...

Страница 22: ...ated to the user keys the following icons can be visible Icon Description Icon Description Navigate right Select a profile Navigate left Select DVI as the main input source Navigate up Select SDI as the main input source Navigate down Select 4K SDI as the main input source Activate OSD main menu Select HDMI 1 as the main input source Exit front OSD menu Select HDMI 2 as the main input source Exit ...

Страница 23: ...oard Each function in the front menu is immediately activated by pressing the corresponding key on the front keyboard With the rear keyboard Press the left and right buttons to navigate through the front menu The currently selectable function is underlined Press the center button to confirm selections or adjustments To customize the front menu user keys Please refer to Front menu user keys page 36...

Страница 24: ...ts press to exit the OSD menu and return to the front main menu With the rear keyboard Press the up down right and left buttons to navigate through the OSD menus The right button is used to go into a submenu the left button is used to return to a higher level menu Press the center key to confirm adjustments when is visible or to exit the OSD menu and return to the front main menu when is visible 3...

Страница 25: ...14105 01 MDSC 8532 Not all features described in the chapter Advanced operation are available The features not available in specific software versions are shown on OSD menu in light grey Advanced operation 4 ...

Страница 26: ...y User 1 User 2 User 3 To select a profile 1 Bring up the OSD main menu 2 Navigate to the Picture menu 3 Enter the Profile submenu 4 Select one of the available profiles and confirm 4 1 2 Brightness To adjust the brightness level 1 Bring up the OSD main menu 2 Navigate to the Picture menu 3 Enter the Brightness submenu The command bar Brightness is highlighted 4 Set the brightness level as desired...

Страница 27: ... has been selected it is possible to get access to the color regulation commands to adjust the gain of red green and blue primary colors To select a color temperature preset 1 Bring up the OSD main menu 2 Navigate to the Picture menu 3 Enter the Color Temperature submenu 4 Select one of the available color temperature presets and confirm If you selected the User option a new menu will be displayed...

Страница 28: ...alent to Gamma 2 2 with correction on low levels Video2 Transfer function equivalent to Video1 applied to Input Range 16 255 Native No correction curve is applied DICOM Grayscale levels are following closely the DICOM curve for reference only not for diagnostic purposes To select a gamma preset 1 Bring up the OSD main menu 2 Navigate to the Picture menu 3 Enter the Gamma submenu 4 Select one of th...

Страница 29: ...image sizes for your display are Fill Aspect Fill the screen on largest dimension no modification in image aspect ratio 1 1 Native image no scaling Vert Fill Hor Fill Fill All With modification of image aspect ratio To select the image size 1 Bring up the OSD main menu 2 Navigate to the Picture Advanced menu 3 Enter the Image Size submenu 4 Select one of the available image sizes and confirm 4 2 3...

Страница 30: ... applied Mirror flips the image horizontally making the left content appear on the right and vice versa Rotation rotates the image 180 Hor Ver flip When image rotation is selected the latency will increase with 20 msec Image mirroring does not cause any latency increase To enable disable horizontal flip 1 Bring up the OSD main menu 2 Navigate to the Picture Advanced menu 3 Enter the Image Flip sub...

Страница 31: ...available SDI config modes for your display are Quad SDI Quad link 3G SDI 12G SDI 1 12G SDI 2 To select the SDI config mode 1 Bring up the OSD main menu 2 Navigate to the Input Select menu 3 Enter the SDI config submenu 4 Select one of the available SDI config modes and confirm 4 3 4 DisplayPort mode About DisplayPort mode The available DisplayPort DP modes for your display are DP 1 2 SST DP 1 2 M...

Страница 32: ...ed failover input The failover input will be activated within about 7 seconds after the main source has been lost During the transition from main to failover input and vice versa a text message is visible to inform the user The main source can be changed while the failover input remains unchanged During the selection and synchronization of a new main source the failover function is temporary 7 sec...

Страница 33: ... 8532 12GP version Primary input up to 4K resized to half screen on left side Secondary input up to 4K resized to half screen on right side The Video Parameters applied to the Primary input Source are also applied to the Secondary input The 2nd source keeps the same image size Native Aspect as the Primary input Source To select Picture by Picture input 1 Bring up the OSD main menu 2 Navigate to th...

Страница 34: ... to the Input Select menu 3 Enter the PiP Input submenu 4 Select the value for each of the following options PIP Mode ON OFF PIP Source select input PIP Position Bottom Right Top Right Bottom Left Top Left PIP Size Small Medium Large Max PIP Swap ON OFF PIP Transparency Range 0 10 4 4 Configuration menu 4 4 1 Information About information The available information items for your display are Model ...

Страница 35: ...out 5 Select one of the available OSD time out values and confirm 4 4 4 Recall Profile About recalling profiles To recall a profile means to restore the default factory settings Factory and X Ray profiles or recall the user defined profiles The available profiles to recall from your display are Factory X Ray User 1 User 2 User 3 To recall a profile 1 Bring up the OSD main menu 2 Navigate to the Co...

Страница 36: ...ve any of the following functions associated to it Main source sub menu Brightness slide bar Color space sub menu DVI direct selection SDI direct selection HDMI 1 direct selection HDMI 2 direct selection DP direct selection 4K SDI direct selection Gamma direct selection Image flip ON OFF PiP mode ON OFF Profile sub menu 12GP version only When a function is not available for the current display con...

Страница 37: ... the name of a profile 1 Bring up the OSD main menu 2 Navigate to the Configuration menu 3 Enter the Profile name submenu 4 Select one of the available profiles and move right to the name definition area 5 Use the up down arrows to select characters for up to 8 positions 4 5 System menu 4 5 1 Control lock About control lock This setting allows you to avoid unwanted activation of any function throu...

Страница 38: ... main menu 2 Navigate to the System menu 3 Enter the Power Saving submenu 4 Select one of the available options and confirm 4 5 3 Video out About video out This setting allows to enable or disable the Video output function of your display Enabling Video output will copy the Main Source only in case of DP SST HDMI 1 HDMI 2 4K SDI to the DisplayPort 1 2 SSToutput To enable disable video out 1 Bring ...

Страница 39: ...39 R5914105 01 MDSC 8532 Troubleshooting 5 ...

Страница 40: ...anel failure The screen is black no logo is visible after display switch on the front LED is not visible The display is not powered or the unit is not working DP HDMI DVI input is available but no image is displayed Check if the input signal has HDCP revision 1 4 The message WARNING FAILSAFE MODE check display settings appears on screen during start up of the monitor Reboot the monitor The message...

Страница 41: ...41 R5914105 01 MDSC 8532 Important information 6 ...

Страница 42: ...ntilation slot of the monitor Dust can obstruct the air flow and cause temperature increase of the electronics General recommendations Keep the monitor clean to prolong its operational lifetime LCD panel performance may deteriorate in the long term Periodically check that it is correctly operating Periodically check the tightness of the VESA mount screws If not sufficiently tight the monitor may d...

Страница 43: ...ls must follow the requirements of clause 16 of IEC60601 1 3rd Ed or Table BBB 201 of IEC 60601 1 1 for the medical electrical systems To maintain compliance with EMC Regulation use only well shielded interface cables for the connection to peripheral devices Power cords Europe H05VV F or H05VVH2 F PVC cord with appropriate EU plug US and Canada hospital grade cord set has to be used provided with ...

Страница 44: ...l to licensed contractors of Barco and pay adequate attention to safety during the installation and usage All devices and complete setup must be tested and validated before taking into operation At end user application level it is necessary to foresee a backup unit in case the video falls away Barco is not liable for any damage or injury caused by mishandling or improper installation Malfunctions ...

Страница 45: ...he recycling of waste electrical and electronic equipment To prevent possible harm to the environment or human health from uncontrolled waste disposal please separate these items from other types of waste and recycle them responsibly to promote the sustainable reuse of material resources For more information about recycling of this product please contact your local city office or your municipal wa...

Страница 46: ...ement in GB T 26572 X 表示该有毒有害物质至少在该部件的某一均质材料中的含量超出 GB T 26572 标准规定的限量要求 X Indicates that this toxic or hazardous substance contained in at least one of the homogeneous materials used for this part is above the limit requirement in GB T 26572 在中国大陆销售的相应电子信息产品 EIP 都必须遵照中国大陆 电子电气产品有害物质限制使用标识要 求 标准贴上环保使用期限 EFUP 标签 Barco产品所采用的EFUP标签 请参阅实例 徽标内部的编号使 用于指定产品 基于中国大陆的 电子信息产品环保使用期限通则 标准 All Electronic Informa...

Страница 47: ...rview The structure and the specifications of this device as well as the materials used for manufacturing makes it easy to wipe and clean and therefore suitable to be used for various applications in hospitals and other medical environments where procedures for frequent cleaning are specified However normal use shall exclude biological contaminated environments to prevent spreading of infections T...

Страница 48: ...omplies with Part 15 of the FCC Rules Operation is subject to the following two conditions 1 this device may not cause harmful interference and 2 this device must accept any interference received including interference that may cause undesired operation This device has been tested and found to comply with the limits for a Class B digital device pursuant to Part 15 of the FCC Rules These limits are...

Страница 49: ...uipment could result Electromagnetic emissions The MDSC 8532 is intended for use in the electromagnetic environment specified below The customer or the user of the MDSC 8532 should assure that it is used in such an environment Emissions test Compliance Electromagnetic environment Guidance RF emissions CISPR 11 Group 1 The MDSC 8532 uses RF energy only for its internal function Therefore its RF emi...

Страница 50: ...Line to ground 0 5 kV 1 kV 2 kV Line to line 0 5 kV 1 kV Line to ground 0 5 kV 1 kV 2 kV Mains power quality should be that of a typical commercial or hospital environment Voltage dips short interruptions and voltage variations on power supply input lines IEC 61000 4 11 0 residual voltage for 0 5 period at 0 45 90 135 180 225 270 and 315 0 residual voltage for 1 period at 0 70 residual voltage for...

Страница 51: ...tooth WLAN 802 11 b g n RFID 2450 LTE Band 7 Pulse modulation 217 Hz 2 0 3 28 5240 5100 5800 W LAN 802 11 a n Pulse modulation 217 Hz 0 2 0 3 9 5500 5785 6 7 Cleaning instructions To clean the display Apply a cleaning disinfecting product to a soft lint free cloth such as a microfiber or gauze and rub the display surface thoroughly In order to be effective all surfaces must be cleaned for a certai...

Страница 52: ... without front glass carefully remove with a soft object such as a plastic card or finger nail Do not use sharp objects such as paperclips or tweezers to avoid damage to the LCD CAUTION Do not apply or spray liquid directly to the display as excess liquid may cause damage to internal electronics Instead apply the liquid to a cleaning cloth CAUTION The use of products on phenol base and fluids like...

Страница 53: ...device is approved according to the VCCI regulations Indicates the device is approved according to the KC regulations Indicates the device is approved according to the BSMI regulations Indicates the device is approved according to the PSE regulations Indicates the device is approved according to the RCM regulations Indicates the device is approved according to the EAC regulations Caution Federal l...

Страница 54: ...temperature limitations1 for the device to safely operate within specs MD Indicates this is a Medical Device SN Indicates the device serial number REF Indicates the device part number or catalogue number UDI Indicates the Unique Device Identifier REP EC Indicates the Authorised Representative for the European Union REP CH Indicates the Authorised Representative for Switzerland Warning dangerous vo...

Страница 55: ... broken or damaged if not handled carefully when being stored Indicates a device that needs to be protected from moisture when being stored Indicates the storage direction of the box The box must be transported handled and stored in such a way that the arrows always point upwards 15 n or n Indicates the maximum number of identical boxes which may be stacked on each other where n is the limiting nu...

Страница 56: ...ce This document is copyrighted All rights are reserved Neither this document nor any part of it may be reproduced or copied in any form or by any means graphical electronic or mechanical including photocopying taping or information storage and retrieval systems without written permission of Barco 2022 Barco NV all rights reserved Product Security Incident Response As a global technology leader Ba...

Страница 57: ...ideo inputs MDSC 8532 SSTP 4K UHD input 1x DP 1 2 SST MST up to 3840 x 2160 50 60 Hz user configurable 2x HDMI 2 0 up to 3840 x 2160 50 60 Hz FHD input upscaled to UHD 1x DVI 1x 3G SDI Note DP HDMI and DVI all support HDCP 1 43 Video inputs MDSC 8532 12GP 4K UHD input 1x DP 1 2 SST MST up to 3840 x 2160 50 60 Hz user configurable 2x HDMI 2 0 up to 3840 x 2160 50 60 Hz 4K SDI Quad 3G SDI up to 4x 1...

Страница 58: ...sions packaged W x H x D 900 x 720 x 170 mm 35 4 x 28 3 x 6 7 Net weight display only MDSC 8532 SSTP 12 0 kg 26 5 lbs Net weight display only MDSC 8532 12GP 12 2 kg 26 9 lbs Net weight packaged MDSC 8532 SSTP 19 0 kg 41 9 lbs Net weight packaged MDSC 8532 12GP 19 5 kg 43 0 lbs Mounting standard VESA 100 x 100 mm Operating temperature 0 C to 35 C for performance 0 C to 40 C for safety Storage tempe...

Страница 59: ...P timings Format SDI DVI HDMI DP 720x487 59 94Hz NTSC Y N N N 720x480p 59 94Hz N Y Y Y 720x480p 60 00Hz N Y Y Y 720x576i 50 00Hz PAL Y N N N 720x576p 50 00Hz N Y Y Y 800x600 60 00Hz N Y Y Y 800x600 75 00Hz N Y Y Y 1024x768 60 00Hz N Y Y Y 1024x768 70 00Hz N Y Y Y 1024x768 75 00Hz N Y Y Y 1152x864 75 00Hz N Y Y Y 1280x720p 50 00Hz Y Y Y Y 1280x720p 59 94Hz Y Y Y Y 1280x720p 60 00Hz Y Y Y Y 1280x102...

Страница 60: ...uad link Y Y 3840x2160 25 00Hz Single link 6G SDI N Y 3840x2160 29 97Hz Single link 6G SDI N Y 3840x2160 30 00Hz Single link 6G SDI N Y 3840x2160 50 00Hz Single link 12G SDI N Y 3840x2160 59 94Hz Single link 12G SDI N Y 3840x2160 60 00Hz Single link 12G SDI N Y 4096x2160 50 00Hz Quad link Y Y 4096x2160 59 94Hz Quad link Y Y 4096x2160 60 00Hz Quad link Y Y 4096x2160 25 00Hz Single link 6G SDI N Y 4...

Страница 61: ...61 R5914105 01 MDSC 8532 Dimensions 768 4 710 5 VIEWING AREA 78 8 M4 4x 100 100 463 3 400 5 VIEWING AREA 480 2 181 6 334 2 Image 6 1 Important information ...

Страница 62: ...R5914105 01 MDSC 8532 62 Important information ...

Страница 63: ......

Страница 64: ...www barco com R5914105 01 2022 03 17 Barco NV President Kennedypark 35 8500 Kortrijk Belgium ...

Отзывы: