manualshive.com logo in svg
background image

Installation adjustment mode

8-2

5975996 BARCOGRAPHICS 808s 241197

Optical Lens Focusing

The optical focusing procedure is performed separately for each lens.

The  appropriate  CRT  will  be  switched  on  as  the  user  proceeds

through the optical focusing adjustment sequence.

Each lens has two focus adjustment points, one at the rear of the lens

and one at the front. The center of the projected image is focused by

loosening the wing nut at the rear  end of the lens and rotating the lens

barrel until the center of the image is clearly focused. The corners of

the projected image are focused by loosening the wing nut at the front

end of the lens and rotating the lens barrel until the corners of the

image are clearly focused. Repetition of these adjustments may be

necessary to optimize optical focusing.

Press the 

<ENTER> 

key to continue. After finishing focusing of the

three lenses, press the 

<ENTER>

 key to enter the Raster centering.

Press the


<EXIT>


key to return to operational mode.

Press the


<ADJUST>


key to return to operational mode.

Important : Access to adjustments

The top cover of the projector should be removed in order to gain

access to the adjustments.

Please refer to p.4-1 for how to remove the top cover.
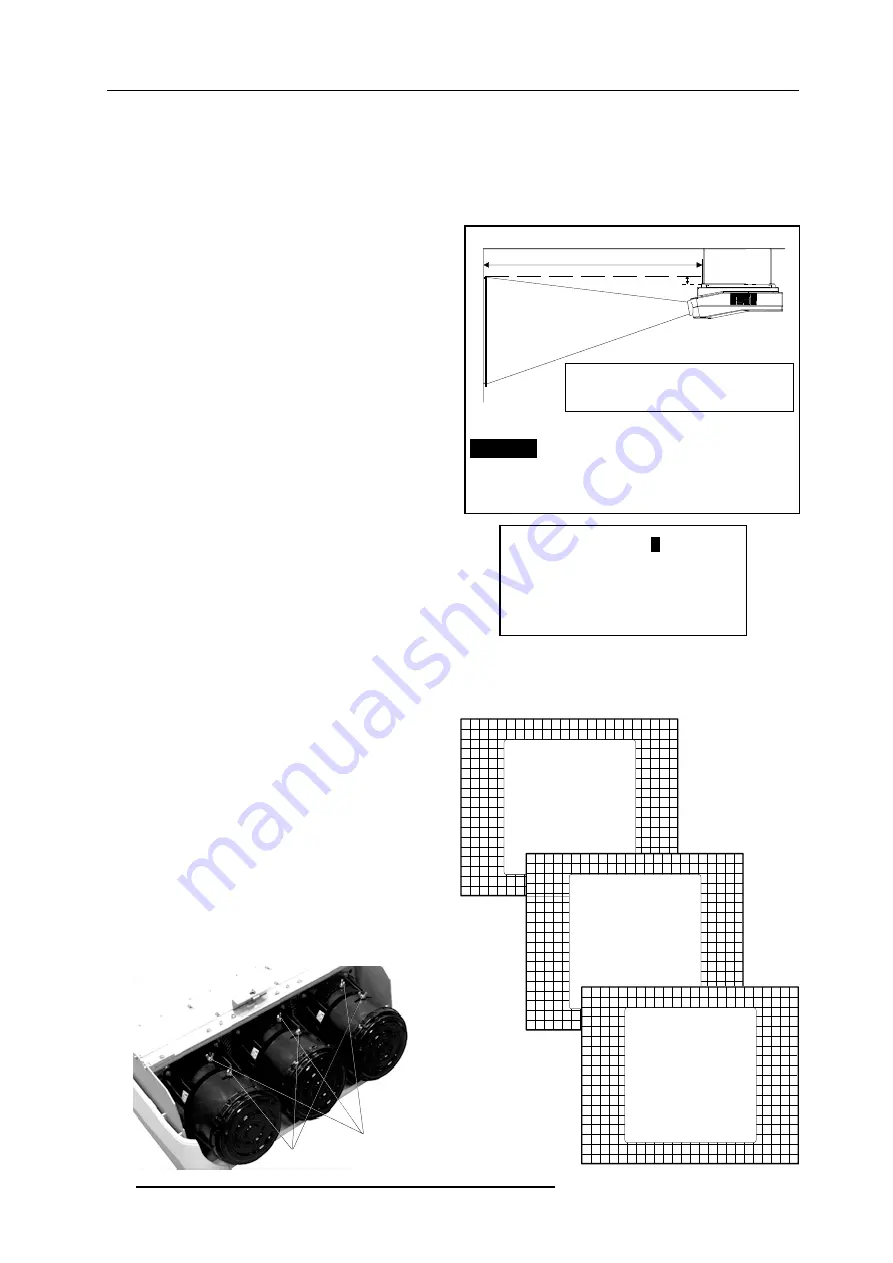
Projector Distance

On the screen, a drawing will be displayed together with parameters

indicating a correct installation position.

To change the screen width :

•

Push the control stick to the left or to the right to highlight the item

SW 

  in  the  "Projector  Distance  1"  menu  and  then  press  the

<TEXT>

 key.

•

If the 

<ENTER>

 key is pressed, the "Optical Lens Focusing" will be

displayed.

•

If  the

  <EXIT>

  key  is  pressed,  the  projector  will  return  to  the

previous menu.

•

After  the 

<TEXT>

  key  is  pressed,  the  next  menu  "Projector

Distance 2" will be displayed on the screen. It allows the user to

change the Screen width.

•

Push the control stick to the left or to the right to highlight the digit
needed to be changed, and enter the desired digit with the numeric

keys on the RCU or the local keypad.

•

Press the 

<ENTER>

 key to confirm the changes. The projector will

redisplay the "Projector Distance 1" menu with updated values for

the three parameters.

•

Press  the   

<ENTER>

  key  to  continue  with  the  "Optical  Lens

Focusing".
If  the

  <EXIT>

  key  is  pressed,  the  projector  will  return  to  the

previous menu.

The same applies to the PD (projector distance). You can use the

above-mentioned procedure to obtain a correct updated value of SW

(screenwidth) after entering a new value of PD (projector distance).

$

&'

3'

%

6FUHHQ

3URMHFWRU

&HLOLQJ

6FUHHQZLGWK

6:

)URQWYLHZ

7RSYLHZ

A = Correction value

PD= Perpendicular distance between screen and projector

SW= Screen width

SCREENWIDTH =  

2


, 6 0  m

Select with arrow keys; reprogram with numeric keys and

then <ENTER> to confirm.

Maximum screenwidth = 6 m
Maximum proj. distance = 8,1 m.

SW = 2.6 m

PD= 3.64m

A=12 cm

Select with arrow keys; <TEXT> to reprogram

<ENTER> to continue; <EXIT> to return.

WARNING: ONLY FOR STANDARD PROJECTORS !!

Corner focusing

Center focusing

237,&$//(16)2&86,1*

<ENTER> to continue
<EXIT> to return

1. LOOSEN THE NUT ON THE 
   REAR OF THE GREEN LENS,
   ROTATE THE LENS BARREL
   TO FOCUS THE CENTER 
   OF THE IMAGE,
   THEN TIGHTEN THE NUT
2. LOOSEN THE NUT ON THE 
   FRONT OF THE GREEN LENS
   AND ROTATE THE FRONT 
   SECTION OF THE LENS TO 
   FOCUS THE CORNERS OF THE 
   IMAGE, THEN TIGHTEN THE NUT.

237,&$//(16)2&86,1*

<ENTER> to continue
<EXIT> to return

1. LOOSEN THE NUT ON THE 
   REAR OF THE RED LENS,
   ROTATE THE LENS BARREL
   TO FOCUS THE CENTER 
   OF THE IMAGE,
   THEN TIGHTEN THE NUT
2. LOOSEN THE NUT ON THE 
   FRONT OF THE RED LENS
   AND ROTATE THE FRONT 
   SECTION OF THE LENS TO 
   FOCUS THE CORNERS OF THE 
   IMAGE, THEN TIGHTEN THE NUT.

237,&$//(16)2&86,1*

<ENTER> to continue
<EXIT> to return

1. LOOSEN THE NUT ON THE 
   REAR OF THE BLUE LENS,
   ROTATE THE LENS BARREL
   TO FOCUS THE CENTER 
   OF THE IMAGE,
   THEN TIGHTEN THE NUT
2. LOOSEN THE NUT ON THE 
   FRONT OF THE BLUE LENS
   AND ROTATE THE FRONT 
   SECTION OF THE LENS TO 
   FOCUS THE CORNERS OF THE 
   IMAGE, THEN TIGHTEN THE NUT.

All manuals and user guides at all-guides.com

Содержание GRAPHICS 808s

Страница 1: ...GRAPHICS 808s R9000901 R9000908 R9000902 R9000907 INSTALLATION MANUAL All manuals and user guides at all guides com a l l g u i d e s c o m...

Страница 2: ...All manuals and user guides at all guides com...

Страница 3: ...GRAPHICS 808s BARCO PROJECTION SYSTEMS Date 241197 Art No R5975996 R9000901 R9000908 R9000902 R9000907 INSTALLATION MANUAL Revision 04 All manuals and user guides at all guides com...

Страница 4: ...nge without notice Produced by BARCO NV November 1997 All rights reserved Trademarks are the rights of their respective owners Printed in Belgium BARCO nv Projection Systems Noordlaan 5 B 8520 Kuurne...

Страница 5: ...at image size How big should the image be 3 1 Where to install the projector 3 2 MountingConfiguration 3 2 CHAPTER 4 INSTALLATION SETUP Access to Controls 4 1 Opening the top cover 4 1 Removing the to...

Страница 6: ...ponent Video source to Port 4 5 7 3 Connecting a RGB Analog source with Tri level sync to Port 4 5 option 7 4 Connecting a Component Video source with Tri level sync to Port 4 5 option 7 4 Peripherale...

Страница 7: ...tection against harmful interference when the equipment is operated in a commercial environment This equipment generates uses and can radiate radio frequency energy and if not installed and used in ac...

Страница 8: ...g fixtures The use of controlled ambient lighting such as incandescent spot light or a dimmer is recommended for proper room illumination Where possible care should also be taken to ensure that the fl...

Страница 9: ...E7 or ANSI 73 11 1 Owner s Manual 1 Installation Manual To open the banding around the carton pull out the clip as shown below Take the projector out of its shipping carton and place it on a table Sav...

Страница 10: ...226 170 84 27 45 5 136 728 960 MAX 500 FIXATION POINT 4 X M8 MAX 1076 AIRFLOW AIRFLOW AIRFLOW AIRFLOW 703 148 MAX 428 590 FRONT IR RECEIVER 456 558 576 POWER SUPPLY BACK IR RECEIVER 510 590 APPROXIMA...

Страница 11: ...ere is just sufficient light to read or write comfortably Spot lighting is desirable for illuminating small areas so that interference with the screen is minimal What image size How big should the ima...

Страница 12: ...rojector and ceiling Ceiling mounted or total distance between projector and floor Table mounted CD A B Ceiling Mounted when the result is negative enlarge the distance between ceiling and top of the...

Страница 13: ...ector Place the top cover in front of the hinges as shown in the picture and push in the direction of the black arrow until the cover locks into the hinges Pivot the top cover to close Secure the lock...

Страница 14: ...e positions of the switches diagram on next page for the corresponding projector configuration To set the scan switches Remove the horizontal deflection module the second module viewing from the rear...

Страница 15: ...vertical scan switch Remove the vertical deflection module the third module viewing from the rear of the projector To remove the vertical deflection module Vertical deflection module Toggle the verti...

Страница 16: ...ABLOCK DELETEALLBLOCKS CHANGEPASSWORD CHANGELANGUAGE RUNTIME DYNAMICASTIGMATISM MORE ADJUSTMENT MODE Select a path from below Select with or then ENTER EXIT to return source 1 GUIDED RANDOM ACCESS INS...

Страница 17: ...e address is set the projector can be controlled now by RCU for addresses between 0 and 9 IBM PC or compatible or Apple MAC for addresses between 0 and 255 The DIP switches on the controller board all...

Страница 18: ...d address is correct Use the numeric keys to enter the address For more information please refer to the projector Owner s Manual 1 2 3 4 5 6 7 8 0 1 OFF ON 1 2 3 4 5 6 7 8 ON OFF Power up mode OFF ON...

Страница 19: ...cted with a password When the password feature is enabled the user has to enter a password before he can enter the adjustment mode For more information about password setting and reprogramming the pas...

Страница 20: ...L F Q R W F V K I O L Q W I Q F Q G W K LV G L F VW FF W Q LQ W I Q F F L G L Q FO G LQ J LQ W I Q F W K W F V Q G VL G R WLR Q 21 2 POW ER M AINS 9 QRP QRP UHT 9 PS Preparing your power cord Mains l...

Страница 21: ...llow the procedure as described below to adapt the voltage WARNING turn off the projector and be sure the AC Power Cord is unplugged before starting the procedure Open the top cover see Access to cont...

Страница 22: ...or 20 minutes This white image will be shifted on the faceplate of the CRT to avoid CRT burn in During this warm up period it is possible to interrupt this white image projection by pressing the EXIT...

Страница 23: ...LV VXEMH F W WR I R OO R ZL Q J WZR F R Q G L W LR Q V 7 K L V G LF QR W F V K I O LQ W I QF Q G WKL V G LF VW FF W Q LQW I QF F L G LQFO GLQ J LQ W I QF WK W F V QG VL G R WLR Q 75 Termination Switch...

Страница 24: ...R101 Vsync R41 Blue R21 Green R1 Red S2 Blue in Green ON yes Line termination 75 resistors 75 Termination Switch 1 2 3 4 4 pin connector configurations For S video Pin 1 earth ground luminance Pin 2...

Страница 25: ...c signals on green can be connected to the projector via Port 4 5 The projector automatically detects where the sync signal is located An interface is recommended when connecting a computer and local...

Страница 26: ...s Manual order number R5975765 Connecting a VS05 source selector to the BARCOGRAPHICS 808s The VS05 can switch up to 5 Composite Video sources 3 S Video Sources and 1 RGB analog or component Video so...

Страница 27: ...3 you will be requested to enter the 4 digit password Enter the digits with the numeric keys on the RCU or the local Installation Raster Centering Projector Distance Optical Lens Focusing Scheimpflug...

Страница 28: ...ht the digit needed to be changed and enter the desired digit with the numeric keys on the RCU or the local keypad Press the ENTER key to confirm the changes The projector will redisplay the Projector...

Страница 29: ...e Press the ENTER key to activate the raster on the Red CRT faceplate Shift the Red raster with the control stick until the raster is centered on the CRT faceplate Press the ENTER key to activate the...

Страница 30: ...XIT to return Press the ENTER key to start the CRT angle adjustment proce dure Press the ENTER key to continue with the second part of the CRT projection angle adjustment Press the ENTER key to contin...

Страница 31: ...ojection angle adjust ment CRT PROJECTION ANGLE ADJUSTMENT Align crosshairs ENTER continue EXIT to return Blue crosshair Green crosshair Move the blue CRT to the outside away from the green CRT Blue c...

Страница 32: ...focusing 21 0 2 86 1 ENTER to continue EXIT to return 1 TURN THE SCREW MARKED 01 TO FOCUS THE IMAGE DIAGO NALLY from LEFT bottom TO RIGHT top 2 TURN THE SCREW MARKED 00 TO FOCUS THE IMAGE DIAGO NALLY...

Страница 33: ...yed on the screen Source number horizontal and vertical frequencies of the displayed source WARNING source not available The input is a valid input but the source is not connected to the inputterminal...

Страница 34: ...ch the user has to answer FAILURE invalid RWI soft version Wrong software version in your projector Call for technical support FAILURE I2 C error addr 7FH3 Hardware failure Call a qualified service te...

Страница 35: ...on the upper support 2 Projector placement on lower support a Projector placement on support b Location of controls for projector position correction 3 Mounting instructions of the cord to lift up the...

Страница 36: ...O ceiling mount support A 2 5975996 BARCOGRAPHICS 808s 241197 Projector position corrections Water level adjustment D Projector axis adjustment C All manuals and user guides at all guides com a l l g...

Страница 37: ...e out If not follow the procedure below to adjust the G2 Open the second metal cover by turning out the retaining screws on both sides and pivot the cover to the front side of the projector see Photo...

Страница 38: ...Correction Push the control stick forward or backward to highlight the item BLUE GAMMA CORRECTION in the menu and then press the ENTER key If the EXIT key is pressed the projector will return to the S...

Страница 39: ...lights a text box with a bar scale 0 16 will be displayed to visualize the magnitude of the correction Press the ENTER key to return to the Gamma Corrections menu GAMMA CORRECTIONS BLUE GAMMA CORRECTI...

Страница 40: ...CIATION STD 704M SIGNAL TRESHOLD LIMIT VALUE Units TRESHOLD LIMIT VALUE Units BASE METAL ALLOYS METALLIC COATINGS FILLER METAL PLUS COATING OR CORE FLUX OTHERS MATERIAL SAFETY DATA SHEET Form Approved...

Страница 41: ...THE USE THEREOF VENDOR ASSUMES NO RESPONSABILITY FOR INJURY TO VENDEE OR THIRD PERSONS PROXIMATELY CAUSED BY THE MATERIAL IF REASONABLE SAFETY PROCEDURES ARE NOT ADHERED TO AS STIPULATED IN THE DATA S...

Отзывы: