31
R5906852 /09
F80
Note:
Plugging the remote control will switch the broadcast address of the remote control to the
default value '0'. This is the only broadcast address that will work when hardwired. If you want to
change the broadcast address after disconnecting the remote control, see
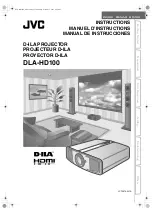
Pointing directly to the IR sensor
When using the wireless remote control, make sure you are within the effective operating distance (30m, 100ft
in a straight line). The remote control unit will not function properly if strong light strikes the sensor window or if
there are obstacles between the remote control unit and the projector IR sensor.
F1
F2
F3
F4
F5
ADJ
EXIT
ENTER
PAUS E
PHASE
TEXT
SHARPN
TINT
COLOR
BRIGHTN
CONTR
TREBLE
BALANCE
BASS
VOL
9
0
7
8
5
6
3
4
1
2
45°
45°
Image 2–9 RCU to one of the IR sensors
2.11 Projector Address
Projector address
Address installed in the projector to be individually controlled.
Broadcast address
Projector will always execute the command coming from a RCU programmed with that broadcast
address.
2.11.1 Controlling the projector
Why a projector address?
As more than one projector can be installed in a room, each projector should be separately addressable with
an RCU or computer. Therefore each projector has its own address.
Set up an individual Projector Address
The set up of a projector address can be done via the software.
Projector controlling
When the address is set, the projector can be controlled now:
•
with the RCU: only for addresses between 1 and 31.
Содержание F80-Q12
Страница 1: ...ENABLING BRIGHT OUTCOMES User Manual F80 ...
Страница 21: ...21 R5906852 09 F80 Graph shows Hazard Distance in meters versus Throw ratio of the lens Safety ...
Страница 22: ...R5906852 09 F80 22 Safety ...
Страница 34: ...R5906852 09 F80 34 Getting Started ...
Страница 44: ...R5906852 09 F80 44 Remote Control Unit ...
Страница 56: ...R5906852 09 F80 56 GUI Introduction ...
Страница 62: ...R5906852 09 F80 62 GUI Source ...
Страница 78: ...R5906852 09 F80 78 GUI Image ...
Страница 146: ...R5906852 09 F80 146 GUI System Settings ...
Страница 156: ...R5906852 09 F80 156 Advanced Settings ...
Страница 160: ...R5906852 09 F80 160 GUI Status menu ...
Страница 176: ...R5906852 09 F80 176 Specifications ...
Страница 181: ...181 R5906852 09 F80 Image B 1 HDCP revision information Connector specifications ...
Страница 182: ...R5906852 09 F80 182 Connector specifications ...
Страница 186: ...R5906852 09 F80 186 Control interface specifications ...
Страница 194: ...R5906852 09 F80 194 Regulatory information ...
Страница 205: ...205 R5906852 09 F80 DMX chart F ...
Страница 209: ......
Страница 210: ...www barco com R5906852 09 2022 11 15 ...