background image

Connecting the signal cables

26

6.

Connect the signal cables:

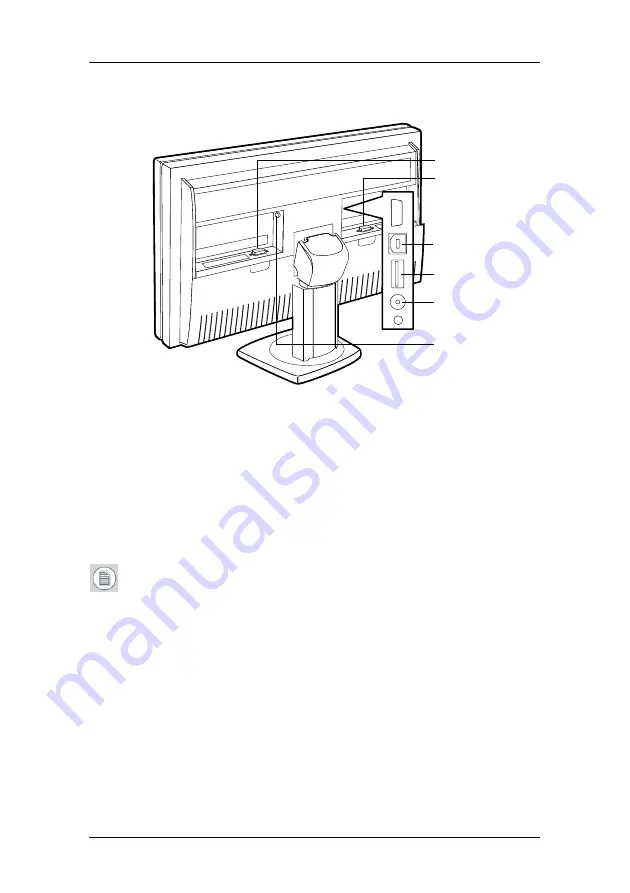
Figure 6: Signal cable connections

• For 

Single View

 mode, connect one end of a DVI cable to any of 

the DVI inputs of the display (4) or (5). Connect the other end of 
the DVI cable to the DVI connector of the graphic board.

• For 

DuoView

 mode, connect Head1 of the graphic board to the 

“left” DVI connector (5) and connect Head2 to the “right” DVI 
connector (4).

Note:

When connecting a plug-and-play graphic board: After 

connecting the cables and starting up the display, make sure to 
select the proper setting in the 

Preferred Input

 function, in the 

Settings on-screen menu. After changing this setting, you must 
reboot the PC so that the graphic board adapts to the new setting.

• Connect the display’s USB upstream connector (6) to a PC USB 

downstream connector by means of a USB cable.

• Connect any USB device to one of the display’s USB downstream 

connectors (7).

• Connect the DC power input (9) of the display to the supplied 

external DC power supply. Connect the other end of the external 

4
5

6

7

8

R

L

9

Содержание Coronis Fusion 4MP

Страница 1: ...Getting Started Guide Nio Fusion 4MP...

Страница 2: ...2 This page intentionally left blank...

Страница 3: ...or this document nor any part of it may be reproduced or copied in any form or by any means graphical electronic or mechanical including photocopying taping or information storage and retrieval system...

Страница 4: ...ymbols 13 Introduction 15 Display parts controls and connectors 16 Front 16 Rear 17 Connectors 19 Display installation 23 Installation precautions 24 Connecting the signal cables 25 Cable routing 28 V...

Страница 5: ...5 Preface...

Страница 6: ...is device complies with Part 15 of the FCC Rules Operation is subject to the following two conditions 1 this device may not cause harmful interference and 2 this device must accept any interference re...

Страница 7: ...15 of the FCC rules These limits are designed to provide reasonable protection against harmful interference in a residential installation This equipment generates uses and can radiate radio frequency...

Страница 8: ...onsult the dealer or an experienced radio TV technician for help The use of shielded cables for connection of the monitor to the graphics card is required to ensure compliance with FCC regula tions Ch...

Страница 9: ...rder to avoid the dissemination of those substances in the environment and to diminish the pressure on natural resources we encourage you to use the appropriate take back systems Those systems will re...

Страница 10: ...h external power supply Class III equipment Degree of safety flammable anesthetic mixture Equipment not suitable for use in the presence of a flammable anesthetic mixture with air or with oxygen or ni...

Страница 11: ...ds at plugs and receptacles Water and moisture Never expose the display to rain or moisture Never use the display near water e g near a bathtub washbasin swimming pool kitchen sink laundry tub or in a...

Страница 12: ...and PC and activating a good screen saver may decrease the risk of image sticking image retention This apparatus conforms to CE LVD 73 23 EEC IEC 60950 1 UL 60950 1 CAN CSA C22 2 No 60950 1 c UL EN 60...

Страница 13: ...approved according to the UL regulations or Indicates the display is approved according to the c UL regulations Indicates the display is approved according to the DEMKO regulations Indicates the displ...

Страница 14: ...xplanation of symbols 14 Symbols used throughout the manual Warning Risk of injury to human beings Caution Risk of damage to the product Important notice or remark Note Hint tip Additional information...

Страница 15: ...15 Introduction...

Страница 16: ...n screen display OSD is on the screen the front illumination is switched on for a few seconds When you touch a key again while the illumination is on the function of the key is executed Figure 1 Front...

Страница 17: ...Power LED Indicates the display s power status Green Display is on when enabled in the OSD Orange Display is in Standby power saving mode Off Display is disconnected from the power or the LED s on st...

Страница 18: ...to attach the panel unit to a VESA mount stand 4 Display stand neck cover Detach it before connecting the signal cables to route the cables neatly 5 Cable duct covers Push them down and open them befo...

Страница 19: ...Display parts controls and connectors 19 Connectors Figure 3 Connectors rear Figure 4 Connectors front 1 Sealed connector Not used 1 2 3 4 5 6 7 R L 8...

Страница 20: ...2 0 devices are supported Note The MDNC 4130 disposes of 2 video inputs You can connect both video inputs or just one input When both inputs are used DuoView the signal on the left DVI connector 6 is...

Страница 21: ...s and connectors 21 setting in the Preferred Input function in the on screen display Settings menu After changing this setting you need to reboot the PC for the graphic board s to change the output re...

Страница 22: ...Display parts controls and connectors 22...

Страница 23: ...23 Display installation...

Страница 24: ...o reduce eye strain Place the display on a strong and stable table or desk Keep the display away from heat sources and provide enough ventilation around the display Do not use the display in direct su...

Страница 25: ...to put the cover clips under stress Then one by one starting at the side where you are pulling release the 4 cover clips by pressing with the other hand on top of the cover where the clips are locate...

Страница 26: ...ecting a plug and play graphic board After connecting the cables and starting up the display make sure to select the proper setting in the Preferred Input function in the Settings on screen menu After...

Страница 27: ...DC power supply 10 to a grounded power outlet by means of the proper power cord delivered in the packaging Figure 7 External DC power supply 7 After routing the cables see further startup the display...

Страница 28: ...he cables in the connector compartments in the provided clips 2 Route the cables alongside the neck and in the cable ducts in the tilt swivel foot 3 Re attach the connector compartment cover and neck...

Страница 29: ...to an arm stand 1 Release the display panel from the display stand Therefore 1 press the panel release button at the rear of the panel not visible on the drawing below Next 2 pull the panel forward a...

Страница 30: ...Vesa mount installation 30 positioned at the bottom When mounted in portrait position the BARCO logo must be positioned at the left side...

Страница 31: ...31 Where to get more information...

Страница 32: ...es proceed as follows In Windows control panel select Internet Options Select the Advanced tab In the Security section check the option Allow active content to run in files on My Computer Document Loc...

Страница 33: ...Vesa mount installation 33...

Страница 34: ...Vesa mount installation 34...

Страница 35: ...35 Troubleshooting...

Страница 36: ...o Static Gray palette modes for them you should follow these guidelines also Recommended Configuration The recommended configuration for best grayscale image quality when using a color display in conj...

Страница 37: ...Open the Windows Display Control Panel by one of the two methods below a Start Settings Control Panel Display or b Open the Display Properties Control Panel by right clicking in an empty area on the d...

Страница 38: ...o temporarily make another display the primary display 4 For the display which is still attached click Click on the Advanced Button 5 Select the Adapter tab and then click on the List All Modes button...

Страница 39: ...splay If you are using a Quad Head Configuration repeat all of the above steps for the two displays on the second display controller Note If you have a single display configuration and you have enable...

Страница 40: ...General tips 40...

Страница 41: ...41 Warranty Statement...

Страница 42: ...riod for the replacement parts will expire at the same moment as the original warranty period of the equipment All parts replaced hereunder and returned to BarcoView or an authorized service center sh...

Страница 43: ...ut not limited to damage to or loss of tangible or intangible property or equipment loss of profits or revenues cost of capital cost of purchase of replacement goods or claims of customers of user for...

Страница 44: ...www barco com K5902002 01 October 2006...

Отзывы: