background image

6. Connecting

user 5

5

5

4 users

1

2

3

4

Image 6-34
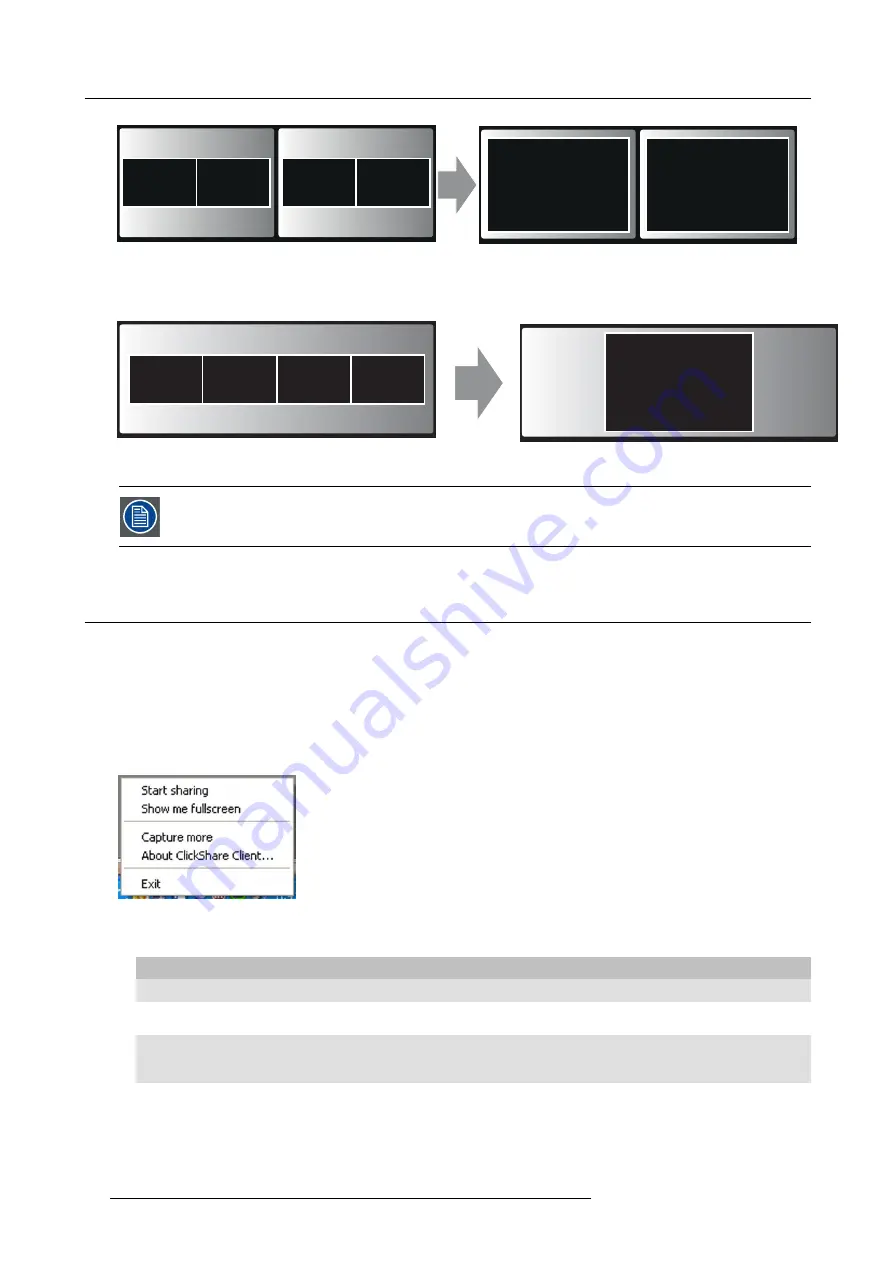
Dual display

2

1

3

4

5

Image 6-35
Panoramic display

When you click again, your content is removed and the Base Unit shows the welcome screen again. The
content of the previous users is not restored on the display.

6.8

User Interface

User Interface functionality

After launching the client, the ClickShare icon appears in the system tray.

ClickShare context menu

The content of the context menu is related to the operating system.
1. Right-click the ClickShare icon in the system tray.

The context menu appears.

Image 6-36
Context menu

2. From the list, click the action you want to perform.

Click

To

Result

Start sharing

to show your screen on the display.

The LEDs of your Button become red.

Show me fullscreen

to bring the content of your screen on
the display full screen.

The screens of other users that were
shown on the display disappear.

Capture mode

to choose to capture video with more
(slower performance) or less detail
(faster performance).

Tune video performance and quality

Shared desktop (only for Windows7 and
Windows8)

to select primary or extended desktop

Depending on the selection the primary
or the extended display is displayed.

42

R5900006 CLICKSHARE 04/12/2013

Содержание ClickShare

Страница 1: ...ClickShare Service Guide R5900006 03 04 12 2013...

Страница 2: ...Barco nv President Kennedypark 35 8500 Kortrijk Belgium Phone 32 56 23 32 11 Fax 32 56 26 22 62 Support www barco com esupport Visit us at the web www barco com Printed in China...

Страница 3: ...tware products ClickShare Software License Terms 1 This Software License is between you and BARCO NV a corporation organized and existing under the laws of Belgium registered under number BE 0473 191...

Страница 4: ...IFICALLY DISCLAIMS ALL IMPLIED WARRANTIES OF MERCHANTABILITY FITNESS FOR A PARTICULAR PURPOSE AND NON INFRINGEMENT OF INTELLEC TUAL PROPERTY AND DOES NOT WARRANT THAT THE SOFTWARE WILL BE FREE FROM ER...

Страница 5: ...n about the functionality of the products which are connected through the Software Functional Information and that Barco may make use of such Functional Information with the exclusion of any personal...

Страница 6: ...rco website or other online means Open Source component Open Source License alsa lib http www gnu org licenses gpl html http www gnu org licenses lgpl html alsa utils http www gnu org licenses gpl htm...

Страница 7: ...T libfontconfig1 http opensource org licenses BSD 3 Clause libfontenc1 http opensource org licenses BSD 3 Clause freetype http freetype sourceforge net FTL TXT http www gnu org licenses old licenses g...

Страница 8: ...ses old licenses gpl 2 0 html openssh sftp server http opensource org licenses BSD 3 Clause openssl http www openssl org source license html opkg http www gnu org licenses old licenses gpl 2 0 html pc...

Страница 9: ...f after the transfer of risks the goods are subject to influences not agreed upon in the contract all guarantee claims of the purchaser will be rendered invalid Not included in the guarantee coverage...

Страница 10: ...erference that may cause undesired operation of the device Radio Frequency RF Exposure Information The radiated output power of the Barco Wireless Device is below the Industry Canada IC radio frequenc...

Страница 11: ...as l intensit n cessaire l tablissement d une communication satisfaisante Le pr sent metteur radio 4104 A AR5BHB116 a t approuv par Industrie Canada pour fonctionner avec les types d antenne num r s c...

Страница 12: ......

Страница 13: ...ideo signal connections to the Base Unit 29 6 2 Audio connection 31 6 3 LAN connection 31 6 4 Power connection and switching on 32 6 5 Connecting an iOS device 33 6 6 Basic Use 37 6 7 Advanced Use 40...

Страница 14: ...very procedure via software recovery stick 88 9 4 Buttons software update 92 10 Maintenance of the product 95 10 1 Maintenance of your ClickShare 95 11 Troubleshooting 97 11 1 Step by step support pro...

Страница 15: ...le ClickShare documents The ClickShare documentation consists of the following manuals Guide Article number User Guide R5900001 Quick Start Guide R5900002 Installation Guide R5900004 Safety Guide R590...

Страница 16: ...n about the described subject Tip gives extra advice about the described subject Font overview Buttons are indicated in bold e g OK Menu items are indicated in italic Step related notes tips warnings...

Страница 17: ...the total of the Ampere ratings on the products plugged into the extension cord does not exceed the extension cord Ampere rating Never spill liquid of any kind on the product Should any liquid or soli...

Страница 18: ...363 The wires of the mains lead are colored in accordance with the following code Green yellow Earth Ground Blue Neutral Brown Line Live Make sure you use the correct fuse rating for the appliance Pow...

Страница 19: ...power input AC clip Image 2 3 Type I power input AC clip two pins Image 2 4 2 5 Repacking On Repacking Save the original shipping carton and packing material they will come in handy if you ever have t...

Страница 20: ...to disconnect them by pulling the connector not the wire Some of the connectors e g mains power plug can be mechanically secured make sure to release the mechanical lock prior to unplugging the connec...

Страница 21: ...s ClickShare component failure RMA request by distributor Facilitates shipment of faulty unit from customer to distributor The distributor troubleshoots the returned assemblies and gives Tier II suppo...

Страница 22: ...st form Image 3 4 5 Click Subnit Add Attachment 6 Click Choose File and browse to the file to attach 7 Click Attach file 8 To add extra files repeat the Choose File and Attach file action When all fil...

Страница 23: ...e local Barco helpdesk How to reach 1 Go to Barco s website www barco com Image 3 6 2 Click on the drop down next to Training Support and select Support 3 Select your Country and the Market Image 3 7...

Страница 24: ...3 ClickShare Service activities Image 3 8 12 R5900006 CLICKSHARE 04 12 2013...

Страница 25: ...g to participate more actively The result is enhanced meeting efficiency and better decision making At the moment 4 different sets are available on the market Each set is sold in its specific region a...

Страница 26: ...rackets a DVI to VGA converter Contact your local sales representative for the correct regional variant to be used in your country Optional accessory ClickShare Link Order number R9861001 Image 4 2 Cl...

Страница 27: ...Humidity Storage 0 to 90 relative humidity non condensing Operation 0 to 85 relative humidity non condensing Authentication protocol WPA2 PSK Output resolution DVI WUXGA 1920x1600 panoramic format 256...

Страница 28: ...ndroid compatibility Support for iPad via cable or Apple TV HDMI and or DVI cable not included in the package Audio No audio HDCP Not supported Weight 170 g Included in the package HDMI to DVI convert...

Страница 29: ...eceiving content from the Buttons and streaming towards the display pairing and software update of the Button is done You can now unplug the Button from the Base Unit during the first phase of the Bas...

Страница 30: ...chanical fixture points are located at the bottom of the Base Unit Antenna Two antennas are included in the ClickShare box To avoid damage during transport they are not pre mounted Depending on the in...

Страница 31: ...number label with the applicable certification logos is stuck at the bottom of the Base Unit The serial number label contains the Barco logo the Barco part number the serial number the revision number...

Страница 32: ...ring software update of the Button in the Base Unit is in progress static white ClickShare is ready to start sharing your screen pairing is done You can now unplug the Button from the Base Unit static...

Страница 33: ...er of the Base Unit and Button on the corresponding label The label of the Base Unit is located at the bottom The label of the Button is located at the bottom 4 8 Mobile Device Support Overview The be...

Страница 34: ...4 Product and components App Used on Logo ClickShare Presenter Android and iOS MirrorOp Sender for Galaxy Samsung Galaxy only 22 R5900006 CLICKSHARE 04 12 2013...

Страница 35: ...f the Base Unit Introduction to the installation methods The base unit can be installed in different ways in a meeting room Table mounted Wall mounted Ceiling mounted Rack mounted The antennas are rem...

Страница 36: ...horizontal line 2 Insert a plug in each hole if needed depends on the wall type and drive in the 2 screws Make sure not to drive in the screws fully so that the bracket can be hooked on the screws No...

Страница 37: ...nly allowed to mount the Base Unit front side up or down Mounting on its side is not allowed 5 4 Ceiling mounting About ceiling mounting Use the mounting brackets inserted in the ClickShare box to mou...

Страница 38: ...responding screwdriver not included How to install 1 Drill four holes in the ceiling according to the dimensions indicated in the picture below length 277mm depth 157mm 277mm 1 5 7 m m Image 5 2 Ceili...

Страница 39: ...rson holding the Base Unit in place one person tightening the screws 5 5 Rack mounting About rack mounting For meeting rooms with a dedicated AV rack an optional Rack Mount for the ClickShare Base Uni...

Страница 40: ...M3 screws Refer to 1 on image 5 5 3 Fasten the antenna to the front panel of the rack mount Refer to 2 on image 5 5 1 2 3 3 2 1 Image 5 5 4 Tighten the antenna cables to the back of the Base Unit Ref...

Страница 41: ...wall mounted or in a ceiling is covered in the Installation Guide R5900004 6 1 Video signal connections to the Base Unit CAUTION Make sure the Base Unit is installed properly before connecting About...

Страница 42: ...kit B5606021 When setting up a single display configuration connect the DVI I or the DisplayPort cable to the display When setting up a dual display configuration connect the DVI I connector with dis...

Страница 43: ...mute unmute lower volume higher volume There will be synchronization between the audio and video signal How to connect separate audio 1 Connect an audio cable with mini jack socket 3 5mm into the aud...

Страница 44: ...for a correct power cord How to connect 1 Plug the power cable in the mains power connector at the back of the Base Unit Note The local variant of the power cable is included in the ClickShare box Ima...

Страница 45: ...n iOS device connection The ClickShare Link allows users to get the content from an iOS device touchscreen to the large meeting room screen The iOS device behaves like an additional laptop Note that t...

Страница 46: ...power adapter of the ClickShare Link Use the one which is applicable in your country Image 6 8 Type A Image 6 9 Type C Image 6 10 Type G Image 6 11 Type I 5 Connect the power cable of ClickShare Link...

Страница 47: ...nnect Apple TV and iOS device to a WiFi network it can be the WiFi network of the Base unit or another WiFi network Or connect Apple TV and the iOS device to a router connected to a LAN network 5 Conn...

Страница 48: ...nd connect to the ClickShare Base Unit WiFi IP address 192 168 2 1 password clickshare SSID ClickSharre serial number unit Image 6 17 Continue without internet Set IP via DHCP Image 6 18 Go to the Set...

Страница 49: ...iOS device user should connect to the same network the Apple TV is connected with and he should start the sharing by enabling AirPlay mirroring For more information on how to set up consult the iPad s...

Страница 50: ...6 Connecting Image 6 24 2 Insert the Button into a USB port of your laptop Image 6 25 38 R5900006 CLICKSHARE 04 12 2013...

Страница 51: ...LEDs of the Button become static red and your screen appears on the display When audio is enabled on the ClickShare Base Unit the audio of your laptop is also available on the audio output of the Bas...

Страница 52: ...ickShare app or connecting an iOS device through the ClickShare Link four persons in the meeting room can display their screens simultaneously They appear as follows For a meeting room with a single d...

Страница 53: ...ltaneously has been reached You can decide to wait until one of the four users removes his content from the display or you can decide to show your content full screen In that case the four screens tha...

Страница 54: ...on in the system tray The context menu appears Image 6 36 Context menu 2 From the list click the action you want to perform Click To Result Start sharing to show your screen on the display The LEDs of...

Страница 55: ...ore details and overlays but video throughput may decrease a bit Selecting this mode will change the window settings and switch off the GPU accelerator of the video card Fast capture mode may capture...

Страница 56: ...otes or other material on primary screen will not be displayed to everyone PC with virtual extended screen 1 2 Image 6 38 Primary screen displayed on the PC extended screen displayed on the meeting ro...

Страница 57: ...systems due to a problem in recent versions of the AMD graphical driver Downgrade to an older version of the driver might resolve the issue 6 11 Audio configuration Audio configuration The audio sign...

Страница 58: ...opens on the Playback tab 3 Select Speakers ClickShare 3 and click Set default 4 4 Click Apply or OK to activate the new setting Set ClickShare as default in Windows XP 1 Right click on the speaker i...

Страница 59: ...ack pane and select ClickShare 3 5 Click Apply or OK to activate the new setting Set ClickShare as default on MAC 1 Click on the Apple logo on the menu bar 1 and select System Preferences 2 Image 6 45...

Страница 60: ...6 Connecting 48 R5900006 CLICKSHARE 04 12 2013...

Страница 61: ...n case you buy additional Buttons or when a Button should be assigned to another Base Unit the Button needs to be paired again When updating the Base Unit software it is advised to also pair your Butt...

Страница 62: ...EDs become static red the Button is paired to the Base Unit and the software update has finished You can unplug the Button from the Base Unit Image 7 3 Pairing finished 2 Unplug the Button from the Ba...

Страница 63: ...System Configuration Load Default Settings Administrator password Log settings ClickShare Help Barco contact data Barco ClickShare EULA 8 1 Accessing the ClickShare Web Interface Getting access to the...

Страница 64: ...68 1 23 A login screen appears 4 Enter the user name admin and the password and click OK By default the password is set to admin The web interface opens To access the Web Interface via the Base Unit w...

Страница 65: ...nguage selection The language of the web interface changes to the selected language The language of the web interface can be changed on nearly any page 8 3 About ClickShare tabs Overview ClickShare ha...

Страница 66: ...l out pane 8 4 Basic settings About Basic settings The basic settings contain the following information Meeting room name Meeting room location Welcome message To change the basic settings 1 Log in to...

Страница 67: ...d and enter the name of the meeting room the location of the meeting room a welcome message which will be displayed below the meeting room name and location Note The name of the meeting room is used b...

Страница 68: ...tion About wallpaper When ClickShare starts up a background wallpaper is displayed By default a general ClickShare and a quick start wallpaper are available The possibility exists to upload personal b...

Страница 69: ...review The preview pane shows the selected wallpaper before it is applied The following message appears on top of the wallpaper selection window Image 8 7 The selected wallpaper is now in use 4 The wa...

Страница 70: ...rs About a personalized wallpaper Via the web interface it is possible to upload personalized backgrounds or wallpapers The free space to upload wallpapers is indicated in the Available storage pane T...

Страница 71: ...he file is checked and when valid format and size the file is uploaded 6 The message Successfully applied changes is displayed on top of the page 5 Now follow the wall paper selection procedure to act...

Страница 72: ...ut setup Click on the drop down list and select the time interval of inactivity after which the display output is disabled standby mode By default the display time out is set to Infinite 4 To show the...

Страница 73: ...hen a port is connected with a display a green LED before the port name lights up Image 8 12 Output ports Output port enable disabled An output can be enabled what means that a video signal can be sen...

Страница 74: ...ed Also the color size and style of the messages can be updated The background color and the transparency can be adapted so that they match with the text layout How to start 1 Log in to the ClickShare...

Страница 75: ...g the marker in the color bar up or down until the desired color is obtained 2 3 To change the tint of the selected color drag the circler marker in the square until the desired tint is obtained 3 Tex...

Страница 76: ...ned 3 Transparency 1 Move the slider to the left or the right to obtain the desired transparency Image 8 17 Transparency Slider to the right more transparency Slider to the left less transparency 8 10...

Страница 77: ...ctionality Changing the audio setting requires a re pairing of the Buttons 8 11 Advanced settings Hostname Hostname Hostnames are human readable nicknames that correspond to the address of a device co...

Страница 78: ...ction to the Internet an IP address must be assigned to each machine Without DHCP the IP address must be entered manually at each computer and if computers move to another location in another part of...

Страница 79: ...put fields and fill out the 4 fields Set the Default Gateway to the IP Address of the router MUST be on the local subnet Note This must NOT be 0 0 0 0 If there is no router on the local subnet then ju...

Страница 80: ...n channel by clicking on the drop down box and selecting the desired channel The channels available in the list vary according to the regional version of your Base Unit Re pairing the Buttons is not r...

Страница 81: ...r disabled for the wireless interface and or for the Ethernet port How to enable disable 1 Log in to the ClickShare web interface 2 Click the Setup tab 1 and click Advanced 2 3 To enable access via wi...

Страница 82: ...check the system status 1 Log in to the ClickShare web interface 2 Click the Maintenance tab and click Status The Status tab page is displayed Image 8 25 Status overview Detailed info for the WiFi net...

Страница 83: ...nance Buttons information About buttons The Buttons tab gives information on the Buttons that have been paired to the Base Unit The following information is given Connected or not Serial number Last c...

Страница 84: ...the list Connected indicates whether the button is connected or not at the moment Serial number the unique serial number of the button Last connected the date the Button was last connected to the Base...

Страница 85: ...the base unit itself To pair buttons on a PC you need to install the ClickShare Button Manager program 8 18 Configured Links About Configured Links The ClickShare Link connected to the Base Unit is in...

Страница 86: ...brating a ClickShare Link About calibration In the context of Apple TV combined with the Link frame grabber calibration is the procedure of detecting and determining a refer ence image This is used by...

Страница 87: ...n the home screen When the calibration is successful the Status will change to Calibrated Note If the visible application icons just below the top row are changed it will be necessary to repeat the ca...

Страница 88: ...pload New Software 3 A browser window opens 5 Browse to the file with the new software and click Open to start the upload Note This should be an ipk file You might have to unzip the file downloaded fr...

Страница 89: ...r 4 To download the ClickShare Client for Windows click on Download Windows Client or for Mac click on Download Mac Client 8 22 Manage System Configuration About Manage system configuration A full bac...

Страница 90: ...a portable version click on Download Portable Version 4 An xml file containing portable information to duplicate settings on another Base Unit 5 To upload a configuration click on Upload Configuration...

Страница 91: ...to frequency 2 4 GHz channel 6 The update history is cleared The table with the associated Buttons is cleared The admin password is reset to admin Debug logging and remote logging are disabled How to...

Страница 92: ...d 2 The content of the Password tab is displayed Image 8 38 Password 3 Enter the old password 3 4 Enter the new password 4 5 To confirm enter the new password a second time 5 6 Click Apply The adminis...

Страница 93: ...ft key while connecting the dongle to the PC until logging is started If the launcher service is not running hold down the shift key while double clicking the ClickShare application The following mess...

Страница 94: ...ds Image 8 42 All kind of manuals brochures and software updates can be found on that page 8 27 Barco ClickShare EULA About the Barco ClickShare EULA The Barco ClickShare End User License Agreement EU...

Страница 95: ...py of the agreement on your laptop 4 In the File Download window click Save The Save as window opens 5 Browse to the location where to store the EULA file and click Save A copy of the Barco ClickShare...

Страница 96: ...8 Web Interface 84 R5900006 CLICKSHARE 04 12 2013...

Страница 97: ...sion 1 Login to the ClickShare web interface User name admin Default password admin The web interface opens 2 Click the Maintenance tab 1 and then click Software 2 Image 9 1 Update software The conten...

Страница 98: ...Button firmware click More Image 9 3 9 2 Base Unit software update Two possible ways to update the software of the Base Unit Via the Maintenance tab of the web interface Using a USB stick containing t...

Страница 99: ...are from Barco s website www barco com clickshare Click on Visit the ClickShare product page and go to tab Downloads Image 9 4 ClickShare product page Image 9 5 Download page 2 Login to the ClickShare...

Страница 100: ...y as the software will look for that specific filename on the device 4 Insert the USB stick into the USB port at the front of the Base Unit 5 Follow the instructions on the meeting room screen 6 When...

Страница 101: ...Unit and keep it pressed until a message appears on screen asking to enter a password Image 9 8 6 Enter clickshare as password Beware when entering the password as the Base Unit will assume a QWERTY k...

Страница 102: ...ng screen appears Image 9 10 8 Select the first option and press Enter A user name is requested Image 9 11 9 Enter the user name barco A password is requested Image 9 12 10 Enter the password barco 90...

Страница 103: ...s Image 9 14 12 Enter the article number of the Base Unit and press Enter Image 9 15 You can find this number on the label at the bottom of the Base Unit The format of the article number is R9861006Bx...

Страница 104: ...sh stick from the Base Unit and start up the unit by pressing the Standby button at the front of the unit After reflashing the Base Unit verify online whether the latest version of the Base Unit softw...

Страница 105: ...starts updating the software When the LEDs become static red the updating and pairing process is finished Note in case no software update of the Button was required only pairing will be performed and...

Страница 106: ...9 Software updating 94 R5900006 CLICKSHARE 04 12 2013...

Страница 107: ...oduct 10 MAINTENANCE OF THE PRODUCT 10 1 Maintenance of your ClickShare Maintenance No specific periodic maintenance is needed WARNING Do not clean the Tray with products containing alcohol R5900006 C...

Страница 108: ...10 Maintenance of the product 96 R5900006 CLICKSHARE 04 12 2013...

Страница 109: ...n of the problem together with the list in step 1 If necessary add also information about the installation environment and other equipment involved 11 2 Troubleshooting list Problem solving Locate the...

Страница 110: ...t support showing HDCP content it will be displayed as black Some programs of Windows are not shown on the display Use of overlays 3D or hardware acceleration in the GPU Disable overlays or hardware a...

Страница 111: ...ot start up correctly after software update It seems to be in an endless loop during startup To recover connect a keyboard to the Base Unit When the boot selection menu comes up press the arrow keys t...

Страница 112: ...e processes WiFi Access Point Daemon and or DHCP Server Configuration file is corrupted Browse to the Configuration tab on the Web Interface and press Load Default Settings Connect a keyboard to the B...

Страница 113: ...splayed Image 11 1 Logging 3 Make sure the Debug logging is checked 4 Click Clear Log The following message appears Image 11 2 5 To confirm that the log file should be cleared click OK The existing lo...

Страница 114: ...11 Troubleshooting Image 11 3 Client logging 2 Reproduce the error of bug that occurred 3 Download the log file 102 R5900006 CLICKSHARE 04 12 2013...

Страница 115: ...m a separate audio output from the Base Unit It is not possible to include the audio signal in the DisplayPort or DVI I signal 9 How does it work when a fifth person wants to connect when there are fo...

Страница 116: ...o it The SSID Service Set Identifier is not visible for users To make the SSID visible for users the configuration pages of the Base Unit can be accessed password protected and the settings can be cha...

Страница 117: ...it There is no limit to the number of ClickShare Buttons that can be paired to the Base Unit We have done tests with 20 ClickShare Buttons connected to the Base Unit simultaneously i e Ready to share...

Страница 118: ...12 Frequently Asked Questions 106 R5900006 CLICKSHARE 04 12 2013...

Страница 119: ...can version of the ClickShare set R9861006BCN CLICKSHARE BASE CN Chinese version of the Base Unit R9861006BEU CLICKSHARE BASE EU European version of the Base Unit R9861006BJP CLICKSHARE BASE JP Japane...

Страница 120: ...13 Order info 108 R5900006 CLICKSHARE 04 12 2013...

Страница 121: ...tive 2006 66 EC which must be collected and disposed of separately from municipal waste If the battery contains more than the specified values of lead Pb mercury Hg or cadmium Cd these chemical symbol...

Страница 122: ...ed for this part is above the limit requirement in SJ T11363 2006 EIP EFUP Barco EFUP All Electronic Information Products EIP that are sold within Chinese Mainland must comply with the Electronic Info...

Страница 123: ...Share 13 Components 13 ClickShare Link 74 Calibration 74 ClickShare product 13 Client software 42 Configuration 77 78 Default settings 78 Manage system 77 Configured Links 73 Connecting 29 31 33 Base...

Страница 124: ...85 Base unit 85 Button 85 Specifications 14 16 ClickShare 14 ClickShare Link 16 Symbols 4 T Table mounting 23 Base unit 23 Tray 20 About 20 Troubleshooting 97 Step by step 97 Troubleshooting list 97...

Отзывы: