background image

23


Safety, Assembly & Instruction Manual      23  

COVERED COOKING

Cooking with the Hood Cloased

Using the roasting hood traps heat, moisture and flavour that is normally lost on an open barbeque. 

The Malibu is designed with enough power to heat up quickly with the hood open or closed.

With the hood closed and the barbeque pre-heated, its important to note that don’t exceed 250°C.

For covered cooking, there are two basis ways to cook: (A) Direct Cooking and (B) Indirect Cooking.

(A) Direct Cooking Method

This is when you place the food directly over the lit burners, either on the grill or the hotplate.

This method is great for frying, searing and grilling, especially with thinner cuts and foods that

require shorter cooking time. Cooking takes less time than with the hood open, and the results

are more tender and juicy.

Preheat the barbeque with all burners on 

HI 

and the hood closed for 5 minutes. Note that the

temperature at the cooking surface will be around 100ºC higher than the temperature measured

at the hood thermometer.

Importantly, once the barbeque is pre-heated and the hood is closed, heat is trapped around the food,

so the burners will only need to be on 

LO

 and in many cases, some of the burners 

OFF

. Heat from the lit

burners will circulate all through the hood cooking quite evenly.

Fatty foods like sausages, can be cooked completely above the OFF burners, retaining juiciness and

flavour without risk of flare-up that results only in burning. Quite close attention needs to be paid to

the food, and the burners frequently reset to 

LO

 or 

OFF

 as required to prevent overheating.

Don’t be afraid to open the hood often to check progress. You are in full control of the temperature

by turning burners higher, lower or 

OFF

 as required. The gas burners will respond instantly and

powerfully to your control.

Most importantly, use the hood thermometer as a warning guide that the barbeque is too hot.

For grilling most foods, aim to keep the thermometer below 200ºC to avoid burning. Never let the

temperature rexceed 250ºC on the hood thermometer or the barbeque will dangerously overheat and

burn your food.

A separate probe thermometer is available as an accessory from all Barbeques Galore stores.

This takes the guesswork out of knowing when your food is cooked.

Always remember to switch the barbeque OFF once you are finished cooking.

(B) Indirect Cooking Method

This is when you place the food only above burners that are 

OFF

. The other burners are adjusted in

combinations of 

LO

 and 

OFF 

to maintain constant lower roasting temperatures. This method is ideal

for thicker cuts of meat, legs of lamb, pork, shoulders of beef, whole chickens and whole fish.

Moist, hot air rises from the lit burners and circulates around the food, trapping juices and flavour.

Even cakes and breads can be cooked in your barbeque this way. Cooking low and slow lets the food 

cook completely through without burning on the outside, yet remaining juicy and tender on the inside.

Содержание G4MALL

Страница 1: ...rbeque Model Number BG1411H4 Tool Required 1 Phillips Head Screwdriver provided 1 Adjustable Spanner not provided INSTRUCTIONS 4 Buner on Side Burner Cart with Hotplate and Grill For safe use and enjoyment of your new barbeque MALIBU ...

Страница 2: ...should not be allowed close to the barbeque during pre heat cooking burn off or cooling down of the unit Please dispose of all polythene packing and plastic bags carefully before first use of the barbaque and keep them out of the reach of children WARNING To protect against the adverse effects of sunlight beware of direct sunlight or diffuse light that may enter the open sides Beware of light refl...

Страница 3: ...tice Flammable liquids of any description including petrol lighter fluid oils etc must not be stored close to the barbeque Spare or extra gas cylinders must NOT be stored inside this barbeque or within close proximity of this barbeque or any other gas or electric appliance Spare or extra gas cylinders should not be stored where they are exposed to continuous direct sunlight as this is a potentiall...

Страница 4: ...oning of the barbeque should take into consideration the possibility of accidental hand or body contact Any enclosure in which the appliance is used shall comply with one of the following An enclosure with walls on all sides but at least one permanent opening at ground level and no overhead cover SEE EXAMPLE 1 Within a partial enclosure that includes an overhead cover and no more than two walls SE...

Страница 5: ...equires an immediate replacement from your local agent or gas expert C SIDE BURNER CONNECTION IF FITTED WITH SIDE BURNER The side burner hose has already been fitted to the gas pipe work on the RIGHT HAND side of the main body The side burner connection is a STANDARD RIGHT HAND THREAD A standard right hand thread is tightened in a CLOCKWISE DIRECTION It is important that the side burner hose is no...

Страница 6: ...nt including valve connections hose connections side burner connections and regulator connections If bubbles appear across any joint or connection there is a leak o Immediately turn the cylinder gas valve OFF o Check and retighten all gas connections and joints o Repeat from the start of section 5E PRECAUTIONARY LEAK TEST o If the leak has been corrected then the barbeque can be used o If the leak...

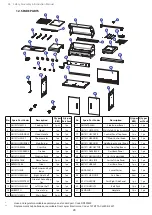
Страница 7: ...J Gas Cylinder Hook 1Pc S Door Handle 2Pcs B Warming Rack 1Pc K Grease Cup 1Pc T Door 2Pcs C Cooking Grill 1Pc L Door Hinge Left Top 1Pc U Swivel Castor 4Pcs D Hotplate 1Pc M Left Cabinet Side Panel 1Pc V Cabinet Base Panel 1Pc E Flame Tamer 2Pcs N Right Cabinet Side Panel 1Pc F Left Side Shelf 1Pc O Door Hinge Right Top 1Pc G Right Side Shelf 1Pc P Upper Front Beam 1Pc H Side Burner Assembly 1Pc ...

Страница 8: ...7 Safety Assembly Instruction Manual 7 7 HARDWARE LIST mm mm mm 2 mm mm mm mm LL 2PCS mm 25 ...

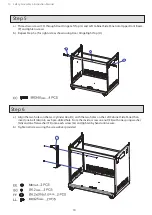
Страница 9: ...Castors U onto the Cabinet Base Panel V with four screws AA each as shown b Ensure all screws are tightened securely Step 2 a Turn the Base Assembly upright b Attach two Magnet Panels R to the Base Assembly with two screws BB each as shown 8 ASSEMBLY INSTRUCTIONS mm mm ...

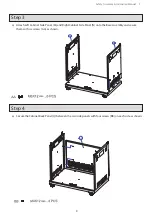
Страница 10: ... Attach Left Cabinet Side Panel M and Right Cabinet Side Panel N onto the Base Assembly and secure them with six screws AA as shown Step 4 a Secure the Cabinet Back Panel Q between the two side panels with four screws BB on each side as shown mm mm ...

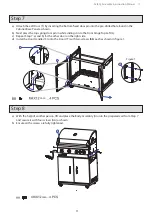
Страница 11: ... as shown using Door Hinge Right Top O Step 6 a Align the two holes on the Gas Cylinder Hook J with the two holes on the Left Cabinet Side Panel then insert one bolt AA into each pre drilled hole From the inside screw one nut EE with one spring washer GG and one flat washer FF onto each screw LL and tighten by hand until secure b Tighten all screws using the screwdriver provided mm nut mm mm mm 25...

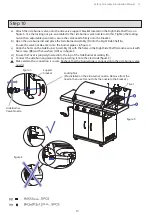
Страница 12: ... in while sliding it into the Door Hinge Top Left L c Repeat Step 7 a and b for the other door on the right side d Instal the Door Handles S onto the Doors T with two screws BB each as shown in figure 1 Step 8 a With the help of another person lift and place the Body Assembly A onto the prepared cart from Step 7 and secure it with four screws AA as shown b Ensure all the screws are fully tightened...

Страница 13: ...side of the firebox with six screws AA as shown in figure 1 b Repeat Step 9 a for the Left Side Shelf F as shown c Further secure both side shelves from inside the firebox each shelf with two screws AA and two flat washers DD as shown in figure 2 d Ensure all screws are tightened properly mm figure 1 figure 2 mm G ...

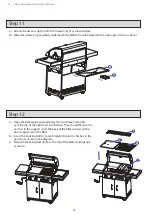
Страница 14: ...alve nozzle enters into the burner pipe as in figure 4 c Align the holes on the Side Burner Assembly H with the holes in the Right Side Shelf G and secure it with five screws BB and five washers HH as in figure 5 d Ensure the Trivet is properly located into the top of the Side Burner Assembly H e Connect the side burner ignition cable by inserting it onto the electrode figure 4 Make certain the co...

Страница 15: ...wn Step 12 a Open the barbeque hood and place the two Flame Tamers E over the top of the right most two burners They should fit onto the notches in the support rail at the back of the BBQ and rest on the front support rail of the BBQ b Insert the Cooking Grills C and Hotplate D into the firebox in the position as shown in the diagram c Place the Warming Rack B onto the top of the firebox side pane...

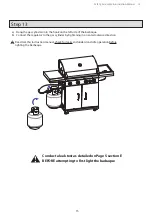
Страница 16: ... the barbeque b Connect the regulator to the gas cylinder by tightening in an anti clockwise direction Read ALL this instruction manual check for leaks and understand safe operation before lighting the barbeque Conduct a leak test as detailed on Page 5 section E BEFORE attempting to first light the barbaque ...

Страница 17: ...all the controls are in the OFF position prior to initiating the start up process Make sure there are no obstructions of airflow to the gas unit Spiders and insects can nest within and clog the burner venturi tube at the orifice A clogged burner tube can lead to a fire beneath the appliance Turn on the gas supply at the gas cylinder Push and turn the knob of a burner anti clockwise to HI as it rea...

Страница 18: ...ture of the grills can vary depending on the type of food and cooking conditions F HOT PLATE COOKING The burner underneath the hot plate will directly heat up the hot plate flame tamers are not required under the hot plate During the pre heat stage the hot plate should heat up sufficiently to start cooking your food The temperature of the hot plate can vary depending on the type of food and cookin...

Страница 19: ...ute period most excess food fat and juices should be burnt off making cleaning easier The retractable hood must be left in the open position during the burn off period Turn the barbeque OFF at the control knobs and at the gas cylinder Allow the barbeque to cool to a safe temperature before cleaning Take care to avoid burns during cleaning by wearing heat resistant mitts Use a grease remover and wa...

Страница 20: ...nd direct sunlight 1 HOT PLATE AND COOKING GRILL While the cooking surfaces are still hot take a long handled and a scraper and remove remaining oil and food scraps You should use an oven mitt to avoid burning yourself Regularly clean with hot soapy water Excess oil residue can be removed by using cleaners available from your local Barbeques Galore Store After any cleaning process of the cooking p...

Страница 21: ... a soft cloth should be used To repair minor tea staining or pitting you can use a light non metallic scourer It is important that you rub with the natural grain of the stainless steel surface to avoid leaving visible scratch marks Between uses it is a good idea to leave the barbeque covered to prevent dust and air borne salts settling on the stainless steel surfaces If left for too long these par...

Страница 22: ...tion section before using If your barbeque uses a flexible hose to connect to the gas check the rubber O ring on the regulator end of the hose assembly at least once a year If it appears worn or cracked have it replaced We recommend having your barbeque checked by an authorised service agent every 5 years This is to ensure there are no leaks and that all components are still functioning correctly ...

Страница 23: ...better to quickly sear the meat on one side at a time turning once only before serving If you like salt with your food try adding it at the end instead of before or during cooking salt draw the natural moisture out of the food and dries it out Baste food with light marinade or canola oil a couple of times while cooking though watch out for excessive flare up if too much oil is used Using the roast...

Страница 24: ...uiciness and flavour without risk of flare up that results only in burning Quite close attention needs to be paid to the food and the burners frequently reset to LO or OFF as required to prevent overheating Don t be afraid to open the hood often to check progress You are in full control of the temperature by turning burners higher lower or OFF as required The gas burners will respond instantly and...

Страница 25: ...rmometer around 160ºC to avoid burning Note that the temperature at the roasting rack may be around 25ºC higher than the temperature measured at the hood thermometer For short periods of browning only or for 10 minutes to make pork crackling aim for around 200ºC Note that temperature at the roasting rack may be around 25ºC higher than the temperature measured at the hood thermometer and most foods...

Страница 26: ...mometer in the thickest part of the flesh careful not to touch any bone COOKING TIMES POULTRY Cut of Meat Weight or Thickness BBQ Method Approx Cook Time Chicken whole 2 kg Indirect 70 80 min Chicken halved or quartered 2 kg total Indirect 55 65 min Chicken breats boneless 150 g ea Direct 12 15 min Chicken breats boneless 150 g ea Indirect 23 25 min Wings 120 g Direct 23 30 min Wings 120 g Indirec...

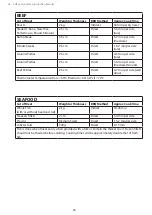
Страница 27: ... Direct 5 6 min per side med rare Ground Beef Patties 2 5 cm Direct 6 7 min per side well done Thermometer Temperature Rare 60ºC Medium 66ºC Well 77ºC SEAFOOD Cut of Meat Weight or Thickness BBQ Method Approx Cook Time Whole Fish with or without head and tail 2 kg Indiret 30 35 min Steaks Fillets 2 cm Direct 3 4 min per side Prawns Medium Sized Direct 1 5 2 min per side Lobster Tails 300 g Direct ...

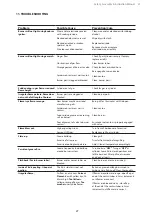
Страница 28: ...soning salt on burner Poor alignment of valve to burner venturi Burn grill for 15 minutes with lid open Clean venturi Clean burner Ensure burner venturi is properly engaged with valve Flame blow out High or gusting winds Turn front of barbeque to face wind Low on ULPG gas Replace or refill gas cylinder Flare up Persistent grease fire Grease buildup Excessive fat in meat Excessive cooking temperatu...

Страница 29: ... Firebox 1pc 1pc 23 HH1411A404BACK Cart Back Panel 1pc 1pc 8 HH1411A40209 Warming Rack 1pc 1pc 24 HH1411H4GASHOOK Gas Cylinder Hook 1pc 1pc 9 HHGSF2616AK Flame Tamer 2pcs 1pc 25 HH1411H4LSIDE Cart Left Side Panel 1pc 1pc 10 G4PMHDJ 56 Trivet 1pc 1pc 26 HH1411H4BASE Cart Base Panel 1pc 1pc 11 HH1411H4SB Side Burner and Spill Bowl 1pc 1pc 27 HHGAC3615 Swivel Caster 4pcs 1pc 12 HH1411H4RSHELF Right S...

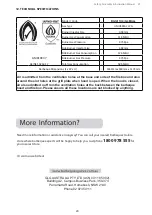
Страница 30: ...round the slot holes at the grill plate when hood is open When the hood is closed air also admitted out from the ventilation holes at the back between the barbeque hood and firebox Please ensure all these locations are not blocked by anything Need more information or assistance in anyway You can call your nearest Barbeques Galore store where barbeque experts will be happy to help you Just phone 18...

Отзывы: