


13
the machine is off or it could spread through the
inside of the appliance.
NOTE 2: Never add more than 1 level measure,
otherwise either the appliance will not make the
coffee and the pre-ground coffee will be disper-
sed inside the appliance, dirtying it, or the coffee
will be delivered a drop at a time.
NOTE 3: Use the measure provided to add the
right amount of coffee.
NOTE 4: Introduce only pre-ground coffee for
espresso coffee machines into the funnel. Never
fill with coffee beans, freeze dried coffee or other
substance that could damage the appliance.
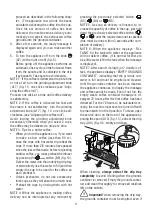
NOTE 5: If more than one measure of pre-ground
coffee is used and the funnel clogs, push the cof-
fee down with a knife (fig. 17) then remove and
clean the infuser and machine as described in
the “Cleaning the infuser” chapter.
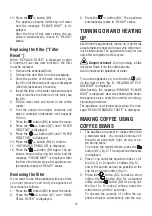
DELIVERING HOT WATER
The appliance is set by default to automatically
deliver 200 ml of hot water.
•
Always make sure the appliance is ready.
•
Turn the cappuccino maker outwards and
place a container underneath (fig. 3).
•
Press the
button (B9) (fig. 1).
“HOT WATER PRESS OK” is displayed.
•
Press the
button and hot water is de-
livered from the cappuccino maker into the
container underneath. (You should not de-
liver hot water for more than 2 minutes at a
time).
To interrupt the flow, press the
button
(B9). Once the set quantity of hot water has
been reached, delivery stops automatically.
MAKING CAPPUCCINO
(USING THE STEAM
FUNCTION)
•
Turn the cappuccino maker (A10) towards
the centre (fig. 3).
•
Take a container and fill it with about 100 g
of milk for each cappuccino to be made and
place it under the cappuccino maker.
In choosing the size of the recipient, bear in
mind that the milk doubles or triples in vo-
lume.
You are recommended to use partially skim-
med milk at refrigerator temperature.
•
Turn the steam knob
(A9) (fig. 18) (to
the right or left). “STEAM PRESS OK” is di-
splayed.
•
Press the
button (B9) (fig. 1).
•
To stop steam delivery, turn the steam knob
(A9).
•
Immerse the cappuccino maker (A10) in the
milk container (fig. 19), taking care not to
immerse the raised line on the cappuccino
maker (shown by the arrow in fig. 19).
Steam comes out of the cappuccino maker
giving the milk a creamy frothy appearance.
For a creamier froth, immerse the cappuc-
cino maker in the milk and rotate the contai-
ner with slow upward movements.
(You should not discharge steam for more
than 2 minutes at a time).
•
Once the required froth has been reached,
stop steam discharge by turning the steam
knob
(A9).
•
Prepare the coffee as described above using
sufficiently large cups, then fill them with the
frothed milk prepared previously.
The cappuccino is ready.
Sweeten to taste and if desired, sprinkle the
froth with a little cocoa powder.
IMPORTANT: always clean the cappuccino
system immediately after use.
Proceed as follows:
•
Turn the steam knob
(A9) and press
the
button (B9) to discharge a small
amount of steam for a few seconds.
This empties the cappuccino maker of all
traces of milk.
IMPORTANT: to ensure the hygiene of the
appliance, you are recommended to carry
out this procedure each time you make cap-
puccino to avoid stale milk remaining in the
circuit.
•
Wait a few minutes for the cappuccino maker
to cool down, then holding the cappuccino
maker lever firmly in one hand, unscrew the