background image

5

How to Assemble and Operate the Vacuum

Fig. 1

Fig. 2

How to Assemble and Operate the Vacuum 

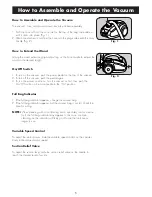
The vacuum, hose, wand and accessories are packed separately�

1�  Push the hose cuff into the hose inlet on the top of the bag compartment 

until it clicks into place (Fig� 1)�

2�  Attach the electrical cord from the hose into the plug underneath the carry 

handle (Fig� 2)�

How to Extend the Wand

Grasp the wand extension grip and pull up on the hose handle to extend the 

wand to the desired length�

On/Off Switch

1�  To turn on the vacuum, push the power pedal on the top of the vacuum�

2�  To turn off the vacuum, push the pedal again�

3�  To turn the power nozzle on, turn the vacuum on first, then push the  

On/Off switch on the hose handle to the “On” position�

Full Bag Indicator

1� If the full bag indicator appears, change the vacuum bag�

2�   If the full bag indicator appears, but the vacuum bag is not full, check the 

hose for a clog�

NOTE:

  When cleaning with a tool (dusting brush, upholstery tool or crevice 

tool), the full bag indicator may appear� In this case, continue 

cleaning, as the indicator will likely go off once the tools are no 

longer in use�

Variable Speed Control

To adjust the motor power, slide the variable speed control on the canister 

body to the desired motor speed�

Suction Relief Valve

To adjust the suction level, slide the suction relief valve on the handle to 

reach the desired level of suction�

Содержание MINT

Страница 1: ...Before operating the vacuum please read these instructions completely OWNER S MANUAL...

Страница 2: ...bers of this product may be found on the back side of the unit You should complete the enclosed warranty card and mail it back to us as soon as possible for your protection Also note the model and ser...

Страница 3: ...n it to a service center 6 Do not pull or carry by cord use cord as a handle close a door on cord or pull cord around sharp edges or corners Do not run appliance over cord Keep cord away from heated s...

Страница 4: ...ing the plug If the plug should still fail to fit contact an electrician to replace the obsolete outlet Do not defeat the safety purpose of the polarized plug Two Wire Polarized Cord State of Californ...

Страница 5: ...edia Filter 10 On Off Pedal 11 Power Nozzle 12 Wand Release Button 13 Telescopic Wand 14 Cleaning Tools 15 Wand Extension Grip 16 Handle Release Button 17 Suction Relief Valve 18 On Off Switch for Pow...

Страница 6: ...sh the pedal again 3 To turn the power nozzle on turn the vacuum on first then push the On Off switch on the hose handle to the On position Full Bag Indicator 1 If the full bag indicator appears chang...

Страница 7: ...al cord When to Change the Filters At a minimum it s recommended to replace the HEPA media and secondary filters after using 12 vacuum bags If someone in your household is sensitive to airborne allerg...

Страница 8: ...ig 1 Dusting Brush The dusting brush is ideal for vacuuming delicate objects and surfaces Fig 2 Upholstery Tool The upholstery tool cleans pet hair quickly and easily from sofas and chairs Fig 3 Rug F...

Страница 9: ...lling the wand toward you Fig 2 2 Turn on the power nozzle How to Remove and Insert the Wand 1 Removing the wand from the power nozzle allows you to use cleaning tools for baseboard or ceiling cleanin...

Страница 10: ...es and remove any blockages The vacuum can be turned on again after approximately 20 minutes Power cord does not rewind Power cord Pull out the power cord a little and press the cord rewind button aga...

Страница 11: ...ides at no cost to you all labor and parts to keep this vacuum in correct operating condition during the warranted period How to Get Service Warranty service can only be obtained by presenting the vac...

Страница 12: ...ial numbers of your unit in the spaces provided below and retain this book as a permanent record of your purchase Model Number ____________________________________________________________________ Seri...

Отзывы: