background image

14

You can change the basic settings of

your music system to your liking. The

OPTIONS menu allows you to set the

clock, switch the Timer function on

or off, choose language and set DVD

sound options.

You can also set your preferences for

the display and select the sources

and functions which should appear

when you press the LIST button. 

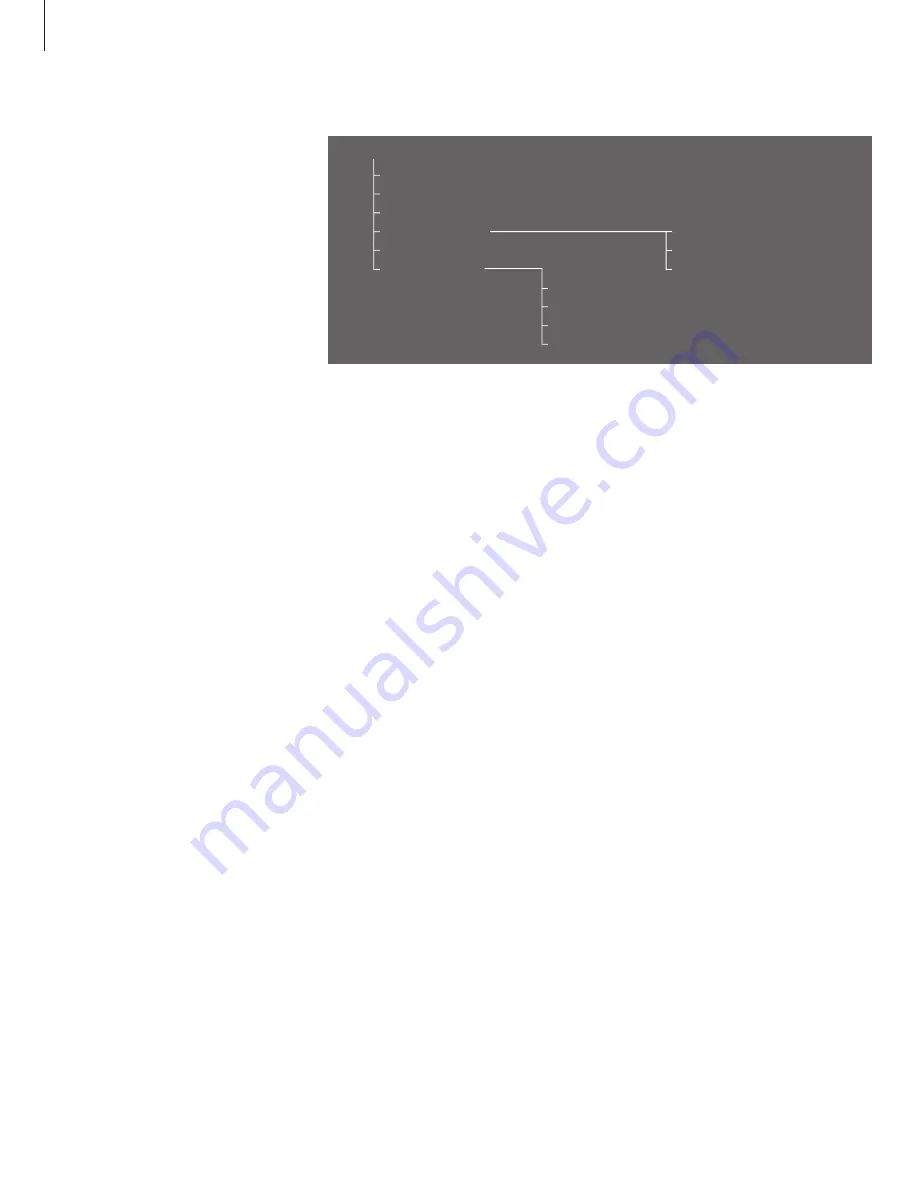
Make option settings

1 RADIO 

2 CD 

3  STATUS [DEFAULT/ EXTENDED]

1  SCART SENSE OUT 

2 DVD SOUND 

3  SCART VIDEO OUT [RGB/CVBS …] 

4 PARENTAL LOCK

. . OPTIONS

1 SET CLOCK …

2 ACTIVATE TIMER [ON/OFF] 

3  SELECT LANGUAGE …

4 DISPLAY SETUP …

5  LIST OPTIONS [N.MUSIC  …] 

6 DVD OPTIONS … 

To enter the OPTIONS menu, press LIST, enter the

SETUP menu and then enter the OPTIONS menu.

What’s on the OPTIONS menu…

SET CLOCK... 

Use this menu to set the built-in 

clock to the correct time and date. – This menu 

only appears if your music system is not 

connected to a television. 

ACTIVATE TIMER (ON/OFF)... 

Use this menu to 

switch the Timer function on or off. Select ON 

to include the speakers of the music system in a 

Timer.

SELECT LANGUAGE... 

Use this menu to select 

your preferred language for the texts in the 

display from the list of available languages.

DISPLAY SETUP... 

Use this menu to select the 

display (default or extended information) you 

prefer for radio, CD and status respectively.

LIST OPTIONS... 

Use this menu to add functions, 

features and menus to the list which appear 

when you press LIST.

DVD OPTIONS... 

Use this menu to select settings 

for DVD. For further information, refer to page 

18. 

Useful hints…

From the factory, the only menu entry available

when you press LIST is SETUP.

If you change the STATUS DISPLAY from DEFAULT

to EXTENDED, the information, which is otherwise

only briefly shown in the display, will be shown

continuously. 

You can call up the time in the display via the LIST

button or via the Beo4 remote control. 

When the system is connected to a Bang &

Olufsen television or radio, you must set the clock

as described in the Guide for the television or

radio. 

When your system is connected to a television or

radio, Timers are programmed via the television or

radio, but if you want them executed on

BeoCenter 2, you must set the ACTIVATE TIMER

menu to ON. 

If by accident, you have chosen a language you do

not want, you can enter the language menu by

pressing LIST, move down to the last menu entry,

press 

tt

, then press 5 and then 3. 

Содержание BeoCenter 2

Страница 1: ...BeoCenter 2 Guide...

Страница 2: ......

Страница 3: ...ur own preferences for volume bass treble balance and loudness Make option settings 14 Find out how to change the basic settings of your music system This Guide explains how to operate your BeoCenter...

Страница 4: ...the menu system or leaves the menu system Switches BeoCenter 2 to standby RADIO DISC LOAD LIST 0 9 EXIT Searches through a CD steps between folders in N MUSIC mode and moves the cursor sideways in me...

Страница 5: ...speakers connected to your music system are muted The status display The extended status display is not switched on permanently Only the first line is displayed all the time When you operate the musi...

Страница 6: ...indicates that you have moved down one level in the menu system Two dots in front of a menu indicates that you have moved down two levels in the menu system Three dots in front of a menu indicates tha...

Страница 7: ...oose not to store your settings press tt to move the cursor to IGNORE and press GO or just press EXIT again STORED appears in the display How to change a setting Press LIST to bring up the menu system...

Страница 8: ...for the menus in the display from the list of available languages AUTO TUNING Let the music system tune in all available FM radio programs for you The display will prompt you to check your aerial conn...

Страница 9: ...yback function for CD CD EDIT ON OFF Select to activate or deactivate playback of the edited series of the loaded CD TIMER ON OFF Select to activate or deactivate the Timer function SHOW CLOCK Select...

Страница 10: ...d radio programs appear DELETE PROGRAM Use this menu to delete unwanted radio programs from the list of available programs ADD PROGRAM Use this menu to add new programs name and store an added program...

Страница 11: ...Use this menu to activate the random or repeated playback functions for all CDs and switch the edited playback function on or off Useful hints You can only name a CD when it is playing You can store a...

Страница 12: ...our programmed Timers SOURCE Use this menu to select a source for your programmed Timer If you select radio as your Timer source select a program number too START STOP Use this menu to enter the start...

Страница 13: ...SET TONE BASS TREBLE LOUDNESS To enter the SOUND menu press LIST enter the SETUP menu and then enter the SOUND menu What s on the SOUND menu PRESET VOLUME Use this menu to preset a volume level for y...

Страница 14: ...language for the texts in the display from the list of available languages DISPLAY SETUP Use this menu to select the display default or extended information you prefer for radio CD and status respecti...

Страница 15: ...1 NEW PINCODE 2 DELETE PINCODE CONFIRM PINCODE To call up the pincode menu press LIST and then press ss twice followed by EXIT What s on the PINCODE menu NEW PINCODE Use this menu to enter or change y...

Страница 16: ...d backwards or forwards during playback press GO then ss tt Press to resume playback To pause or stop playback of a DVD To start playing a DVD press DVD To pause playback press GO then STOP To stop pl...

Страница 17: ...able Video Output The Video Output menu allows you to select a picture format suitable for your television 16 9 widescreen or 4 3 Language The language menu allows you to store your preferred language...

Страница 18: ...ang Olufsen television choose ON DVD SOUND If you want DVD sound via the speakers connected to the music system choose PL SCART If you want DVD sound via the television speakers only choose SCART SCAR...

Страница 19: ...REPEAT or N MUSIC Not the same as LIST on BeoCenter 2 Pauses CD playback at any time Turns the volume up or down Press in the middle to mute speakers press again to restore sound RADIO DVD CD 0 9 MEN...

Страница 20: ...ings for the built in clock 14 Connections Aerial socket Socket unit Guide p 6 Socket unit Socket unit Guide p 6 Connect your music system to a video system Socket unit guide p 6 Connect speakers Sock...

Страница 21: ...e your pincode 15 Placement Placing your music system Socket unit Guide p 4 Settings Set the clock 14 Setting your preferences for DVD playback 17 18 Sound adjustments 13 Radio Delete radio programs 1...

Страница 22: ...ocess of a Bang Olufsen product and we strive to make our products easy and comfortable to operate Therefore we hope that you will take the time to tell us about your experiences with your Bang Olufse...

Страница 23: ...r help This class B digital apparatus meets all requirements of the Canadian Interference Causing Equipment Regulations The black and yellow label on the compact disc player serves as a warning that t...

Страница 24: ...www bang olufsen com...

Страница 25: ...Correction to the Guide BeoCenter 2...

Страница 26: ...umber To wind backwards or forwards during playback press GO then or press or again to change speed Press to resume playback To pause or stop playback of a DVD To pause playback press STOP To stop pla...

Страница 27: ...r choice Press STOP to step backwards in menus Press EXIT to exit on screen menus What s on the Play mode menu The Play mode menu allows you to make selections for playback The following options are a...

Страница 28: ...ter 2 to the television with a S Video cable set S Video Out to S1 Language This menu allows you to store your preferred language for audio subtitles and the disc menu and to decide whether or not ava...

Страница 29: ...Guide BeoCenter 2 Socket Unit...

Страница 30: ...ectric shock is present within this unit This symbol indicates that there are important operating and maintenance instructions in the literature accompanying this unit For the Canadian market only CAU...

Страница 31: ...all cables to the Socket unit Mounting the wall bracket 8 Find out how to mount the optional wall bracket for the Socket unit Audio Video system 10 Find out how to set up your products to the correct...

Страница 32: ...is designed for indoor use in dry domestic environments only and for use within a temperature range of 10 40 C 50 105 F Avoid placing the system in direct sunlight near radiators or other sources of...

Страница 33: ...cess to the sockets it is necessary to remove the cover Lift one end of the cover slide the cover to the side and lift it off The cables must be lead through the openings at each end of the Socket uni...

Страница 34: ...Guides for the BeoLab Loudspeakers Remember to set L R LINE switch on the BeoLab speakers to L and R left and right respectively When headphones are plugged in the speakers connected to your music sys...

Страница 35: ...EO socket on your television Connect the DIG OUT socket on the Socket unit to the COAX socket on your television Connect the LINE OUT R and L socket for right and left channel audio output on the Sock...

Страница 36: ...se to the floor we suggest that you connect all cables before mounting the Socket unit on the bracket See the special notice about light partition walls on the next page Should questions arise concern...

Страница 37: ...trate the gypsum and are screwed a minimum of 15mm 5 8 into a vertical stud Removing the Socket unit from the wall bracket To ensure that the Socket unit is placed securely on the wall bracket the wal...

Страница 38: ...tedly until OPTION is shown in the Beo4 display and press GO Press LIST repeatedly until A OPT is shown in the Beo4 display and then key in the appropriate number 0 1 or 2 Choose V OPT to program Opti...

Страница 39: ...as TV If you press a source button before or after AV has been shown in the Beo4 display the television screen will be switched on To listen to sound from your music system on the television speakers...

Страница 40: ...t with a firmly wrung soft cloth which you have dipped in a solution of water containing a few drops of mild detergent Do not attempt to clean the optics of the system or open any part of the music sy...

Страница 41: ...c system to a video system 6 Connect speakers 6 Connect headphones BeoCenter 2 Guide p 5 Contact Contact Bang Olufsen BeoCenter 2 Guide p 22 Delete Delete CD names BeoCenter 2 Guide p 11 Delete radio...

Страница 42: ...gs Set the clock BeoCenter 2 Guide p 14 Setting your preferences for DVD playback BeoCenter 2 Guide p 17 18 Sound adjustments BeoCenter 2 Guide p 13 Radio Delete radio programs BeoCenter 2 Guide p 10...

Страница 43: ...levision reception which can be determined by turning the equipment off and on the user is encouraged to try to correct the interference by one or more of the following measures Reorient or relocate t...

Страница 44: ...www bang olufsen com...

Отзывы: