


16
17
Configuring the SG200 for First Use
Configuring the SG200 for First Use
When the SG200 Display is first powered up, a splash screen is shown.
Pressing the button once will take you to either a screen where you can
select the device to be monitored (If two SmartShunts are installed, for
instance), or directly to the Real-Time Data if the only devices on the network
are a single Display and a single SmartShunt. Before the SG200 can be
used, you must configure the bank for the correct battery chemistry and the
capacity of the battery bank.
Each SmartShunt on a SmartLink Network has it’s own menu. If you only
have one SmartShunt, it is automatically selected for you. Otherwise, select
the SmartShunt that you wish to configure (Using the long-press method)
and then select MENU, and then CONFIG. A complete description of the
configuration options can be found in the CONFIG section later in this
manual.
Initial configuration of the SmartShunt consists of setting the following
parameters:
Battery Chemistry
Battery Capacity
The default chemistry is AGM-STD with a capacity of 100Ah.
NOTE
: If SoH drops to zero after initially showing a different value, the
battery may have a bad cell. If there are multiple batteries installed in a
parallel bank, the voltage of each battery should be taken individually using
a hand-held meter, as there may be a bad battery in the battery bank.
Initial Accuracy
The SG200 is a self learning product. It continuously monitors the battery
bank, and self adjusts over time to improve the accuracy of the two most
important parameters, State of Health (SoH) and State of Charge (SoC).
On new battery systems, both the State of Health and the State of Charge
values may be very close to accurate after the first full charge and a
brief relaxation period. This is because the stored characteristics of each
battery chemistry is made with healthy batteries. If the batteries are older,
it will take a few cycles before these values can be relied upon, and you
may see significant changes in these values during this time.
NOTE:
The accuracy of the voltage and current measurements are
calibrated at the factory and do not change over time.
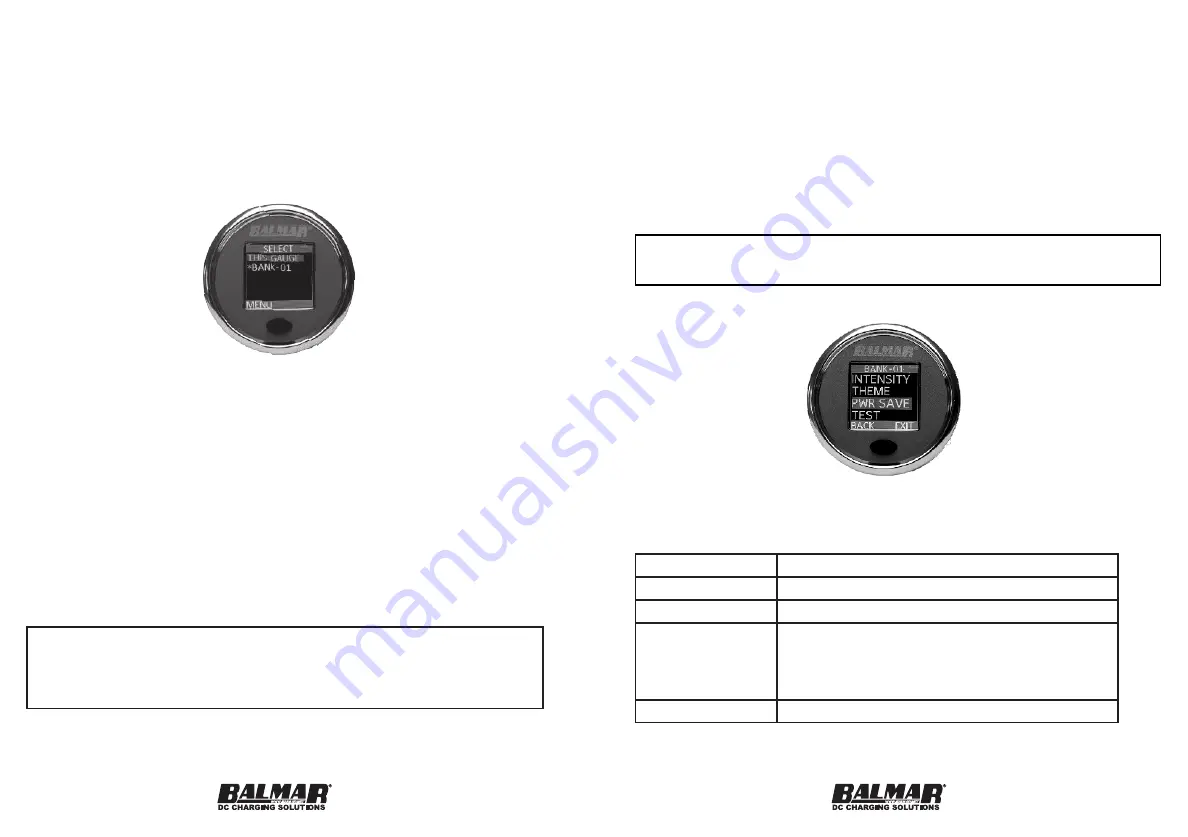
Display
The Display menu allows for the configuration of the Display’s colors,
intensity and power usage.
MENU OPTION
DESCRIPTION
INTENSITY
Change the brightness of the color display
THEME
Change the color theme used on the display
PWR SAVE
Choose four power saving combinations of
the Color Display, using timeout duration, and
whether the Display is dimmed or turned off
after timeout
TEST
Run through a test of the Color Display


