background image

30

Recommended frequency - Service interval & Kms

Activities / Check points

29500

30000

24500

25000

19500

20000

14500

15000

9500

10000

4500

5000

500

~

750

KMS

7th

6th

5th

4th

3rd

(Free)

2nd 

(Free)

1st 

(Free)

   Servicing

   Sr.
  No.

Brake shoes (Front & Rear) for wear limit.

Brake cam (Front & Rear)

30.

31.

R

CL,L

C,R

CL,L

C,R

CL,L

R

CL,L

C,R

CL,L

C,R

CL,L

C,R

C,R

CL,L

Rear sprocket fasteners for looseness.

32.

34.

Fairing & windshield well nuts for rubber cracks

All cables free play adjustment

Head light focus adjustment

Check & confirm all bulbs / switches working. 

General lubrication – Clutch lever, Front Brake 
Lever.

35.

36.

37.

38.

Mirror position & joint firmness. 

40.

Tyre air pressure.

39.

Rear wheel rubber shock dampers for excess play.  

33.

C,T

C,R

C,R

C,A

C,A

C,A

L

C,A

C,A

C,R

C,A

C,A

C,A

L

C,A

C,A

C,T

C,R

C,R

C,A

C,A

C,A

L

C,A

C,A

C,R

C,A

C,A

C,A

L

C,A

C,A

C,T

C,R

C,R

C,A

C,A

C,A

L

C,A

C,A

C,A

C,A

C,A

L

C,A

C,A

C,T

C,A

C,A

C,A

L

C,A

C,A

C,T

C,R

C,R

C,A

C,A

C,A

L

C,A

C,A

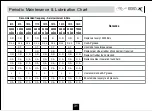
Periodic  Maintenance  &  Lubrication  Chart 

Содержание GT110X BS VI

Страница 1: ......

Страница 2: ......

Страница 3: ...avail all these services at any of our Vehicle Dealers or Authorised Service Dealers ASD as per the schedule contained in this booklet Your CT110X BS VI comes with a warranty of 5 Years or 75 000 Kms...

Страница 4: ...to you or other persons to the vehicle can happen if advice provided is not followed Description 1 Technical Specifications 1 2 Identification Data Frame No Engine No 4 3 Location of Parts 5 4 Steerin...

Страница 5: ...rque 9 81 Nm 5000 RPM Ignition System DC Starting Aid Kick Self Spark Plug 2 nos Champion or BOSCH Spark Plug Gap 0 7 to 0 8 mm Transmission 4 Speed All down Lubrication Forced Lubrication Front Brake...

Страница 6: ...I Fuel Tank Full 11 Liters Fuel Tank Reserve 2 3 Liters Length 1998 mm Width 753 m Height 1098 mm Wheel base 1285 mm Ground Clearance 170 mm Electrical System DC Head Lamp 35 35W with DRL Tail Lamp St...

Страница 7: ...nction Indicator 2W Bulb Fuel Level Indicator Analog Battery 12V 3 Ah VRLA Vehicle Kerb Weight 127 kg Vehicle Gross Weight 257 kg Note All dimensions are under UNLADEN condition Above information is s...

Страница 8: ...ster the motorcycle They are the unique alpha numeric codes to identify your particular vehicle from others of the same model and type Frame Number Location On Side of Steering Tube Alpha Numeric 17 D...

Страница 9: ...on of Parts 5 Kick Lever Speedometer Fuel Tank Cap Frame Grip Rear Shock absorber Silencer Tail Lamp Brake Pedal Day Time Running Light DRL Brake Lever Engine Oil Level Window Front Fork with Rubber B...

Страница 10: ...When fuel supply is to be cut off To Lock the Steering To lock the steering turn the handle bar to the left or right Push the key inside turn toward LOCK position Match the lock position turn key to...

Страница 11: ...Signal Indicator Green When Turn signal switch is turned to Left or Right Turn pilot indicator LH or RH will flash 5 Neutral Indicator Green When the transmission is in Neutral Ignition switch ON the...

Страница 12: ...when high beam is selected High Beam Low beam B Turn Signal Switch When the turn signal switch is turned to Left or Right corresponding turn signals flash on off To stop flashing press the switch IN C...

Страница 13: ...l lamps OFF DRL ON High Intensity Head lamp High Low beam Tail lamp Speedometer lamps pilot ON DRL with intensity low will glow F Head Light Switch It has 2 positions F E Ignition Switch High Low beam...

Страница 14: ...er with hole provided on Fuel Tank G and press Side Cover inside Match the Side Cover lock H properly with hole provided on Chassis I Lock A the Side Cover by rotating the key anti clockwise Removal o...

Страница 15: ...Cover LH Fold the First aid kit as shown in Fig A Insert the folded First aid kit in the slot above battery Battery It is located inside side cover LH Make of battery may be differ from vehicle to ve...

Страница 16: ...motorcycle be sure to check following items Please give proper importance to these checks and perform all of them before riding motorcycle If any irregularities are found during these checks refer to...

Страница 17: ...for their longer life Starting The Engine Turn the fuel tap knob to or position Turn ignition switch key to position Confirm that transmission is in neutral This vehicle is equipped with BS VI carbur...

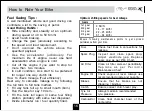
Страница 18: ...engine rpm jumps excessively This may cause engine damage rear wheel may skid Downshifting should be done at recommended speeds as shown in table 14 How to Ride Your Bike Shifting Gears Close throttle...

Страница 19: ...excessively Do not start moving or race the engine immediately after starting Run the engine for a minute at idle speed to give the oil a chance to workup into the engine How to Ride Your Bike 15 CAU...

Страница 20: ...y tank full up to small mouth brim Run the bike for say 100 km Fill the tank full again in same fuel filling station probably with same fuel dispenser Divide kilometer run fuel quantity filled 16 Fuel...

Страница 21: ...rly wrap up loose clothes while driving or riding to avoid entangling in wheel or other objects on road Always concentrate on riding for safety Safe Riding Tips Always wear Helmet while driving or rid...

Страница 22: ...orcycles Model Recommended Grade Engine oil CT110X Bajaj DTS i 10000 10W30 BS6 Compliant JASO MA2 API SN st Engine oil replacement frequency 1 service then every 10 000 Km Engine oil level top up freq...

Страница 23: ...le rules has been ensured 19 Front Rear Solo Rear with Pillion Instructions for customer Do Not REV UP Engine in standstill condition Don t use adulterated fuel or fuel additives as it will result in...

Страница 24: ...battery It is always recommended to hand over the same to Authorised battery Bajaj dealer for proper disposal How to keep battery healthy Switch Off ignition when engine is not running Get battery ch...

Страница 25: ...Chain slackness 20 30 mm Chain slackness to be adjusted whenever required Std Chain slackness 20 30 mm Marking on chain adjusters should be identically positioned on both sides Drive chain must be cl...

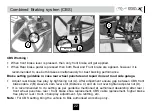
Страница 26: ...oad side garage Adjust rear brake free play by tightening nut A After adjustment ensure gap between CBS front brake cable 2 B sleeve cam lever slot Distance C and do not over tighten adjuster nut D It...

Страница 27: ...a Free Service Guidelines whichever occurs earlier Instruction to avail Free Service through Digitized Free Service Coupon Please follow following procedure Please provide your mobile number to Dealer...

Страница 28: ...bris using a soft brush 2 Use microfiber cleaning cloths Ex Muslin cloth for painted parts cleaning In case petrol is spilled out on white light colour petrol tank it is to be immediately cleaned with...

Страница 29: ...d users besides causing severe damage to motorcycle Ensure luggage is secured will not shift while riding Loosely secured luggage may affect riding stability of motorcycle Do not carry excessively hea...

Страница 30: ...sediment bowl cleaning Fuel pipes for cracks Spark plug clean check gap Valve tappet clearance Carburettor oat chamber cleaning 3 4 5 6 7 8 9 10 11 Carburettor rubber duct Sleeve for hard resulting i...

Страница 31: ...e of oil change Replace Air lter element at every 15000kms Replace air lter cover O ring along with lter element Replace at every 15000 Kms Replace at every 30 000 Kms Replace if required Top up CL C...

Страница 32: ...eck fault code Clear fault history Update latest hex le if applicable 21 22 Non sealed Drive chain wear Clean Lubricate adjust Replace if required Drive chain link lock 23 24 Main stand side stand bot...

Страница 33: ...e Clean by Diesel Lubricate using molten chain grease Replace at every 20000 Kms Use recommended AP grease Replace if required Use Limaplex grease for lubrication Replace oil and oil seal dust seal in...

Страница 34: ...ring windshield well nuts for rubber cracks All cables free play adjustment Head light focus adjustment Check con rm all bulbs switches working General lubrication Clutch lever Front Brake Lever 35 36...

Страница 35: ...L Use model wise torque values Replace rear wheel rubber shock damper if required Replace if rubber found cracked Replace cables if operation found hard Use recommended AP grease Ensure model wise tyr...

Страница 36: ...frequent cleaning may be required while driving in dusty environment C Check A Adjust CL Clean R Replace T Tighten L Lubricate Note Periodic parts Oil Filters All types of greases Cleaning agents Cab...

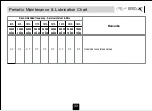
Страница 37: ...12th 11th 10th 9th 8th 15th 16th Remarks 64500 65000 59500 60000 54500 55000 49500 50000 44500 45000 39500 40000 34500 35000 69500 70000 74500 75000 Use model wise torque values C T C T C T C T C T C...

Страница 38: ...the vehicle on a box or a stand so that both wheels are raised off the ground Spray oil on all unpainted metal surfaces to prevent rusting Avoid getting oil on rubber parts or brake liners Cover entir...

Страница 39: ...Set of tools 7 Tyre Fr Make ___________ Sr No ____________ 4 First Aid Kit Rr Make ___________ Sr No ____________ The Vehicle has been delivered to my satisfaction I have understood all terms and con...

Страница 40: ...irectly by the customer Bajaj Auto Limited shall not be Liable to replace them though their dealer however Bajaj Dealers will provide full assistance in referring such claims with respective manufactu...

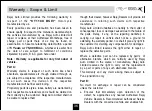
Страница 41: ...tory periodic parts such as air filter oil filter etc as per periodic maintenance schedule Part C Further this warranty is NOT applicable to 1 Normal maintenance operations like brake clutch adjustmen...

Страница 42: ...affects its performance and reliability 12 Vehicles which are not being serviced at recommended dealers as per the service schedule described or which have not been operated or maintained in accordan...

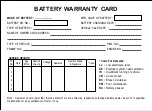
Страница 43: ...OWNER AND ADDRESS TYPE OF VEHICLE REG NO FRAME NO ENGINE NO Code For Remarks LL Low electrolyte level AE Electrical system needs attention IR Insufficient running of vehicle CB Cover broken BC Broken...

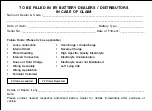
Страница 44: ...of claim ________________________________________________Battery Type _________________ Serial No __________________________________________________Date of Fitment ________________ TO BE FILLED IN BY...

Страница 45: ...Notes...

Страница 46: ...Notes...

Страница 47: ......

Страница 48: ......

Отзывы: