background image


10 

10 

ELECTRICAL 


Power Specifications 

Your tool is wired for 240 volts, 50Hz alternating current. Before connecting the tool to the power 

source, make sure the machine is cut off from power source. Before switching on the power, you 

must check the voltage and frequency of the power to see if they meet with the requirement, the 

allowed range for the voltage is ±5%, and for the frequency is ±1%. 


Considerations 

  Observe local electrical codes when connecting the machine. 

  The circuit should be protected with a time delay fuse or circuit breaker with a amperage 

rating slightly higher than the full load current of machine. 

  A separate electrical circuit should be used for your tools. Before connecting the motor to the 

power line, make sure the switch is in the “OFF” position and be sure that the electric current 

is of the same characteristics as indicated on the tool. 

  All line connections should make good contact. Running on low voltage will damage the 

motor. 

  In the event of a malfunction or breakdown, grounding provides a path of least resistance for 

electric current to reduce the risk of electric shock. This tool is equipped with an electric cord 

having an equipment-grounding conductor and a grounding plug. The plug must be plugged 

into a matching outlet that is properly installed and grounded in accordance with all local 

codes and ordinances. 


ATTENTION:  HAVE ELECTRICAL UTILITIES CONNECTED TO MACHINE BY A 

CERTIFIED ELECTRICIAN! 

Your Baileigh Machine is 


Check if the available power supply is the same as required by the machine (consult 

nameplate on machine) 

WARNING:

 Make sure the grounding wire (green) is properly connected 

to avoid electric shock. DO NOT switch the position of the green grounding wire if any 

electrical plug wires are switched during hookup. 

WARNING:

 In all cases, make certain the receptacle in question is 

properly grounded. If you are not sure, have a qualified electrician check the 

receptacle

.


Содержание PH-28HD-VS

Страница 1: ...OPERATOR S MANUAL POWER HAMMER MODEL PH 28HD VS B9045 2018 Baileigh Industrial Inc Rev 02 2018...

Страница 2: ...TING AND LIFTING 8 INSTALLATION 9 Levelling Feet 9 ELECTRICAL 10 OPERATION 12 Setup and Adjustments 12 Operation 14 MATERIAL SELECTION 15 LUBRICATION AND MAINTENANCE 15 PLATE ASSEMBLY 16 UPPER LOWER R...

Страница 3: ...es Correct installation guidelines Description of the functional parts of the machine Capacity charts Set up and start up instructions Machine operation Scheduled maintenance Parts lists GENERAL NOTES...

Страница 4: ...out a symbol DANGER Indicates a hazardous situation which if not avoided will result in death or serious injury WARNING Indicates a hazardous situation which if not avoided could result in death or se...

Страница 5: ...loss of hearing Wear suitable hearing protective devices such as ear muffs or earplugs to protect against objectionable or uncomfortable loud noises BEWARE OF PINCH POINTS Keep hands and fingers away...

Страница 6: ...lways use common sense and exercise caution in the workshop If a procedure feels dangerous don t try it REMEMBER Your personal safety is your responsibility Dear Valued Customer All Baileigh machines...

Страница 7: ...ety goggles Wear a full face shield if you are producing metal filings 12 Do not overreach Maintain proper footing and balance at all times DO NOT reach over or across a running machine 13 Stay alert...

Страница 8: ...able Throat Depth 28 711mm Working Height 52 1321mm Length of Stroke Adjustment Variable from 1 4 3 4 6 35 19mm Power 240V 1 Phase 50Hz Motor 3hp 2 25kw Shipping Dimensions 48 x 48 x 96 1220 x 1220 x...

Страница 9: ...ge painted surfaces Follow manufacturer s label instructions when using any type of cleaning product After cleaning wipe unpainted metal surfaces with a light coating of quality oil or grease for prot...

Страница 10: ...o the floor Level the machine so that all the supporting feet are taking the weight of the machine and no rocking is taking place Follow these guidelines when lifting crane or hoist Always lift and ca...

Страница 11: ...in position prior to placing the machine The accuracy of any machine depends on the precise placement of it to the mounting surface FLOOR This machine distributes a large amount of weight over a smal...

Страница 12: ...ool All line connections should make good contact Running on low voltage will damage the motor In the event of a malfunction or breakdown grounding provides a path of least resistance for electric cur...

Страница 13: ...NGTH AMP RATING 25ft 50ft 100ft 1 12 16 16 14 13 16 14 12 12 17 20 12 12 10 21 30 10 10 No WIRE GAUGE An undersized cord decreases line voltage causing loss of power and overheating All cords should u...

Страница 14: ...ghly artistic operation It requires time and experience to become proficient at creating the desired results The best recommendation is to practice take notes experiment and seek out advice through te...

Страница 15: ...change release lever MUST be locked in the UP position before and during operation Operating the power hammer with the release lever in the lower position will damage the machines operating linkage 6...

Страница 16: ...and is more forgiving To shrink start feeding the metal in slowly controlling the shrink by your foot control slowing as you pull out not to flatten the edge too much 5 The hammer mode is also used fo...

Страница 17: ...und it Lubricate threaded components and sliding devices Apply rust inhibitive lubricant to all non painted surfaces Grease the fittings every month with two pumps from a standard grease gun Check for...

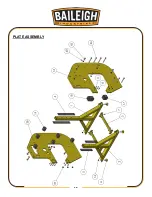
Страница 18: ...16 16 PLATE ASSEMBLY...

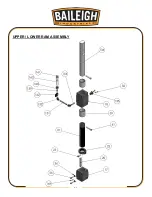
Страница 19: ...17 17 UPPER LOWER RAM ASSEMBLY...

Страница 20: ...18 18 SPROCKET ASSEMBLY...

Страница 21: ...19 19 SPRING ASSEMBLY...

Страница 22: ...20 20 LEVER ASSEMBLY...

Страница 23: ...21 21 SLIDE STROKE ASSEMBLY...

Страница 24: ...22 22 QUICK RELEASE ASSEMBLY...

Страница 25: ...23 23 V BELT ASSEMBLY POST...

Страница 26: ...24 24 GUARD AND CONTROL BOX ASSEMBLY...

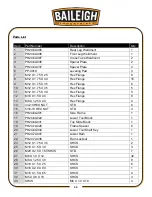
Страница 27: ...ange 5 12 M10 X 1 5 X 40 Hex Flange 8 13 M8 X 1 25 X 40 Hex Flange 4 14 3 4 10 HEX NUT STD 6 15 5 16 18 HEX NUT STD 4 16 PH24 6A001 Side Frame 1 17 PH24 6A022 Lower Tool Block 1 18 PH24 6A031 Top Slid...

Страница 28: ...Plate 1 48 PH24 7A033 Plate Spacer 4 49 MH19 7A005 V2 Crank Shaft 25 Offset 1 50 MH19 6A071 Crankshaft Key 1 51 PP 1778 56T Timing Pulley 1 52 PP 0828 Tapered Lock Bushing 2 53 PP 1692 Rubber Standoff...

Страница 29: ...50 Long 1 85 PP 1004 1 25 ID X 1 75 OD X 125 Thrust Washer 2 86 PH24 7A039 Toggle Block Shaft 1 87 PH24 6A028 Slide Block 2 88 PH24 6A050 Main Lever V2 1 89 PH24 7A014 Main Pivot Hub 1 90 PH24 7A015 M...

Страница 30: ...10 Spring Shaft 1 118 PH24 7A011 Threaded Spring Shaft 1 119 PP 0835 1 50ID X 1 75OD X 1 0 Bushing 6 120 PP 0143 1 25OD X 1 0ID X 1 25LG 2 121 PH24 7A029 Rocker Pin 1 122 M12 X 1 75 Jam Nut 2 123 PH24...

Страница 31: ...12 Button Head 7 153 M6 X 1 0 X 10 Button Head 18 154 PP 0587 1 4 X 2 Pipe 1 155 STD Straight Grease Zerk 13 156 PH24 6A056 Slide Stroke Guard 1 157 M5 X 0 8 X 10 PPMS 4 158 STD 40 Chain 2 159 PP 169...

Страница 32: ...Belt 2 177 STD 25 Lock Washer 3 178 PH24 5A010 Controller Stand 1 179 PP 1846 Leveling Foot 4 180 PP 1831 Control Box 1 181 5 16 18 Acorn Nut 4 182 PH24 6A049 V2 Spring Guard Version 2 1 183 PH24 7A0...

Страница 33: ...31 31 NOTES...

Страница 34: ...32 32 NOTES...

Страница 35: ...33 33...

Страница 36: ...34 34...

Страница 37: ...the off position before re connecting 14 Use correct amperage extension cords Undersized extension cords overheat and lose power Replace extension cords if they become damaged 15 Keep machine well ma...

Страница 38: ...anglement with moving parts 7 Understand the machines controls Make sure you understand the use and operation of all controls 8 Warning Labels Take note of any warning labels on the machine and do not...

Страница 39: ...entification Power Hammer STRIKING O Recommended for Purchase Buyer User Power hammer must be used with extreme precaution and in a controlled enviroment Assessment Hazard Risk Control Strategies Wear...

Отзывы: