background image


21 


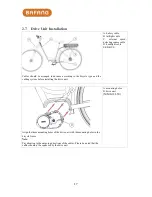
Figure 1 


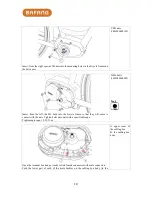
Figure 2 


Make  sure  that  the  cover's  bottom  is  fastened  onto  the  drive  unit's  bottom 
with screws after the cover's upper part buckles into the slot (see Figure 1). If 
brake  cables  and  gear  cables  are  to  be  arranged  under  the  drive  unit’s 
bottom, the cable gatherers can be fastened onto the cover's bottom and the 
drive unit’s bottom (see Figure 2) to limit the cables into the channel. . 


Tightening torque

1N.m


C. screw holes on the drive 
unit’s cover 
D. end cover on the right 
E. cable gatherers  
1401150100005 
F. 

cross 

head 

screw 

assembly M3*8 
(1401020000127) 


Tool: 


Содержание MM G31.250

Страница 1: ...1 Max Drive System User Manual Suzhou Bafang Electric Motor Science Technology Co Ltd www szbaf com...

Страница 2: ...DRIVE UNIT INSTALLATION 17 3 SYSTEM CABLING 23 3 1 LINK THE BATTERY CABLE TO THE DRIVE UNIT 23 3 2 LINK THE EXTERNAL SPEED DETECTING SENSOR TO THE DRIVE UNIT 23 3 3 LINK THE EB BUS TO THE DRIVE UNIT...

Страница 3: ...TCH 41 HEADLIGHT BACKLIGHT SWITCH 41 WALK ASSISTANCE MODE 42 BATTERY LEVEL INDICATION 42 6 5 PARAMETER SETTING 43 ITEMS TO BE SET 43 SETTING PREPARATION 43 DATA RESET 44 KM MILE 44 LIGHT SENSITIVITY 4...

Страница 4: ...uct Please consult the local sales office or an electric bicycle dealer for help Make sure to read all of the installation manuals delivered with the product Do not disassemble or modify the product u...

Страница 5: ...els are not securely installed the bicycle may fall over and serious injury may result When riding a pedal assisted electric bicycle make sure that you are fully familiar with the starting off charact...

Страница 6: ...er The product is designed to be fully waterproof to withstand wet weather riding conditions However do not deliberately immerse it into water Do not clean the bicycle in a high pressure wash If water...

Страница 7: ...following environmental conditions Ambient temperature 20 55 Relative humidity 15 95 RH Note The product can t work normally if there is any major corrosive gas any medium that affects the product s e...

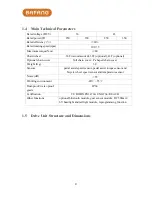
Страница 8: ...in cover P shaped chain cover Weight Kg 3 9 Sensors pedal assist speed sensor pedal assist torque sensor and bicycle wheel speed sensor and temperature sensor Noise dB 55 Working environment 20 55 Dus...

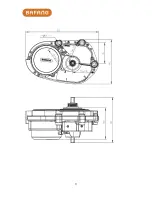
Страница 9: ...9...

Страница 10: ...nto the drive unit Cross screwdriver To fasten M6 bolts and nuts which are used to fix the frame adapter with the drive unit Internal hexagonal wrench To fasten the crank mounting screw M8 Internal he...

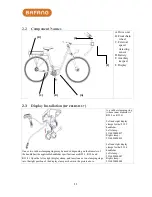
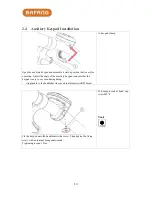
Страница 11: ...ndlebar specifications are 22 2 25 4 and 31 8 Open the left or right display clamp and insert one or two clamping rings into the right position of the display clamp as shown in the picture above A a r...

Страница 12: ...agonal wrench to fasten the left and right clamps onto the handlebar B display clamp C hexagon socket head cap screws M4 8 Adjust the angle of the display so that you can easily see the display screen...

Страница 13: ...of the auxiliary keypad to ensure that the keypad is easy to see seen during riding Applicable to the handlebar whose external diameter is 22 2mm A keypad clamp Fix the keypad onto the handlebar with...

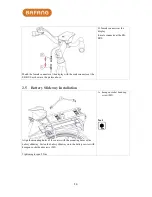
Страница 14: ...nector at the display h male connector at the EB BUS 2 5 Battery Slideway Installation Align the mounting holes of the carrier with the mounting holes of the battery slideway Fasten the battery slidew...

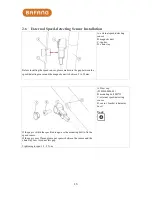
Страница 15: ...speed detecting sensor B magnetic unit C spokes D chain stay If the gap is within the specified range use the mounting bolt to fix the speed sensor If the gap is over 25mm please put spacers between...

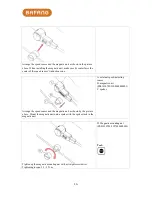
Страница 16: ...Arrange the speed sensor and the magnetic unit as shown by the picture above Mount the magnetic unit onto a spoke with the spoke stuck in the magnetic unit A external speed detecting sensor B magneti...

Страница 17: ...ry cable B taillight cable C external speed detecting sensor cable D headlight cable E EB BUS Align the three mounting holes of the drive unit with the mounting holes in the bicycle frame Note Pay att...

Страница 18: ...frame so that they will come to contact with the nuts Tighten bolts onto nuts with a specified torque Tightening torque 18 20 N m D M6 bolts 1401080000099 Tool Open the terminal box and get ready to...

Страница 19: ...ectors in the cabling box according to the cabling diagram printed on the upper cover of the cabling box see C in the picture above After matching all male connectors with female connectors cover the...

Страница 20: ...re arranged with the help of the two cable clips Please be noted that all cables must thread through the cable clips after going out of the cabling box Push the buckle on the drive unit cover into th...

Страница 21: ...cables and gear cables are to be arranged under the drive unit s bottom the cable gatherers can be fastened onto the cover s bottom and the drive unit s bottom see Figure 2 to limit the cables into th...

Страница 22: ...ve unit cover has been fixed onto it Brake cables and gear cables can either be arranged in the channel at the bottom of the drive unit see Figure 3 where cable gatherers are provided or within the in...

Страница 23: ...nnector for the positive cable at the battery b male connector for the positive cable at the battery C male connector for the negative cable at the drive unit c female connector for the negative cable...

Страница 24: ...dlight Cable to the Drive Unit Link the headlight cable to the connector for the headlight at the drive unit F female connector at the headlight cable f male connector for the headlight at the drive u...

Страница 25: ...th engaged with spline holes A chain wheel B retaining ring 1401010000026 Use a special tool to seize the retaining ring in the spline shaft slot of the drive unit Noted A used retaining ring cannot b...

Страница 26: ...guard 1325020000002 Chain Line 49mm Preferably 36 38T Applicable to a city or mountain bike with an external gearshift system integratable chain wheel guard 1325020000001 4 2 Chain Cover Installation...

Страница 27: ...n cover stick close to the boss on the outer side of the drive unit Then press the inner wall of the full chain cover with the binder plate and fasten them with screws Tightening torque 2N m A full ch...

Страница 28: ...erably 36 38T Applicable to a city bike which is equipped with an internal gearshift system and a full chain cover D chain wheel bushing block E chain wheel 1325020000001 Refer to the chain cover inst...

Страница 29: ...to the drive unit with screws Tightening torque 2N m A p shaped chain cover holder 1401220200003 B cross recessed pan head screw M4 1401020000111 Tool Install the chain wheel onto the appropriate posi...

Страница 30: ...30 Install the chain wheel onto the spline shaft Tool The figure above shows how a p shaped chain cover is mounted onto the drive unit D cross recessed pan head screw M5 E p shaped chain cover...

Страница 31: ...on Installation of cranks onto a bottom bracket where a chain cover is also mounted Fasten the right crank onto the bottom bracket on the right with a socket head cap screw M8 Install the left crank i...

Страница 32: ...ted Fasten the right crank onto the bottom bracket on the right with a socket head cap screw M8 Install the left crank in the same way Fastening torque 35 40N m A right straight crank 1327010000001 le...

Страница 33: ...t thoroughly before inserting it If the battery does not become fully charged after 6 hours of charging immediately unplug the battery from the outlet to stop charging and contact the place of purchas...

Страница 34: ...inals to get wet Doing so may cause overheating bursting or ignition of the battery Use the specified charger and observe the specified charging conditions when charging the battery Not doing so may c...

Страница 35: ...it as soon as possible If you do not charge the battery it will be damaged 5 2 Charge the Battery When using the battery for the first time check whether the battery has not run low due to transporta...

Страница 36: ...100 Light on Light off 5 4 Battery Health Indication Press the battery level display switch for a second to check how healthy the battery is Battery Health Indication Battery Health Condition 40 41 5...

Страница 37: ...battery pack from the tail of the carrier onto the slideway Make sure the battery is pushed to the right position on the slideway Note Please make sure the battery pack is locked to prevent it from dr...

Страница 38: ...and Dimensions Materials and Dimensions The shell is made of PC poly carbonate The liquid crystal interface is made of hard hardness acrylic 6 3 Function Overview and Key Definitions Function Overvie...

Страница 39: ...and accumulated distance TOTAL The displayable max distance is 99999 Fualt code prompt Walk assistance Parameter settings various parameters including mode wheel diameter speed limit etc can be set on...

Страница 40: ...lated distance TOTAL Distance indication it displays the information on distance according to the settings Key Definitions 6 4 Normal Operation On off Turn on the power Press and hold the on off key f...

Страница 41: ...ding speed MAXS km h and average riding speed AVG km h sequentially Mode Switch Interface Headlight Backlight Switch After pressing and holding the headlight key for 2 seconds both the backlight of th...

Страница 42: ...electric bicycle enters the state of walk assistance and the symbol WALK is displayed in the field of assistance mode Once the down key is released the electric bicycle will exit the mode of walk ass...

Страница 43: ...ration When the display is active pressing the mode key two times the interval between the two pressing actions should be shorter than 0 3 seconds the system will enter the MENU parameter setting stat...

Страница 44: ...ers the MENU state In this state the speed field displays tC and then also displays y after pressing the up key At this moment the temporary data including maximum speed MAXS average speed AVG and sin...

Страница 45: ...press the up or down key to display a figure between 1 to 5 The figure 1 represents the lowest backlight brightness while 5 indicates the highest backlight brightness After this setting press the mode...

Страница 46: ...of accumulated riding distance will flash for 4 seconds when the display is started up indicating the bicycle needs maintenance When the number of battery charge discharge cycles exceeds 100 can be c...

Страница 47: ...inch A wrong wheel diameter can lead to speed anomalies After this setting press the mode key for shorter than 0 3 seconds to enter the setting interface of speed limit change Speed Limit Change When...

Страница 48: ...ay will only show when entering the battery communication interface Information to be displayed on the interface of battery communication Information Displayed in the Speed Field Definition b01 curren...

Страница 49: ...is displayed in the field for speed display Overvoltage protection Check the battery voltage 08 is displayed in the field for speed display Motor hall signal cable fault Check the motor module 09 is...

Страница 50: ...50 Fault Alert Interface...

Страница 51: ...ht display clamp 231602040000 8 1 hexagon socket head cap screw 1 M3 8 hexagon socket head cap screw 2 M4 8 MM G31 250 Drive Unit Drive Unit Accessorie s Cabling box 140108000009 7 1 Cable clip 140130...

Страница 52: ...straight crank with a cover 132704000000 1 1 170mm Right straight crank optional 132701000000 1 1 170mm Left straight crank 132702000000 1 1 170mm Crank mounting screws 140102000010 9 2 M8 Cables Cab...

Страница 53: ...authorized by Bafang 7 Damage failure or loss caused by normal wear and tear Bafang reserves the right to repair or replace the components and is only responsible for repairing or replacing them In ca...

Отзывы: