background image

5

 Copyright © 2016, Baby Trend Inc., All Rights Reserved. Todos los derechos reservados. Tous droits réservés.

ASSEMBLY

 Copyright © 2016, Baby Trend Inc., All Rights Reserved. Todos los derechos reservados. Tous droits réservés.

6

ASSEMBLY

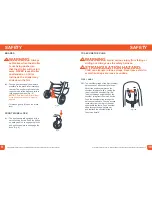
Remove stroller from box. The front and 

rear wheels 

MUST

 be installed prior 

to use.

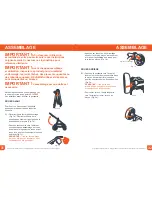
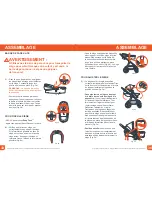
FRONT WHEELS


To attach the front wheels, unfold stroller as 

described in the following section:


1)

  • Unlock the release lever (Fig. 1a) and 

unfold stroller frame by pulling upward 

on the stroller handle until the frame 

locks (Fig. 1b).

• Lean the stroller backwards and push 

each front wheel assembly into the front 

wheel housing until they lock into place 

(Fig. 1c). 

NOTE:

 Pull on the wheel assembly to 

ensure that it is securely attached to the 

stroller. 

• Push release button on the side of the 

wheel hub and pull wheel assembly from 

hub (Fig. 1d).


IMPORTANT!

 To ensure safe operation of your 

stroller, please follow these instructions carefully. Please 

keep these instructions for future reference.

IMPORTANT!

 Before assembly and each use, 

inspect this product for damaged hardware, loose joints, 

missing parts or sharp edges. NEVER use if any parts are 

missing or broken.

IMPORTANT!

 Adult assembly is required.

Fig. 1a

Fig. 1b

Fig. 1c

Fig. 1d

Release Buttons

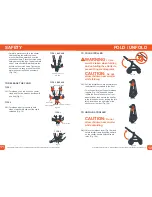
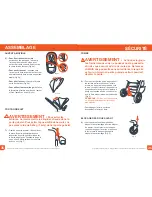
REAR WHEELS


2)


•  Lean the stroller forward and press the 

rear wheel post into the rear frame hub 

until it clicks into place (Fig. 2a).  

NOTE:

 Pull on the rear wheel to ensure 

that it is securely attached to the stroller.

• To remove, push tab inward and pull 

wheel from hub (Fig. 2b).

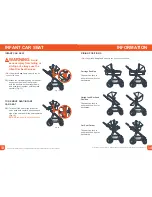
BUMPER BAR


WARNING:

 Do not 

use bumper bar to carry seat 

with child inside. The bumper 

bar is not a carrying handle.

3)

  •  Attach the bumper bar by lining up 

anchors with the slots on the seat. Push 

until it locks into place (Fig. 3a). 

NOTE:

 The bumper bar must be securely 

attached before using this product.


• To detach bumper bar, press the release 

button on the bottom of the bar and pull 

bar out of the anchor. Swing the bar 

upwards to access the seat (Fig. 3b).

Fig. 2a

Fig. 2b

Fig. 3b

Fig. 3a

Содержание TS53A

Страница 1: ...instalación es de la exclusiva responsabilidad del usuario final El Departamento de Servicio al Cliente puede ser contactado a 1 800 328 7363 Lunes a viernes entre 8 00am y 4 30pm PST Un numero de autorizacion es requerido antes de la devolución de los producto s a Baby Trend Garantia válida sólo en América del Norte GARANTIE NE PAS RETOURNER VOTRE PRODUIT AU MAGASIN VEUILLEZ CONTACTER BABY TREND ...

Страница 2: ...HAT YOU HAVE ALL THE PARTS FOR THIS MODEL BEFORE ASSEMBLING THE STROLLER ENGLISH 2 PARTS 2 WARNING 3 ASSEMBLY 5 SAFETY 9 FOLD UNFOLD 12 INFANT CAR SEAT 13 INFORMATION 14 ESPANOL 15 PIEZAS 15 ADVERTENCIA 16 MONTAJE 18 SEGURIDAD 22 PLEGAR DESPLEGAR 25 SILLITA PARA EL AUTOMÓVIL 26 INFORMACIÓN 27 FRANÇAIS 28 PIÈCES 28 AVERTISSEMENT 29 ASSEMBLAGE 31 SÉCURITÉ 36 PLIER DÉPLIER 39 SIÉGE D AUTO 41 INFORMAT...

Страница 3: ...azardous unstable condition The maximum weight that can be carried in the storage basket is 5 pounds 2 27kg The maximum weight that can be carried in the cup holder is 1 pound 0 45kg Excessive weight may cause a hazardous unstable condition to exist Be certain the stroller is completely opened and locked in place before allowing a child near the stroller Use of the stroller with a total weight mor...

Страница 4: ... please follow these instructions carefully Please keep these instructions for future reference IMPORTANT Before assembly and each use inspect this product for damaged hardware loose joints missing parts or sharp edges NEVER use if any parts are missing or broken IMPORTANT Adult assembly is required Fig 1a Fig 1b Fig 1c Fig 1d Release Buttons REAR WHEELS 2 Lean the stroller forward and press the r...

Страница 5: ...d an upper and lower adjuster Pull tight the upper adjuster for upright seating position Loosen the adjuster for a desired recline position Fasten the lower buckle for upright position and pull the excess strap through the plastic ring and secure in place with hook and loop Fig 5b Carriage Position Make sure the upper adjuster is fully loosened and the lower buckle is unbuckled to fully extend the...

Страница 6: ... FRONT WHEEL LOCK 9 The front wheels are equipped with a swivel locking device Push the button on each wheel up to engage the locks and push downward to disengage the locks Fig 9 Fig 8 Fig 9 TO SECURE THE CHILD WARNING Avoid serious injury from falling or sliding out Always use the safety harness STRANGULATION HAZARD Child can strangle in loose straps Never leave child in seat when straps are loos...

Страница 7: ...p until the clip is released Fig 12 Fig 10b Fig 10b Shoulder Strap Squeeze Waist Strap Crotch Strap Adjust for a snug fit TYPE 2 BUCKLE Adjust for a snug fit TYPE 1 BUCKLE Fig 11 Center Clasp TYPE 1 Fig 12 TYPE 2 TO FOLD STROLLER WARNING Care must be taken when folding and unfolding the stroller to prevent finger entrapment CAUTION Do not allow children near stroller while folding 13 Pull the stro...

Страница 8: ...oducts can be used on the frame 15 Attach the car seat by lining up the seat anchors on the side of the car seat with the anchors on the stroller frame and push them together until they lock securely Fig 15 TO REMOVE SEAT INFANT CAR SEAT 16 To take off the seat or the infant car seat push both center buttons on each side of the seat and lift the seat upwards Fig 16 DO NOT remove with child in the ...

Страница 9: ... debe ser prudente al plegar y desplegar el carrito para evitar que queden dedos atrapados Aprobado SOLAMENTE Snap TechTM productos pueden ser utilizados en el armazón PRECAUCIÓN Este carrito está diseñado para un niño solamente El uso con más de un niño podría provocar inestabilidad y lesionar o dañar a su hijo Los bolsos bolsas de compras paquetes bolsas de pañales o artículos accesorios podrían...

Страница 10: ...éstico o detergente suaves y agua tibia en una esponja o trapo limpio OTROS Verifique con frecuencia que su carrito no tenga tornillos sueltos piezas gastadas materiales o costuras rasgados Reemplace o repare las piezas conforme sea necesario Retire el carrito de la caja Antes del uso SE DEBEN instalar las ruedas delanteras las ruedas traseras RUEDAS DELANTERAS Para colocar las Ruedas Delanteras d...

Страница 11: ...TE Snap TechTM productos pueden ser utilizados en el armazón 4 Asegúrese de que la tela de la sillita esté sujeta al soporte para la sillita Si la tela de la sillita trae el zíper abierto envuelva la tela de la sillita por el soporte de la sillita Fig 4a y cierre el zíper de la tela Instale la sillita alineando las anclas que están a los lados de la sillita con las anclas del armazón del carrito y...

Страница 12: ... de 1 libra 0 45kg en la portavasos 7 Para colocar el portavasos deslice el gancho del portavasos sobre una de las lengüetas para portavasos en la barra de manubrio Presione hasta que se ajuste firmemente Fig 7 Fig 6b Fig 6c Fig 7 Fig 6a FRENOS ADVERTENCIA Siempre aplique los frenos cuando el carrito no esté siendo empujado para impedir que ruede fuera de su alcance NUNCA deje el carrito desatendi...

Страница 13: ...a cintura del niño y por encima de sus hombros Fig 10b PARA SOLTARLAS AL NIÑO TYPO 1 11 Para soltarlas presione el Botón en la presilla central para destrabar las dos Hebillas del Arnés Fig 11 TYPO 2 12 Para soltarlas presione el Botón en el Broche Central y se desprenderán las dos Hebillas del Arnés Fig 12 Fig 12 HEBILLA TIPO 2 Presilla central Fig 10b Fig 10b Correa del hombro Apriete Correa de ...

Страница 14: ...or encima del remache Fig 13b PARA DESPLEGAR EL CARRITO PRECAUCIÓN No permita que los niños se acerquen al carrito mientras lo despliega 14 Destrabe la palanca de liberación Fig 14a Despliegue el armazón del cochecito tirando hacia arriba del manubrio Fig 14b La barra se trabará cuando las patas estén completamente extendidas ADJUNTO DE LA SILLITA PARA EL AUTOMÓVIL ADVERTENCIA Evite una lesión gra...

Страница 15: ...as direcciones ya sea hacia adelante o hacia atrás Transporte Carruaje La sillita puede quedar mirando hacia cualquiera de las direcciones ya sea hacia adelante o hacia atrás Posición Vertical y Reclinada La sillita puede quedar mirando hacia cualquiera de las direcciones ya sea hacia adelante o hacia atrás Siège Roues avant Barre de pare choc Roues arrière Auvent Plateau pour adulte Veuillez vous...

Страница 16: ...rté dans le panier de rangement est de 2 27 kg 5 lb Le poids maximal pouvant être transporté dans le porte gobelet est de 0 45 kg 1 lb Le fait de soumettre l appareil à un poids excessif peut provoquer des conditions dangereuses ou instables Assurez vous que la poussette est complètement déployée et verrouillée en place avant de laisser un enfant s en approcher L utilisation de la poussette avec u...

Страница 17: ...solidement fixé à la poussette Bouton de Verrouillage Appuyez sur le bouton de verrouillage situé sur le côté du moyeu de roue avant et tirez sur l assemblage de roues pour le retirer du moyeu Fig 1d ROUES ARRIÈRE 2 Penchez la poussette vers l avant et insérez le crochet des roues arrière dans le moyeu du cadre arrière jusqu à ce qu elles s enclenchent en bonne position Fig 2a REMARQUE Tirez sur l...

Страница 18: ...on verticale Desserrez l ajusteur pour régler l inclinaison du siège dans la position inclinée souhaitée Attachez inférieur pour fixer le siège en position verticale tirez ensuite sur la sangle et passez la à travers l anneau de plastique afin de la bloquer en place de façon sécuritaire à l aide des fermetures à boucles et à crochets Fig 5b Position nacelle Assurez vous que l ajusteur supérieur es...

Страница 19: ...s ne poussez pas la poussette afin de vous assurer qu elle ne roule pas Ne laissez JAMAIS une poussette sans surveillance lorsqu elle est sur un terrain en pente puisque celle ci pourrait dévaler la pente PORTE GOBELET AVERTISSEMENT Pour éviter les brûlures ne jamais mettre les liquides chauds dans la porte gobelet Pour éviter la possibilité de basculer ne pas placer plus de 0 45kg 1 livre dans la...

Страница 20: ...ER DE STRANGULATION Un enfant peut s étrangler avec une sangle détachée Ne laissez jamais un enfant dans le siège lorsque les sangles sont desserrées ou détachées Asseyez délicatement l enfant dans le siège et placez le harnais de sécurité autour de la taille de l enfant et par dessus ses épaules Placez la sangle d entre jambe entre les jambes de l enfant Insérez l extrémité mâle de chaque sangle ...

Страница 21: ...a poussette de plusieurs centimètres vers l arrière de façon à ce que les roues avant soient positionnées vers l avant Pliez la poussette en appuyant sur les deux gâchettes Fig 13a et poussez la poignée vers le bas Assurez vous que les deux roues avant reposent à plat et repliez la poussette en bloquant le dispositif de verrouillage situé du côté droit de la poussette au dessus de la languette Fig...

Страница 22: ...UTO POUR BÉBÉ AVERTISSEMENT Afin d éviter des blessures graves causées par une glisse ou une chute toujours utiliser siège d auto pour bébé le harnais de sécurité SEULS des produits Snap TechTM approuvés peuvent être utilisés sur le cadre 15 Fixez le siège d auto en alignant les dispositifs d ancrage situés de chaque côté du siège avec les ancrages situés sur le cadre de la poussette et poussez le...

Отзывы: