background image

page 4

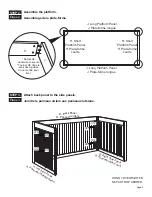
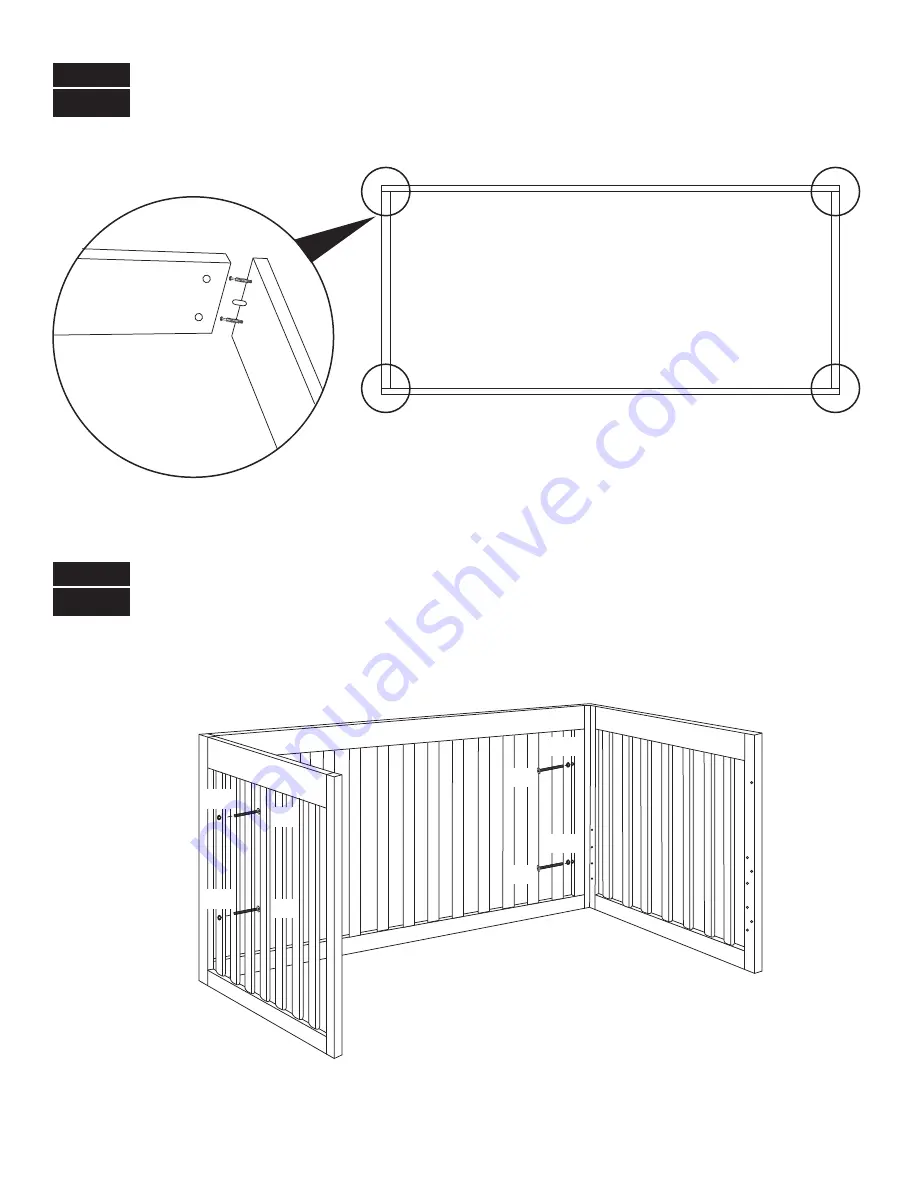
J. Long Platform Panel

J. Plate-forme longue

J. Long Platform Panel

J. Plate-forme longue

H. Short

Platform Panel

H. Plate-forme

courte

H. Short

Platform Panel

H. Plate-forme

courte

H

J

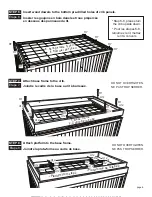
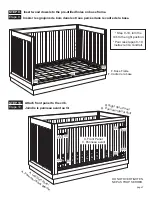
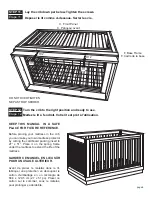
DO NOT OVERTIGHTEN.
NE PAS TROP SERRER.

Assemble the platform.
Assemblage de la plate-forme.

STEP 2.

Étape 2.  

Attach back panel to the side panels.
Joindre le panneau arrière aux panneaux latéraux.

STEP 3.

Étape 3.  

* Rotate H9

clockwise to secure

*Tourner H9 dans le

sens des aiguilles

d’une montre pour

fixer.

H3

H3

H3

H3

A. Left Side Panel

B. Right Side Panel

D. Panneau arrière

A. Panneau latéral gauche

B. Panneau latéral droit

D. Back Panel 

H12

H12

H12

H12

Содержание 8601K

Страница 1: ...en wrench included in the hardware box Do not use power screwdriv ers All of our cribs are made from natural woods Please understand that natural woods have color vari ations which are the result of nature and not defects in workmanship DO NOT SUBSTITUTE PARTS ALL MODELS HAVE THE SAME QUANTITY OF PARTS AND HARD WARE YOUR MODEL MAY LOOK DIFFERENT FROM THE ONE ILLUSTRATED DUE TO STYLISTIC VARIATIONS...

Страница 2: ...rière F Base Frame F Cadre de la base H Short Platform Panel 2 H Plate forme courte 2 J Long Platform Panel 2 J Plate forme longue 2 G 1 Left bracket 2 G 1 Support de gauche 2 G 2 Right bracket 2 G 2 Support de droite 2 not included Outils nécessaires non inclus Phillips screwdriver Tournevis cruciforme Tools Needed E Spring Frame Type II E Sommier de Type II PARTS PIÈCES ...

Страница 3: ...n Head Bolt 8 H3 Boulon Allen de 57 mm 2 1 4 po 8 H1 3 Round Head Bolt with Nut 8 H1 Boulon Allen de 76 mm 3 po 8 H2 1 1 4 Round Head Bolt 6 H2 Boulons à tête ronde de 32 mm 1 1 4 po 6 H4 1 3 4 Allen Head Bolt 4 H4 Boulon Allen de 44 mm 1 3 4 po 4 H7 Wood Dowel 16 H7 Goujon de bois 16 H8 Cam Bolt 8 H8 Boulon à came 8 H9 Cam Lock 8 H9 Verrou à came 8 H6 Washer 8 H6 Rondelles 8 H11 1 1 4 Allen head ...

Страница 4: ...ROP SERRER Assemble the platform Assemblage de la plate forme STEP 2 Étape 2 Attach back panel to the side panels Joindre le panneau arrière aux panneaux latéraux STEP 3 Étape 3 Rotate H9 clockwise to secure Tourner H9 dans le sens des aiguilles d une montre pour fixer H3 H3 H3 H3 A Left Side Panel B Right Side Panel D Panneau arrière A Panneau latéral gauche B Panneau latéral droit D Back Panel H...

Страница 5: ...ashers are fastened securely Une fois le sommier de type II E fixé au lit serrer les chapeaux de boulon H13 sous le sommier Vérifier le serrage de tous les boulons et rondelles Fixer le sommier de type II E LE CÔTÉ PLAT VERS LE HAUT Choisir sa hauteur Commencer au niveau supérieur puis ajuster la hauteur en fonction de la croissance de l enfant Boulonner le sommier E aux panneaux latéraux à l aide...

Страница 6: ...t STEP 6 Étape 6 DO NOT OVERTIGHTEN H1 H1 H1 H1 H1 F Base Frame H1 NE PAS TROP SERRER F Cadre de la base Attach base frame to the crib Joindre le cadre de la base au lit à barreaux STEP 7 Étape 7 H12 H12 H12 H12 H12 H12 DO NOT OVERTIGHTEN H2 H2 H2 H2 H2 H2 Platform from step 2 Plate forme de l étape 2 NE PAS TROP SERRER Attach platform to the base frame Joindre la plate forme au cadre de base STEP...

Страница 7: ...VERTIGHTEN NE PAS TROP SERRER Attach front panel to the crib Joindre le panneau avant au lit STEP 10 Étape 10 H7 H7 H7 Insert wood dowels to the pre drilled holes on base frame Step 9 10 turn the crib to the right position Pour les étapes 9 10 mettez le lit à l endroit F Base Frame F Cadre de la base Insérer les goujons de bois dans les trous percés dans le cadre de la base ...

Страница 8: ...r les vis GARDER CE MANUEL EN LIEU SÛR POUR UN USAGE ULTÉRIEUR Avant de placer le matelas dans le lit fabriquer une protection en découpant le carton d emballage en un rectangle de 68 6 x 129 5 cm 27 x 51 po Placer ce carton sur le sommier sous le matelas pour prolonger sa durabilité KEEP THIS MANUAL IN A SAFE PLACE FOR FUTURE REFERENCE Before placing your mattress in the crib you can make your ow...

Страница 9: ...ily com CAUTION ANY MATTRESS USED IN THIS CRIB MUST BE AT LEAST 27 1 4 INCHES 69CM BY 51 5 8 INCHES 131CM WITH A THICKNESS NOT EXCEEDING 6 INCHES 15CM ATTENTION TOUT MATELAS UTILISÉ DANS CE LIT DOIT MESURER AU MOINS 69 CM 27 1 4 POUCES PAR 131 CM 51 5 8 POUCES ET AVOIR UNE ÉPAISSEUR NE DÉPASSANT PAS 15 CM 6 POUCES ATTENTION TOUT MATELAS UTILISÉ DANS CE LIT DOIT MESURER AU MOINS 69 CM 27 1 4 POUCES...

Страница 10: ...s loose bolts or other fasteners missing parts or sharp edges before and after assembly and frequently during use Securely tighten loose bolts and other fasteners DO NOT use crib if any parts are missing damaged or broken DO NOT substitute parts Contact MDB FAMILY for replacement parts and instructional literature if needed DO NOT use a water mattress with this crib Parents should ensure a safe en...

Страница 11: ... un oreiller ou un édredon Ne jamais placer un coussin supplémentaire sous un nourrisson Pour réduire les risques de SMSN les pédiatres recommandent de placer les nourrissons en bonne santé sur le dos pour dormir sauf indication contraire de votre médecin Les cordons peuvent causer un étranglement Ne pas placer un objet muni d une ficelle autour du cou de l enfant tels que les cordons d un capucho...

Страница 12: ...orisateurs de produits chimiques sur de l acrylique Les meubles et accessoires acryliques distinctifs peuvent durer une éternité avec des soins et un entretien minimaux L entretien de l acrylique se limite à un nettoyage normal à l aide d un chiffon afin de conserver son apparence neuve Toutefois il faut prendre soin d éviter les égratignures L acrylique est aussi stable lorsqu il est exposé aux r...

Страница 13: ...ous entre prenez de refinir ce meuble sa garantie sera annulée L enregistrement de votre produit est plus facile que jamais Veuillez l enregistrer sur notre site Web à www themdbfamily com POUR COMMANDER DES PIÈCES DE RE CHANGE OU MANQUANTES VISITEZ NOUS À WWW THEMDBFAMILY COM OU CONTACTEZ NOUS PAR LA POSTE MDB FAMILY 855 WASHINGTON BLVD MONTEBELLO CA 90640 GARANTIE LIMITÉE D UN AN Nous remplacero...

Страница 14: ... the side panel posts using four Allen head bolts H4 and lock washers H12 The guard rail can be installed with the high end facing either to the left or the right Check to make sure that all of the bolts are fastened securely Do not overtighten K Guardrail K Balustrade page 14 Fixer la balustrade K aux montants des panneaux latéraux à l aide de quatre boulons Allen H4 et rondelles de blocage H12 L...

Страница 15: ...e items with a string cord or ribbon around a child s neck such as hood strings or pacifier cords DO NOT suspend strings over a toddler bed for any reason If guard rails are used as the mattress containment means guard rails provided must be used to avoid the formation of a gap between the mattress and the bed that could cause an entrapment Négliger de suivre ces avertissements et ces instructions...

Отзывы: