Famovy GmbH | Wittenberger Straße 44 | 25335 Elmshorn | Germany |
www.BabyBubu.de
+49 4121 8649400
www.facebook.com/BabyBubuWiege/
3
Mounting with original BabyBubu Baby
Hammock:
Please mount the suspension system as described in
the following text:
Tipp: The assistance of a second person is
recommended during mounting..
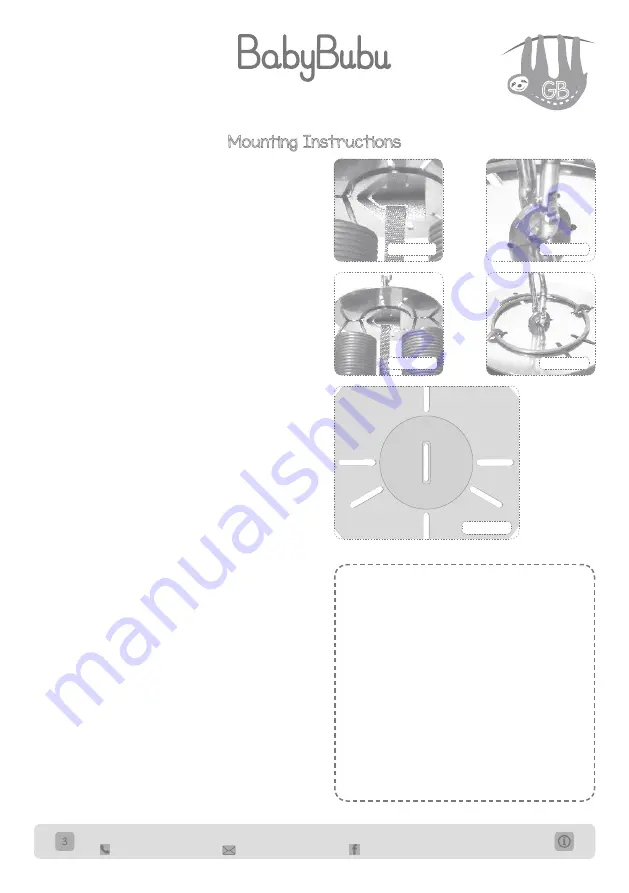
1. Pass the loop at the end of the safety rope through the
slot of the retainer hook (see picture 1).
2. Insert the eye of the retainer from the bottom to the slot
of the stabilisation plate.
3. Then put the base plate with its middle slots correctly on
the eye at the stabilisation plate.
4. Now fix the snap hook to the above projecting eye of the
retainer hook (see picture 2).
5. Now position the springs with their eyelets from
the bottom to the respective slots of the base plate
(see picture 3)
6. Once all springs are placed according to the given
marking, pass the mounting ring through all of the
projecting spring eyelets. The ring must be fully “closed“
after completion of mounting (see picture 5).
The upper part is now mounted. Mount the lower
part in the same way.
7. Pass the loop on the end of the safety rope, as it was
done on the upper side, through the slot of the second
retainer hook as you did with the upper side.
(see picture 1).
8. Insert the eye of the retainer, here as well, from the
bottom to the slot of the stabilisation plate.
9. Next put the base plate (see picture 3) with its middle
slot on the eye with the stabilisation plate as well.
10. Now fix the snap hook to the visible eye of the retainer
hook (see picture 2)
Picture 2
Important: Arrangement must be aligned with the
markings of the base plate ! (see picture 4)
Please note when using...
... two springs
– always arrange the springs
parallel to each other, according to marking “2“
(see Picture 4).
... three springs
– always arrange the springs
in the shape of a triangle, according to marking “3“
(see picture 4).
... four springs
– always arrange the springs
placed in a square, according to marking “4“
(see picture 4).
Picture 1
Picture 3
2
2
3
3
3
4
4
4
4
Picture 4
Picture 5
Mounting Instructions
GB


