background image

T

H

R

E

A

D

I

N

G

15

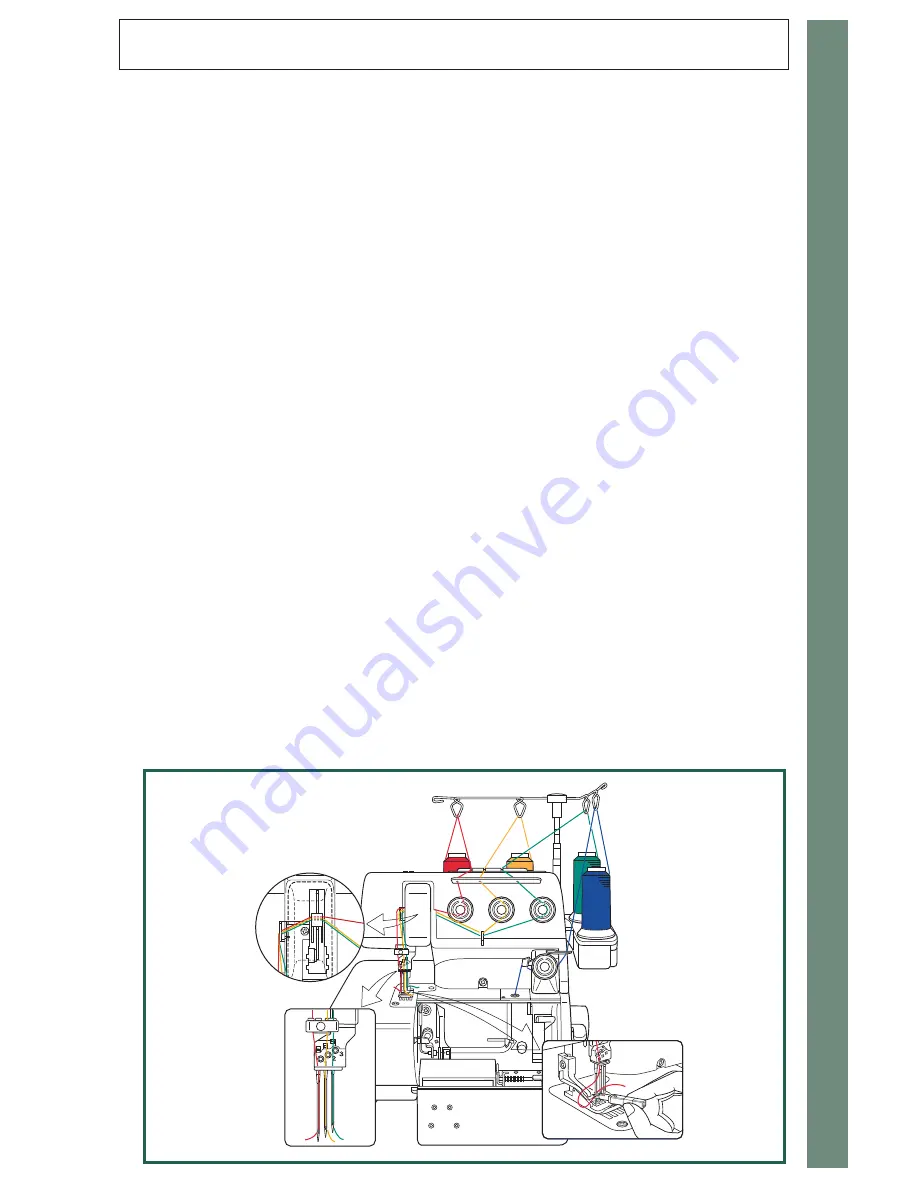
Left Needle C-1

1. Raise presser foot and place the thread on the far left spool pin.  Slip the thread into the tele-

scopic  antenna  thread  guide  directly  above  the  thread  spool.    See  drawings  below  for  refer-

ence.

2. Bring thread down from the telescopic antenna, snap thread into the red thread guide on the

top of the machine, and then down into the red hole above the tension dial.

3. Bring the thread down the right side of the red tension dial, under the dial and back up the

left side, making sure the thread is in the tension disk.

4. Bring the thread through thread guide at top of machine and down to the pre-tension thread

guide above the needle.

5. Pass the thread from the left side behind the pre-tension thread guide plate on needle clamp

and into thread guide above the needle.  See drawings below for reference. 

6. With the needle threader or tweezers in the accessory compartment, thread needle in the left

"C-1" needle position.

Center Needle C-2

1. Raise presser foot and place the thread on the second from the left spool pin.  Slip the thread

into the telescopic antenna thread guide directly above the thread spool. See drawings below

for reference.

2. Bring thread down from the telescopic antenna, snap thread into the yellow thread guide on

the top of the machine, and then down into the yellow hole above the tension dial.

3. Bring the thread down the right side of the yellow tension dial, under the dial and the thread

guide below the dial.

4. Bring the thread through thread guide at top of machine and down to the pre-tension thread

guide above the needle.

5. Pass the thread from the right side behind the pre-tension thread guide plate on needle clamp

and into thread guide above the needle.  See drawings below for reference. 

6. With the needle threader or tweezers in the accessory compartment, thread needle in the cen-

ter "C-2" needle position.

Right Needle C-3

1. Raise presser foot and place the thread on the back right spool pin.  Slip the thread into the

telescopic antenna thread guide directly above the thread spool.  See drawings below for refer-

ence.

2. Bring thread down from the telescopic antenna, snap thread into the green thread guide on

the top of the machine, and then down into the green hole above the tension dial.

3. Bring the thread down the right side of the green tension dial, under the green dial and under

the thread guide located below the yellow tension dial.

4. Bring the thread through thread guide at top of machine and down to the pre-tension thread

guide above the needle.

5. Pass the thread from the right side behind the pre-tension thread guide plate on needle clamp

and into thread guide above the needle.  See drawings below for reference. 

6. With the needle threader or tweezers in the accessory compartment, thread needle in the right

"C-3" needle position.

NOTE

:  

After threading the needles, the thread is then place to the left and top of the presser foot.

Chain / Cover Needles

Содержание Model BLCS

Страница 1: ...INSTRUCTION MANUAL Model BLCS...

Страница 2: ...op or insert any object into any opening 6 Do not use outdoors 7 Do not operate where aerosol spray products are being used or where oxygen is being administered 8 To disconnect turn the main switch t...

Страница 3: ...ading system makes threading the looper a breeze Speedy at 1300 stitches per minute BLCS allows you to complete hems quickly Other features including differential feed auto ten sion release when the p...

Страница 4: ...ot 10 Stitch Length 11 Differential Feed 11 Chain Cover Stitch Tension Dials 12 Needle Tension Dial 12 Chain Looper Tension Dial 12 THREADING 13 Threading Preparation 13 Threading Your Baby Lock 13 Lo...

Страница 5: ...ES 28 Turning Corners Chain Stitch 28 Turning Corners Cover Stitch 28 Flat Hemming Cover Stitch 29 Hemming in the Round Cover Stitch 29 Securing Chain and Cover Stitching 30 SPECIALTY THREADS 31 Using...

Страница 6: ...the chain needle thread catches the chain looper to form a straight stitch on the top of your fabric and thread chain loops on the underside Use 2 or 3 cover stitch needles and the chain looper to fo...

Страница 7: ...de cover 12 Front table 13 Handwheel 14 Carrying handle 15 Stitch length dial 16 Accessory compartment spool stand 17 Differential feed adjusting lever 18 Left needle tension dial 19 Center needle ten...

Страница 8: ...Accessory compartment Package of assorted sized needles 1 Accessory compartment Schmetz ELx705CF Allen screwdriver 1 Accessory compartment Tweezers 1 Accessory compartment Needle threader 1 Accessory...

Страница 9: ...gh the thread guides thread slots needles and loopers Important Note For maximum performance of the Baby Lock it is recommended to use 100 polyester long fiber thread Recommended brands are Maxi Lock...

Страница 10: ...off when the machine is not in use fig A Available foot controller for U S A Model YC 482 or YC 420W 3 Polarized plug This appliance has a polarized plug one blade wider than the other To reduce the r...

Страница 11: ...til each section clicks into a locked position fig B 6 Opening Front table To open the front table place your thumb against the tab and slide the cover to the right A slight pull toward you will allow...

Страница 12: ...lockwise To decrease pressure turn the screw counterclockwise The Baby Lock has the convenience of a snap on presser foot To Release 1 Raise the presser foot lever This will also lower the feed dogs o...

Страница 13: ...dogs move the same distance This is the setting to use for most fabrics and applications fig B When the dial is set above N the front feed dog will feed more fab rics than the back This is because the...

Страница 14: ...e sure to sew test after changing the settings O V E R V I E W 12 Needle Tension Dials From left to right the dials are Red for C1 chain needle Yellow for C2 chain needle and Green for C3 chain needle...

Страница 15: ...nge disks and spool cap C Thread net on thread Pulling thread through net Threading Your Baby Lock Your Baby Lock is equipped with an exclusive Instant Jet Air Threading System for fast easy threading...

Страница 16: ...on disk See fig A 4 Take the thread down to the chain looper threading port 5 Pull 18 inches 40cm of thread and insert 1 inch 10cm of thread into the chain looper thread ing port Use tweezers if neces...

Страница 17: ...ead down the right side of the yellow tension dial under the dial and the thread guide below the dial 4 Bring the thread through thread guide at top of machine and down to the pre tension thread guide...

Страница 18: ...late C 1 needle is 1 inch 2 5cm C 2 needle is 7 8 inch 2 25cm and C 3 needle is 3 4 inch 2cm This guide is great for hemming garments with cover stitch 1 Turn under hem and press 2 Align the raw edge...

Страница 19: ...2 or 3 stitches 5 Start to sew slowly 6 After the first few stitches stop and cut excess threads fig B 7 Start the next seam at the toe of the presser foot fig C 8 You only need to raise and lower the...

Страница 20: ...machine in locked position to thread the chain looper 2 Follow the diagram to thread the chain looper see page 19 Open side cover of machine to make sure the thread is through the eye of the chain lo...

Страница 21: ...al to a higher number Red yellow or green Or lower the chain looper tension dial to loosen the chain looper thread Blue Needle thread is too tight Loosen the chain cover needle thread tension dial to...

Страница 22: ...achine in locked position to thread the chain looper 2 Follow the diagram to thread the chain looper see page 21 Open the side cover of the machine to make sure the thread is through the eye of the lo...

Страница 23: ...to a higher number Red yellow or green Or decrease the tension on the chain looper tension dial to loosen the chain looper thread Blue Needle thread is too tight Loosen the tension by turning the chai...

Страница 24: ...titch 1 Place the machine in locked position to thread the chain looper 2 Follow the diagram to thread the chain looper see page 23 Open the side cover of the machine to make sure the thread is throug...

Страница 25: ...to a higher number Red yellow or green Or decrease the tension on the chain looper tension dial to loosen the chain looper thread Blue Needle thread is too tight Loosen the tension by turning the cha...

Страница 26: ...machine in locked position to thread the chain looper pg 13 2 Follow the diagram to thread the chain looper see page 25 Open the side cover of the machine to make sure the thread is through the eye o...

Страница 27: ...to a higher number Red yellow or green Or decrease the tension on the chain looper tension dial to loosen the chain looper thread Blue Needle thread is too tight Loosen the tension by turning the cha...

Страница 28: ...ion to thread the chain looper 2 Follow the diagram to thread the chain looper see pg 27 Open the side cover of the machine to make sure the thread is through the eye of the chain looper Trim thread t...

Страница 29: ...n dial to a higher number Red yellow or green Or decrease the tension on the chain looper tension dial to loosen the chain looper thread Blue Needle thread is too tight Loosen the tension by turning t...

Страница 30: ...itch A B C Turning Corners Cover Stitch Sew to the point in fabric where you want to turn a corner Stop the machine Turn the handwheel toward you counter clockwise until the needles are down in the fa...

Страница 31: ...k retailer A B A B C Flat Hemming Cover Stitch Hemming in the Round Cover Stitch 1 Sew all seams on the garment 2 Measure turn up and press the hem on garment 3 Stitch around the hem overlapping the h...

Страница 32: ...the chain stitch or cover stitch at the end of the seam bring the needle thread s to the back of the fabric and tug on the needle threads to secure the seam The cover stitch needle threads may also b...

Страница 33: ...Heavy weight Threads Lightweight threads such as rayon machine embroidery thread lingerie thread can easily be threaded on the Baby Lock Very fine monofilament threads may need threading assistance o...

Страница 34: ...the existing looper thread out of tube extending from the threading mechanism fig B Leave the thread in the loop er arm 5 Tie the specialty thread onto the regular thread with an overhand knot fig C P...

Страница 35: ...n 18 inch 40cm tail above the threading port 5 Place the straight end of the looper threading tool into the threading port Push the looper threading tool until the end comes out of the looper eye Open...

Страница 36: ...of serger thread and fold in half to form a thread cradle Insert the loose ends of the thread cradle into the port about 1 inch 2 5cm 6 Holding the cradle loop with left hand depress the threading lev...

Страница 37: ...r Stitch Left Narrow Right Narrow Wide 4 Thread Triple Cover Stitch COMMENTS Use in needle and chain looper Use in needle and chain looper Use in needle and chain looper Make sure to use soft pliable...

Страница 38: ...he correct Schmetz ELx705CF system Chain or Cover Stitching 1 Are the tensions too tight on the chain cover needles or the chain looper 2 Is the stitch length too short 3 Did you start the first stitc...

Страница 39: ...rrectly 8 Is the needle thread s in the correct tension disk Looper Threading Difficulties 1 Is the thread end in the threading port correctly 2 Is at least 1 inch 2 5cm of the thread end in the threa...

Страница 40: ...er stitch To Replace a Needle 1 Raise the needle to the highest position by turning the handwheel toward you 2 Using the allen screwdriver loosen the needle screw for the needle to be changed Screws a...

Страница 41: ...e 15W 240V Bayonet Type 1 For safety reasons unplug main power cord prior of replacing light bulb 2 Open front cover 3 Remove light bulb and replace bulb with the same type rated 15watts 110volts or 1...

Страница 42: ...e clamp 4 For easy access to the needle plate lock pin set screw raise needle clamp to its highest position fig A 5 Place allen screwdriver 1 5mm into allen screw and loosen needle plate pin holder sc...

Страница 43: ...esser Foot Snap On Foot Looper Chain Looper Needle System Organ ELx705CF 80 12 and 90 14 Number of Needles 3 C 1 C 2 C 3 Sewing Speed Up to 1500 s p m Machine Weight 7 3 kg 16 2bs Light Bulb 15W 110V...

Страница 44: ...nter needle tension dial Right needle tension dial Diff Feed Seam width 4 Thread C1 C2 C3 4 6 4 6 4 6 N 6mm C2 C3 3 Thread 3 5 4 6 4 6 3 0 4 0 2 Thread C1 C2 3 0 4 0 4 6 4 6 N 3mm 6mm N 4 6 3 5 3 5 4...

Отзывы: