background image


37 

5

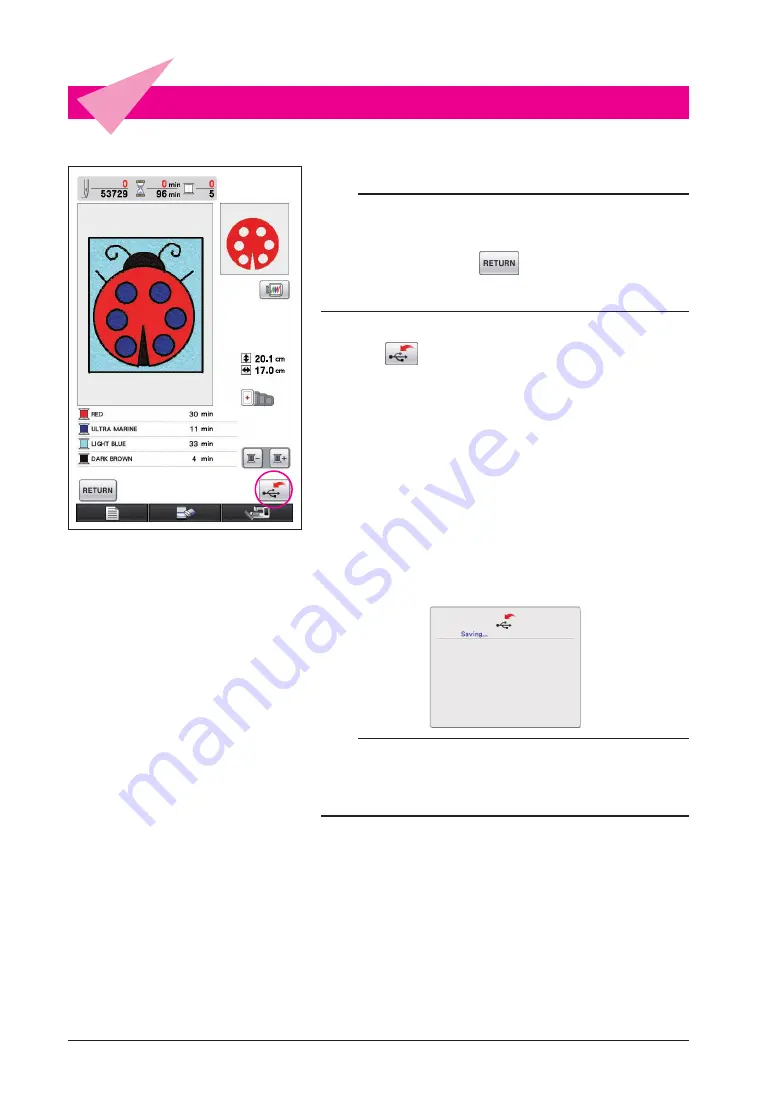
 Saving the Embroidery Data

The embroidery data can be saved on USB media.

Notes
•  Saved  embroidery  data  cannot  be  recalled  with  On  Screen 

Designer™. To recall data and edit it with On Screen Designer™, 
save  the  image  data  on  USB  media  before  converting  it  to 

embroidery data or press 

 after the conversion to return to 

the pattern drawing screen, and then save the image data on USB 
media. (Refer to “Saving Image Data” on page 42.)

1

  Press 

.

2

  The screen shown below appears. If the embroidery 

data  was  saved  successfully,  the  previous  screen 
automatically appears.

Notes
•  Do not turn off the machine while the [Saving] message is displayed, 

otherwise the embroidery data being saved may be lost. In addition, 
while saving the data onto USB media, do not try to remove the 
USB media, otherwise the USB media may be damaged.

Содержание Ellisimo Gold II

Страница 1: ......

Страница 2: ...not contain explanations on the operation of the sewing machine For details on using the sewing machine functions to edit embroidery patterns refer to the Instruction and Reference Guide for the sewin...

Страница 3: ...ith a pen Until now you could select various characters from those available combine them and then embroider the characters However now you can write your signature on the screen and then embroider it...

Страница 4: ...eets the following requirements Models BLSO BLSOG BLSOG2 Program KIT II certified The KIT II certification can be checked by pressing Settings key For more details refer to the Instruction and Referen...

Страница 5: ...ified for example the name contains special characters the names are not displayed If this occurs change the name of the file Do not create folders in USB media If embroidery data is stored in a folde...

Страница 6: ...The Software The sewing machine must first be set so that On Screen Designer can be started up Application Check on the settings screen must be set to ON If the sewing machine is turned on with USB me...

Страница 7: ...media that does not contain the application is inserted the home screen appears 5 Press the icon for the application On Screen Designer starts up Caution Do not turn off the machine or remove the USB...

Страница 8: ...tings screen 1 Adjusts the speaker volume Press and to adjust the speaker volume 2 Changes the display language Use and to choose the display language 3 Changes the thread color display thread brands...

Страница 9: ...atin stitches and the sewing direction of the fill stitches page 32 4 Converting the image data to embroidery data The embroidery data check screen appears page 35 5 Saving the embroidery data on USB...

Страница 10: ...selected Application Screens Pattern Drawing Screen When On Screen Designer is started up the following pattern drawing screen appears The pattern can be drawn in this screen 2 3 4 1 Key functions Ke...

Страница 11: ...ave been drawn 23 Fill key This key will highlight when the area thread color key is pressed and thread color selected 28 Area thread color key Press this key to select the color for an area to be fil...

Страница 12: ...n area is the size of the extra large embroidery frame 30 cm height 20 cm width The pattern moves to the center of the display area and the embroidery data is displayed 8 The names of the thread color...

Страница 13: ...t it changes to 2 From the point that will be the center of the circle drag the pen along the screen until the circle is the desired size 3 When the circle is the desired size remove the pen from the...

Страница 14: ...rmed is undone and the drawing reverts back to the same condition it was before that operation was performed Notes can be pressed at any time while the image is being drawn For example if a line is ac...

Страница 15: ...uch the last point to finish drawing the line A straight line is drawn connecting the last point to the previous point To draw straight lines that are connected 1 2 3 Each time you touch the screen wi...

Страница 16: ...ellipse is drawn with the starting point as the center the horizontal length of the line connecting the starting point and ending point as the horizontal radius and the vertical length of the line con...

Страница 17: ...cted the selection frame could not be drawn try drawing it again Touch the screen with the pen to erase the selection frame that was originally drawn and then draw a new selection frame After a select...

Страница 18: ...how to delete lines using Before deleting a line using press so that it changes to and then select the section to be deleted Refer to page 17 Lines can also be erased by selecting the key Refer to pa...

Страница 19: ...on frame with the pen and then drag the pen along the screen to move the selection 3 When the section is moved to the desired location remove the pen from the screen Notes If the section could not be...

Страница 20: ...t adjusting the operation sound volume 4 Touch inside the red frame selection frame with the pen and then drag the pen along the screen The copied section is moved to the desired location 5 When the s...

Страница 21: ...cannot be drawn perfectly Caution Do not try to fill an area with lines otherwise the drawing cannot be converted to embroidery data We will draw the pattern in the following order 9 Drawing a Straigh...

Страница 22: ...s drawn with the line connecting the starting point and the ending point as the diagonal An angled rectangle like the one shown at the right cannot be drawn 1 Starting point 2 Ending point 2 1 Use to...

Страница 23: ...on page 18 however to erase detailed sections or if the desired area cannot be surrounded by a selection frame press Use the appropriate method as necessary Erasing Lines Using 1 Press so that it cha...

Страница 24: ...he pattern in the pattern drawing area that you want to enlarge 3 The blue frame moves to the part of the pattern that was selected and that part is shown enlarged in the enlarged area Notes To change...

Страница 25: ...he number of drawing operations are limited Once this limit is reached the error message shown at the right appears and no operation other than pressing can be performed Once the drawing is finished a...

Страница 26: ...r of the lines in the pattern and changes to the selected color To quit selecting a color press The line color can also be selected before the line is drawn or while it is being drawn The color of the...

Страница 27: ...this example select red To quit selecting a color press Notes The color selected for the lines is not available in the palette of colors for the areas The color selected for the lines cannot be selec...

Страница 28: ...s filled with the color Notes Color can only fill an outlined area If the desired area is not filled with color or if an area that you did not want to fill with color is filled correct the lines Refer...

Страница 29: ...s also filled with the background color Because the drawing of the shape of ladybug is not completely enclosed we must search for the openings and close them 1 The color of this area is not correct 1...

Страница 30: ...ings If the stitching settings are not to be specified continue with the procedure described in 4 Converting to Embroidery Data on page 35 To erase the entire drawing and start a new one press All dat...

Страница 31: ...left appears 1 Reduces the size of the pattern The size of the drawn pattern can be changed Refer to page 34 2 Specifies the width of the satin stitches used to sew the lines of the drawing Refer to p...

Страница 32: ...0 5 mm A setting between 1 0 mm and 3 0 mm in 0 5 mm increments can be specified Setting examples 1 0mm 2 0mm 3 0mm 3 Specifying the Sewing Direction of Fill Stitches 1 Press or beside The default se...

Страница 33: ...ard 110 fine Notes It is recommended that a finer stitch density be selected if a detailed drawing is created If areas of the embroidery shrinks when a trial embroidery of the design is sewn specify a...

Страница 34: ...ress once to reduce the size to 70 Press again to reduce the size to 50 To return the size to the original size 100 press 3 Press The screen returns to the one displayed before the stitch settings scr...

Страница 35: ...cated to be converted to embroidery data Press to return to the pattern drawing screen and then correct the data In this screen the number of thread colors and the number of stitches in the created pa...

Страница 36: ...as it will be embroidered appears 1 Press these keys to display the pattern in the various sizes of embroidery frames The embroidery frames that appear in gray on the gray keys cannot be selected 2 Pr...

Страница 37: ...on to return to the pattern drawing screen and then save the image data on USB media Refer to Saving Image Data on page 42 1 Press 2 The screen shown below appears If the embroidery data was saved suc...

Страница 38: ...mount of space available To be able to save the embroidery data previously saved embroidery data must be deleted To quit saving press Deleting Saved Data 1 Press To change the USB media press 2 The fo...

Страница 39: ...n to be deleted 1 If a pattern is selected to be deleted the size of the data for the selected pattern is displayed 2 The page number for the displayed list and the total number of pages are displayed...

Страница 40: ...ed When saving onto USB media containing data other than embroidery data such as image data it may not be possible to save the new embroidery data even after embroidery data is deleted In this case pr...

Страница 41: ...s so that it changes to 5 Using the tablet pen slowly trace the picture Notes Working area of the pen tablet differs depending on performing functions of the sewing machine 1 Working area when using t...

Страница 42: ...edia containing pattern data other than those saved using this application Only pm7 and phc data can be used 2 Press If the pattern is displayed in the enlarged area the enlarged display will be cance...

Страница 43: ...as embroidery data and a list of image data does not appear even when is pressed When saving onto USB media containing data other than image data such as embroidery data and the new image data is not...

Страница 44: ...ber of pages are displayed 2 Each page of the list shows 15 image data To view the next page press To view the previous page press If there is only one page 1 and 2 do not appear To quit recalling pre...

Страница 45: ...it did when the application was started up Notes Before resetting the screen the currently displayed data is deleted Be sure to save any necessary data before resetting the screen Clearing The Screen...

Страница 46: ...turning the machine off then on again 1 Press 2 The following message appears 3 To close the application press To stop closing the application press 4 The home screen appears Notes Before closing the...

Страница 47: ...sted data Each arrow represents a shrinkage adjustment value 0 1 mm increments 1 Display in the pattern drawing screen the data with shrunken areas and then press The screen shown at the left appears...

Страница 48: ...ars when a pattern is being saved 2 This message appears when saved data will be deleted 3 This message appears when image data or embroidery data is being recalled 4 This message appears when a patte...

Страница 49: ...ppears while the USB media is transmitting 12 This message appears when you try to recall or save a pattern while no USB media is loaded 13 This message appears when you try to use incompatible media...

Страница 50: ...screen Create or edit your embroidery designs using the scale indicator effectively 1 1 Storage capacity indicator Notes Frequent use of freehand line drawing and erasing tends to cause high memory c...

Отзывы: