


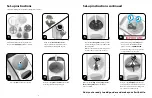


Powder Container Lid
Stirring Wheel
Locking Cover with Silicone Scraper
Measuring Wheel
Powder Container
Axle
Powder-Dispensing Hole
Control Panel
Base
Power Cord
(on back - not shown)
Drip Tray
For use with tall bottles,
a riser base is available for
purchase at babybrezza.com
Funnel
Water Tank
Water Tank Lid
Funnel Cover
Funnel Compartment
• Get a cup or bottle larger than 10oz and place it under the funnel.
• Press the “ounce” button on the control panel repeatedly until the LCD screen says “10oz”.
• Now press the “Start” button on the control panel. The Formula Pro® Mini will dispense 10oz of water.
• Dispose of the water dispensed, or use it to water your plants.
Attention:
Don’t take anything apart yet.
Follow these steps before doing anything else.
Now let’s rinse the inside of the machine.
Now you can turn off and unplug the machine,
remove all the parts shown on the next page and
set-up your new Formula Pro® Mini.
Formula Pro® Mini Parts
Disassemble and wash all parts (except the base) and
dry thoroughly. Assemble as shown on pages 5 & 6.
Never clean the Powder Container
in a dishwasher, sterilizer or microwave!
• Place the Formula Pro® Mini on the counter or other level surface and turn it around so the back is facing you.
• Remove the water tank and water tank lid from the back of the machine, wash it with warm soapy water,
rinse thoroughly, then dry.
• Fill water tank with bottled water suitable for infant formula preparation, or boiled water, cooled to room temperature.
• Place the full water tank and lid back on base, turn the machine around so the front is facing you and then plug it in.
The machine will turn on and the LCD screen will light up.
• The machine will beep once to tell you it’s powered on. You’ll also see the LCD display turn on. If the LCD screen is
not lit up when plugged in, press the power button to turn on the machine.
• Get familiar with the part names on the next page, then proceed with the set-up on the following pages.
4
3