background image

BLUETOOTH

10

PAIRING CONNECT

Turn on car unit, put your mobile near the unit, and activate your mobile Bluetooth function. Soon 

the phone will find the new Bluetooth device "CAR AUDIO”.
Input the pairing password “8888” and click OK. The phone will prompt the matching success

-

ful. When the pairing connect is successful, on the LCD, it shows BT ON, and the Bluetooth logo 


will stop blinking .Then you may perform the Bluetooth operation.

REMARK: depend on Bluetooth mobile, the Bluetooth system support “HSP” “HFP” “A2DP” and 

AVRCP Bluetooth profile.
Handsfree phone service
If your mobile phone has matched with the unit, you can dial calls out through your mobile 
phone. It will turn to unit automatically when calling come in and the calling phone number will 
indicate on the LCD screen.

-Press the “BAND” button shortly to accept the call .Then you can talk with the other party 

through the mic on the panel.

-Press “MUTE” button shortly to reject the call when calling come in.
-Press “MUTE” button shortly to hang up after you finish the talk.

Advance Audio distributing profile (A2DP) playing.
Through mobile and unit A2DP connected, the music playing in mobile can turn to the unit audio 
system play. Press button   and 

 i

n the panel can select the music track.

-Press “

” button shortly to pause the music playing.

-Press “BAND” (mode) longly to temporarily disconnect the Bluetooth.
-Press “BAND” (mode) button longly again to reconnect the Bluetooth.
-Press “  ” button shortly to pause the music playing.
-Press “BAND” (mode) longly to temporarily disconnect the Bluetooth.
-Press “BAND” (mode) button longly again to reconnect the Bluetooth.

Phone number book.
This Bluetooth system can automatically store incoming call numbers, up to 10 phone numbers.

-Press “MUTE” (mode) button longly to enter the phone number book and press VOL button to 

look up the phone number.

-Press “BAND” button once can call out you desired phone number.

Interrupt Bluetooth connection/reconnection.

Pressing the “BAND” button shortly to interrupt the Bluetooth connection when you are talking a 

call and the voice can turn to mobile speaker.

Press “BAND” button again to reconnection.

NOTE: Different mobile phone has different responses. We do not guarantee all the operation of 
connectable devices.
How to delete stored phone number?
The unit can store ten number of missed, rejected and ANS separately,
and the first number will auto deleted when the 11th number calling

How to use “Missed”, Rejected” Auto ANS” Functions.
Press MUTE button for 3 seconds to enter into RECEIVED /MISSED/REJECTED/ AUTO .ANS .Turn 

VOL button for choosing the telephone number.

Содержание DV 8512

Страница 1: ...MOBILE ENTE RTAINMENT SY ST EM INSTRUCTIONS MANUAL DV 8512 CAR DVD MP4 PLAYER www b52audio com INSTRUCTIONS MANUAL 02 25 MANUAL DE INSTRUCCIONES 27 50 Manual de Instru es 52 75 ENGLISH...

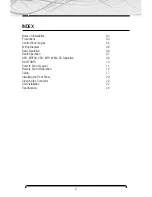
Страница 2: ...ing Diagram 06 Basic Operation 06 Radio Operation 07 DVD MPEG4 VCD MP3 WMA CD Operation 08 BLUETOOTH 10 Remote Control Layout 11 Remote Control Operation 12 Setup 17 Installing the Front Panel 20 Clea...

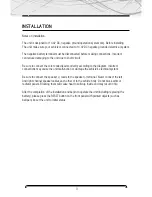
Страница 3: ...o the diagram Incorrect connections may cause the unit malfunction or damage the vehicle s electrical system Be sure to connect the speaker leads to the speaker terminal Never connect the left And rig...

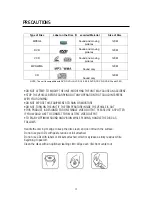
Страница 4: ...HILE PLAYING HANDLE THE DISC AS FOLLOWS Handle the disc by its edge to keep the disc clean and do not touch the surface Do not use your CDs with paste residue or ink attached Do not use CDs with label...

Страница 5: ...ime Display Adjustment 7 Mode Switch 8 Remote Control Sensor 9 Band Button 20 USB socket 10 Tuning Selecting Tracks 11 LOC DX Selector 12 MO ST Selector 13 Preset Stations AMS 14 Number Button 15 Ejec...

Страница 6: ...ss Tre BAL L R Selector 3 For Volume Control 3 rotate VOL knob clockwise to increase the sound level and anticlock wise to decrease the sound level Repeatedly press 3 button to select the desired mode...

Страница 7: ...r 5 seconds or press the button again Time Adjusting Press and hold the button until the clock stop blinking you can rotate 3 knob to adjust hours Then press the 3 button once you can rotate the knob...

Страница 8: ...Automatically Press 13 button to scan each stored station for 5 seconds respectively which stored in 14 1 6 number buttons When AMS mode is carrying out INT appears on display You also can press the...

Страница 9: ...to stop repeat mode for MP3 and WMA playing mode Scanning Track Automatically During CD playback press 2INT button to play the first 10 seconds of each track on the disc the display will show INT tra...

Страница 10: ...ress button and in the panel can select the music track Press button shortly to pause the music playing Press BAND mode longly to temporarily disconnect the Bluetooth Press BAND mode button longly aga...

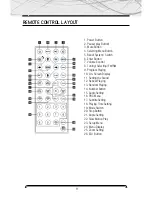
Страница 11: ...Control 8 Tuning Selecting FW RW 9 Program Playing 10 On Screen Display 11 Setting the Sound 12 Repeat Playing 13 Random Playing 14 Number Button 15 Audio Setting 16 PBC Menu 17 Subtitle Setting 18 Pl...

Страница 12: ...tton Press 1 button to turn power On Off Pause Play Button Press 2 button to suspend the playback of CD MP3 WMA VCD and DVD Press it again to return to normal playback mode Mute Button Press 3 button...

Страница 13: ...ter programming page Press 4 button and 14 numbers button to program the tracks to be played NOTE ST will only work on Radio mode On Screen Display During DVD VCD and CD mode press 10 OSD button The d...

Страница 14: ...avorite track by using number button 14 10 To cancel PBC playing press 16 PBC button again During DVD mode when press 16 PCB button to show all tracks title on TV screen Subtitle Selector During DVD m...

Страница 15: ...trol in the stop mode Press the STOP button twice to ensure the player is under STOP mode 2 The main page of setup menu is displayed 3 Select the preferred item by using the 4 button 4 Press 6 ENTER b...

Страница 16: ...press NUMBER BUTTONS directly to select your favorite picture files or move the arrow on that file and press ENTER button Then the picture will be displayed on the monitor by pressing you can adjust...

Страница 17: ...right edges are cut off 2 4 3 LB Played in back in LETTERBOX style If connected to wide screen TV black bands appear at top and button of the screen 3 16 9 Select when a wide screen TV set is connecte...

Страница 18: ...llowing when children under 13 are forbidden to view Rating 5 PG R Select this when the PG R was printed on the DVD disc Rating 6 R Select this when children under 17 must be guide to view by their pa...

Страница 19: ...19 SETUP This is to activate the audio output from ANALOG OPTICAL mode to SPDIF RAW mode or SPDIF PCM mode C AUDIO SETUP SPDIF OFF Analog or optical output port all has not output signal...

Страница 20: ...ier you connected must have the decode function of Dolby Digital DTS or MPEG This is for the user to set Brightness Contrast Hue and Saturation of the picture by pressing the arrow left right button P...

Страница 21: ...e user to set operation mode dynamic range compression and stereo mode To set the operating modes for Dolby Digital decoder To set the stereo mode To set the dynamic range compression e Sharpness c Du...

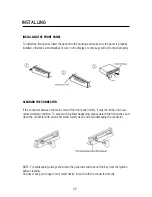
Страница 22: ...he connector between the main unit and the front panel is dirty it may result the unit in ab normal working condition To avoid such problem happening please detach the front panel and clean the connec...

Страница 23: ...rnillos del soporte y los agujeros de la unidad se encuentren alineados y ajuste los tornillos en dos lugares en cada lado Utilice tornillos de 5x5 mm o de 4x5 mm 2 Tornillo 3 Tablero o consola MONTAJ...

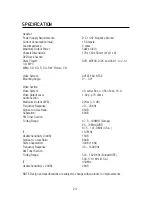
Страница 24: ...an Scan 16 9 Video Output Level 1 0V p p 75 ohms Audio Section Maximum Output LEVEL 2Vrms 3 dB Frequency Response 20 20 KHz Signal to noise Ratio 65dB Separation 60dB FM Tuner Section Tuning Range 87...

Страница 25: ...25 NOTE...

Страница 26: ...E ENTE RTAINMENT SY ST EM DV 8512 Reproductor de DVD y MP4 para autom vil www b52audio com INSTRUCTIONS MANUAL 02 25 MANUAL DE INSTRUCCIONES 27 50 Manual de Instru es 52 75 MANUAL DE INSTRUCCIONES ESP...

Страница 27: ...s b sicas 31 Funcionamiento de radio 32 Funcionamiento de DVD MPEG4 VCD MP3 WMA CD 33 BLUETOOTH 35 Diagrama de control Remoto 36 Funciones del Control Remoto 40 Configuraci n 42 Instalaci n del Panel...

Страница 28: ...conexiones incorrectas pueden causar el mal funcionamiento del equipo o pueden da ar el sistema el ctrico del autom vil Aseg rese de conectar el cable del parlante a la terminal Nunca conecte los cabl...

Страница 29: ...ptimas durante la reproducci n tome los discos de la siguiente manera Tome el disco por el borde para mantenerlo limpio y no toque la superficie No utilice discos de CD con residuos pastosos o con tin...

Страница 30: ...o Display Ajuste 7 Tecla Modo 8 Sensor de Control Remoto 9 Banda Enchufe 20 USB 10 Sintonizaci n Selecci n de Pistas 11 Selector LOC DX 12 Selector MO ST 13 Estaciones preconfiguradas AMS 14 Botones N...

Страница 31: ...para apagarla Selector Vol bass Tre BAL Izquierdo Derecho 3 Para control de Volumen 3 gire la perilla VOL en sentido horario para aumentar el nivel de sonido y en sentido contrario para disminuir el n...

Страница 32: ...n Ajuste de tiempo Presione y mantenga presionado el bot n hasta que el reloj deje de titular y gire la perilla 3 para ajustar la hora Luego presione el bot n 3 una vez y gire la perilla para ajustar...

Страница 33: ...t n num rico correspondiente o el bot n AMS para cambiar la estaci n deseada Luego comenzar a reproducir la nueva estaci n Presione y mantenga el bot n 13 por m s de 3 segundos para activar la funci n...

Страница 34: ...imeros segundos de cada pista El display mostrar INT el n mero de pista y el tiempo transcurrido lo que indica que la funci n INT ya est activada Presione el bot n 2INT una vez m s para volver al modo...

Страница 35: ...a hacer una pausa en la reproducci n de m sica Presione el bot n BAND modo por varios segundos para desconectar temporalmete el Bluetooth Presione el bot n BAND modo por varios segundos nuevamente par...

Страница 36: ...roducci n programada 10 Display en pantalla 11 Configuraci n de sonido 12 Repetici n de reproducci n 13 Reproducci n al azar 14 Bot n num rico 15 Configuraci n de audio 16 Menu PBC 17 Configuraci n de...

Страница 37: ...on to turn power On Off Bot n Pausa Reproducci n Presione el bot n 2 para suspender la reproducci n de CD MP3 WMA VCD y DVD Presione nuevamente para volver al modo de reproducci n normal Bot n MUDO Pr...

Страница 38: ...para programar las pistas a reproducir NOTA ST solo funcionar en el modo Radio Display en pantalla Durante el modo DVD VCD y CD presione el bot n 10 OSD El display mostrar la pista cap tulo tiempo ac...

Страница 39: ...6 PBC nuevamente Durante el modo DVD cuando presione el bot n 16 PCB se mostrar n los t tulos de todas las pistas en la pantalla de TV Selector de subt tulos Durante el modo DVD presione el bot n SUB...

Страница 40: ...ductor se encuentre en el modo de detenci n 2 Se muestra la p gina principal del men de configuraci n 3 Seleccione el tem deseado utilizando el bot n 4 4 Presione el bot n 6 INGRESAR A Configuraci n d...

Страница 41: ...ivos de imagen favoritos o mueva las flechas en ese archive y presione el bot n ENTER Luego se mostrar la imagen en el monitor y presione para ajustar los diferentes ngulos para disfrutar mejor de la...

Страница 42: ...2 4 3 LB Reproduce en LETTERBOX Si se conecta a un TV wide screen aparecer n bandas negras en la parte superior e inferior de la pantalla 3 16 9 Seleccione cuando un set de television wide screen est...

Страница 43: ...leccione este nivel cuando los ni os menores de 13 no puedan ver el programa Nivel 5 PG R Seleccione este nivel cuando aparezca PG R impreso en el disco DVD Nivel 6 R Seleccione este nivel cuando los...

Страница 44: ...NFIGURACIoN Esto es para activar la salida de audio de modo ANALOGO OPTICO para modo SPDIF RAW o SPDIF PCM CONFIGURACI N DE AUDIO SPDIF APAGADO La salida de puerto An loga u ptica no tiene se al de sa...

Страница 45: ...nci n de decodificaci n de Dolby Digital DTS o MPEG Esto es para que el usuario configure el con traste de brillo Hue y saturaci n de la imagen presionando el bot n tipo flecha izquierdo dere cho Pres...

Страница 46: ...modo de operaci n compresi n del rango din mico y el modo est reo Para configurar el modo de operaci n para Grabador Dolby Digital Para configurar el modo est reo Para configurar la compresi n del ra...

Страница 47: ...DEL CONECTOR Si el conector entre la unidad principal y el panel delantero est sucio puede causar que la unidad no funcione adecuadamente Para evitar que suceda dicho problema retire el panel delante...

Страница 48: ...los tornillos agujeros del soporte y los agujeros para tornillos de la unidad principal se encuentren alineados y ajuste los tornillos en dos lugares en cada lado Utilice tanto tornillos truss 5 x 5m...

Страница 49: ...Nivel de Salida de Video 1 0V p p 75 ohms Secci n de Audio NIVEL de salida M ximo 2Vrms 3 dB Respuesta de frecuencia 20 20 KHz Indice se al ruido 65dB Separaci n 60dB Secci n Radio FM Rango de sinton...

Страница 50: ...50 NOTAS...

Страница 51: ...LE ENTE RTAINMENT SY ST EM DV 8512 Reprodutor de DVD e MP4 para autom vel www b52audio com INSTRUCTIONS MANUAL 02 25 MANUAL DE INSTRUCCIONES 27 50 Manual de Instru es 52 75 MANUAL DE INSTRU OES PORTUG...

Страница 52: ...o 56 Fun es b sicas 57 Funcionamento do r dio 57 Funcionamento do DVD MPEG4 VCD MP3 WMA CD 58 BLUETOOTH 60 Diagrama do controle Remoto 61 Fun es do Controle Remoto 62 Configura o 67 Instala o do Paine...

Страница 53: ...m o diagrama As conex es incorretas podem causar o mal funcionamento do aparelho ou danificar o sistema el trico do autom vel Verifique a conex o dos cabos do alto falante com o terminal Nunca conecte...

Страница 54: ...ons e imagens timas durante a reprodu o segure os discos da seguinte forma Segure o disco pela borda para mant lo limpo n o tocando sua superf cie N o utilize discos de CD com res duos pastosos ou com...

Страница 55: ...empo Display Ajuste 7 Tecla Modo 8 Sensor de Controle Remoto 9 Banda Plugue 20 USB 10 Sintoniza o Sele o de Faixas 11 Seletor LOC DX 12 Seletor MO ST 13 Esta es pr configuradas AMS 14 Bot es Num ricos...

Страница 56: ...dispositivo Pressione o novamente para desligar Seletor Vol bass Tre BAL Esquerdo Direito 3 Para controlar o Volume 3 gire a chave VOL no sentido hor rio para aumentar o n vel de som e no sentido cont...

Страница 57: ...ot o para ajustar os minutos Ap s finalizar com o ajuste do tempo pressione o bot o 6 para confirmar a configura o de hora Seletor de Modo Pressione o bot o 7 para selecionar o modo Radio Disc USB SD...

Страница 58: ...foram armazenadas nos bot es num ricos 14 1 6 Quando estiver em modo AMS aparecer a palavra INT no display Tamb m pode pressionar o bot o num rico correspond ente ou o bot o AMS para trocar de esta o...

Страница 59: ...INT para reproduzir os 10 primeiros segundos de cada faixa O display mostrar INT o n mero de faixa e o tempo decorrido Isso indica que a fun o INT est ativada Pressione novamente o bot o 2INT para vol...

Страница 60: ...sione o bot o para pausar a reprodu o de m sica Pressione o bot o BAND modo durante v rios segundos para desconectar temporariamente o Bluetooth Pressione novamente o bot o BAND modo durante v rios se...

Страница 61: ...e o FW RW 9 Reprodu o programada 10 Display na tela 11 Configura o de som 12 Repeti o de uma reprodu o 13 Reprodu o aleat ria 14 Bot o num rico 15 Configura o de udio 16 Menu PBC 17 Configura o de sub...

Страница 62: ...ressione o bot o 1 para ligar desligar o aparelho Bot o Pausa Reprodu o Pressione o bot o 2 para suspender a reprodu o de CD MP3 WMA VCD e DVD Pressione novamente para retornar ao modo normal de repro...

Страница 63: ...ra programar as faixas a reproduzir NOTA ST somente funcionar no modo R dio Display na tela Durante o modo de DVD VCD e CD pressione o bot o 10 OSD O display mostrar faixa cap tulo tempo atual NOTA Du...

Страница 64: ...mente o bot o 16 PBC para cancelar a reprodu o PBC No modo DVD e ao pressionar o bot o 16 PCB aparecer o os t tulos de todas as faixas na tela de TV Seletor de subt tulo Pressione o bot o 17 SUB T dur...

Страница 65: ...reprodutor est no modo de pausa 2 Poder visualizar a p gina principal do menu de configura o 3 Selecione o item desejado utilizando o bot o 4 4 Pressione o bot o 6 INGRESSAR A Configura o de sistema E...

Страница 66: ...onar seus arquivos de imagem favoritos ou movimente as setas nesse arquivo e pressione o bot o ENTER Depois a imagem aparecer no monitor e pressione para ajustar os diferentes ngulos para desfrutar me...

Страница 67: ...querda e direita 2 4 3 LB Reproduz em LETTERBOX Ao ser conectado a uma TV wide screen faixas pretas aparecer o na parte superior e inferior da tela 3 16 9 Selecione quando um set de televis o wide scr...

Страница 68: ...cione este n vel quando crian as menores de 13 n o possam ver o programa N vel 5 PG R Selecione este n vel quando apare a PG R impresso no disco DVD N vel 6 R Selecione este n vel quando as crian as m...

Страница 69: ...69 CONFIGURA aO para ativar a sa da de udio no modo AN LOGO PTICO para modo SPDIF RAW ou SPDIF PCM C CONFIGURA O DE UDIO SPDIF DESLIGADO A sa da de porta an loga ou ptica n o possui sinal de sa da...

Страница 70: ...fun o de decodifica o de Dolby Digital DTS ou MPEG CONFIGURA O DE V DEO Para o usu rio configurar o contraste de brilho Hue e satura o de imagem pressionando o bot o tipo seta esquerdo direito Pressio...

Страница 71: ...odo de opera o a compress o do n vel din mico e o modo est reo Para configurar o modo de opera o para Gravador Dolby Digital Configura o modo est reo Configura a compress o do par metro din mico e Sha...

Страница 72: ...DO CONECTOR Se o conector entre a unidade principal e o painel frontal estiver sujo pode causar que a uni dade n o funcione adequadamente Para evitar esses problemas retire o painel frontal e limpe o...

Страница 73: ...rif cios para parafusos do dispositivo fiquem alinhados e ajustar os parafusos em dois lugares a cada lado Utilize tanto parafusos truss 5 x 5mm como parafusos de superf cie alinhados 4 x 5mm 2 Parafu...

Страница 74: ...N vel de Sa da de V deo 1 0V p p 75 ohms Se o de udio N VEL de sa da M ximo 2Vrms 3 dB Resposta de frequ ncia 20 20 KHz ndice sinal ru do 65dB Separa o 60dB Se o R dio FM Par metro para sintoniza o 8...

Страница 75: ...75 NOTA...

Отзывы: