background image

b4 Adventure 4010 Holly Street Unit 16 • Denver Colorado 80216 • 1-844-834-4334 QUESTIONS?  

[email protected] · www.b4adventure.com 303-339-0482  - DC:080818

9

6. FINAL TUNING

• After the Course Speed Test, your zipline cable may “stretch” slightly (this is normal) and require some 
additional tightening by loosening your U-Clamps, pulling the slack out (Remember to have your 2 
helpers with brooms lift and support the cable and trolley while you are pulling out the slack) and then 
re-tightening the U-Clamps
• Check the tightness of all nuts and bots of all clamps and the trolley.
• Always walk the area and remove any rocks, debris, or other objects that might cause harm to the 
rider. NEVER assume that the course is clear, check it before each use.
• If you have extra cable at the end of your setup you must either coil up carefully the extra cable and 
clamp and place a piece of tape on the cut end to prevent possible injury.
• Check the rope knot on the bottom of the seat and make sure the knot will NOT pull through the seat.
• Check the trolley grips and make sure they do not slip or twist.
• ALWAYS MAKE SURE YOUR RIDERS KNOW AND FOLLOW THE RULES AND INSTRUCTIONS!

I

NSTALL TURNBUCKLE SAFETYBACKUP:

Install your turnbuckle safety back-up cable (available on certain zipline kits). Note: The safety back up 
should be installed after all turnbuckle adjustments are finished. It must be removed if future 
adjustments are required.
• Slide the cable through both of the sling cables eye loops and the course cable eye loop.
• Pull out slack until you have a snug fit around the turnbuckle connection points.
• Attach the three U-clamps onto overlapped sections of cable
• Place thread cover caps on each of the U-bolts.

BACKUP BRAKING SYSTEM
•Your Slackers Zipline may include our Spring brake, If not, you can go online to purchase our SLA.803 
Zipline brake kit which is is over 5ft of powder coated steel that can be added to your line prior to 
installation for a safe and easy ending point.

         WARNING! - 

NEVER use a brake 
system that stakes into the 
ground, as it can become 
a dangerous projecttile.

Содержание slackers ZIPLINE SLA.512

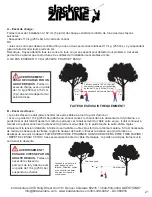
Страница 1: ...s zipline is designed for children to ride a few feet off ground Wear suitable shoes and close fitting clothing No jewelry scarves or other loose clothing Make sure everything is installed correctly I...

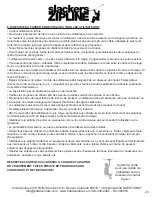
Страница 2: ...e to start looking for an arborist Visit http www isa arbor com find an arborist findanarborist aspx If you are attaching to other types of posts or poles you must get the option of a qualified engine...

Страница 3: ...ld be as low as possible so that if they do lose their grip they only fall a few feet to the ground However their feet should not drag on the ground as they ride the course TO PROTECT YOUR TREE BARK F...

Страница 4: ...NOT HIT FINISH POINT CLAMPS Finish Point Height 78 ACCELERATING PEAK SPEED START TO SLOW SLOW TO A STOP ROLL BACKWARDS Do not add additional slope to the cable It will not improve the ride and may cre...

Страница 5: ...o keep the cable from slipping down the tree during installation Note Do not put the nails into or through the cable Thread the cable using the blunt un looped end through the trolley Figure 2 between...

Страница 6: ...t and support the trolley and cable while you perform the installation This will help you pull out the slack and attach your U Clamps when you wrap your zipline around the Finish Point tree you want t...

Страница 7: ...d cover caps on each exposed thread Course end of cable on bottom Use your tightening tool to make sure everything is secure 4 TIGHTENING ZIPLINE Using the turnbuckle to tighten inspect your initial i...

Страница 8: ...ny issues This will ensure that the attachment structure and cabling is stable and secure DO NOT EXCEED 250 LBS 113 KG FOR THE TEST B Course Speed Test The test weight should never hit the finish poin...

Страница 9: ...ot on the bottom of the seat and make sure the knot will NOT pull through the seat Check the trolley grips and make sure they do not slip or twist ALWAYS MAKE SURE YOUR RIDERS KNOW AND FOLLOW THE RULE...

Страница 10: ...Or if your kit has no seat hold the trolley with arms extended keeping the head below the trolley Figure 1 Adult supervision required at all times Check the grips to make sure they are tight and not l...

Страница 11: ...DATE OF PURCHASE ON YOUR CABLE STICKER REPLACE MAIN CABLE EACH YEAR WARNING MAINTENANCE REQUIRED This product has parts that can wear or loosen during use Tighten all hardware and inspect all componen...

Страница 12: ...uctions in the clear bag provided so you will have them handy the next time you set up your zipline course BEFORE EVERY USE check the anchor points trolley steel line ropes knots trolley grips support...

Страница 13: ...the zipline Ensure that all equipment is properly installed used inspected and maintained before each use Before each use check to see that obstructions and hazards are removed from the zipline path...

Страница 14: ...ximal de 113 kg 250 lb Cette tyrolienne est con ue pour des descentes quelques pieds du sol plus ou moins 1 m Porter des chaussures adapt es et des v tements bien ajust s Pas de bijoux de foulard ni d...

Страница 15: ...ge lat rale laquelle ils seront soumis DES QUESTIONS Veuillez nous appeler au 1 844 834 4334 Assurez vous que le c ble soit assez long pour pouvoir le fixer aux deux arbres en toute s curit Le long c...

Страница 16: ...s utilisateurs l chent prise ils ne tomberont que de quelques pieds de hauteurs Cependant leurs pieds ne doivent pas toucher le sol durant la descente POUR PROT GER VOTRE CORCE D ARBRE DES DOMMAGES PO...

Страница 17: ...IT JAMAIS HEURTER LES SERRE CABLES A TRIER DU POINT D ARRIV E Point d arriv e Hauteur de 78 ACC L RATION VITESSE MAX D BUT DU RALENTISSEMENT RALENTISSEMENT PRONONC ARR T ET LENT RETOUR EN ARRIERE N in...

Страница 18: ...uelle extr mit Si vous installez le kit de frein ressort nous vous recommandons de terminer le parcours avec le tendeur Remarque si le diam tre de l arbre de d part est trop grand inverser l installat...

Страница 19: ...oucle en forme de larme voir illustration Figure 3 Ne pas serrer le c ble autour de l arbre Pendant que les deux aides soutiennent le chariot et le c ble tirer sur le c ble entourant l arbre aussi for...

Страница 20: ...pourquoi ils doivent tre v rifi s tr s attentivement et souvent R gler la tension de la tyrolienne en faisant tourner la section centrale du tendeur Tendre le c ble jusqu ce qu il paraisse horizontal...

Страница 21: ...113 KG 250 LBS POUR CET ESSAI B Essai de vitesse Le poids d essai ne doit jamais heurter les serre c bles trier du point d arriv e Avec un poids de 113 kg 250 Lbs attach au chariot lancez le chariot...

Страница 22: ...les poign es du chariot afin de s assurer qu elles ne sont pas glissantes et ne tournent pas sur elles m mes ASSUREZ VOUS TOUJOURS QUE LES UTILISATEURS CONNAISSENT ET SUIVENT TOUTES REGLES ET TOUS LES...

Страница 23: ...du syst me d ajustement La supervision par un adulte est requise en permanence V rifiez les poign es du chariot afin de s assurer qu elles soient bien serr es et non l ches N autorisez pas des specta...

Страница 24: ...z le c ble principal chaque ann e AVERTISSEMENT ENTRETIEN REQUIS Certaines pi ces peuvent s user ou se desserrer lors de l utilisation Ajustez correctement tout le mat riel et v rifiez l usure V rifie...

Страница 25: ...de tyrolienne AVANT CHAQUE UTILISATION v rifiez les points d ancrage le chariot la ligne en acier les cordes les n uds les poign es du chariot le support et tous les raccords pour vous assurer qu ils...

Страница 26: ...orrectement install inspect et entretenu Avant chaque utilisation rep rer et enlever tout obstacle ou autre danger sur le parcours de la tyrolienne et tenir les spectateurs une distance de s curit vit...

Отзывы: