background image

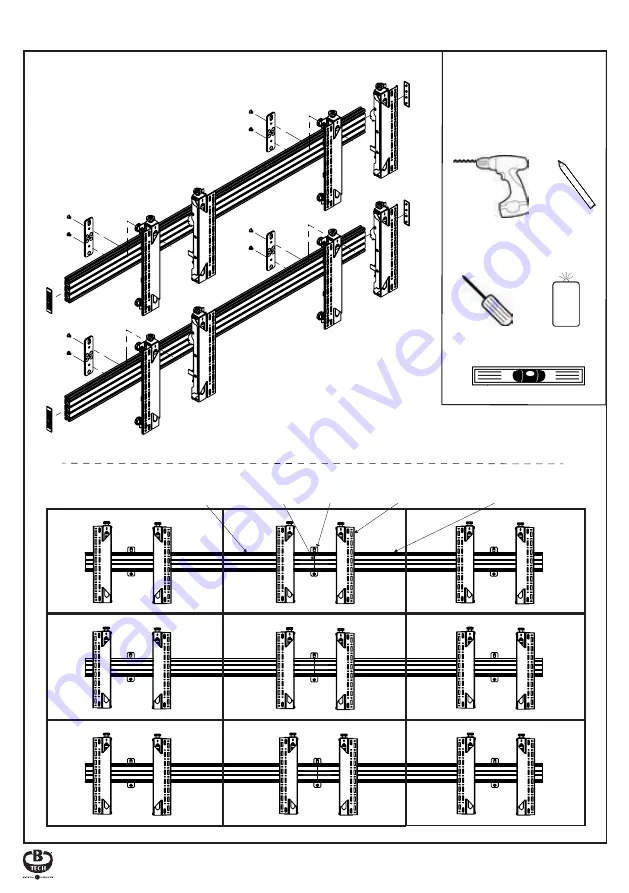
TYPICAL INSTALLATIONS

6

BT8390-150

BT8390-150

BT8390-EXT

BT8390-VESA400MAF

BT8390-WFK1

3 x 3 Videowall installation with VESA 400 Micro-Adjustment Arms

2 x 2 Videowall Installation with  VESA 400 Micro-Adjustment Arms

INSTALLATION TOOLS

REQUIRED

Crosshead 

screwdriver

Level 

(Optional)

Drill

10mm (7/16”) masonry bit

or 4mm (5/32”) wood bit

Pencil

Stud Finder 

(Optional)

Содержание SYSTEM X BT8340

Страница 1: ...lbs Suitable for landscape or portrait mounting Sections can be joined together to increase video wall width Safety screws help prevent unauthorised removal of screens All mounting hardware included Note This assembly manual covers different installations Some parts or procedures shown may not be required for installation Please refer to page 5 for VESA fixings TM PER SCREEN ...

Страница 2: ...ly then please consult a professional for advice and or to install this product for you Failure to mount this product correctly may cause serious injury or death both during installation and at any time thereafter Do not mount any AV equipment that exceeds the specific weight limit of the product you are installing This weight limit will be clearly stated on each product and its packaging and will...

Страница 3: ......

Страница 4: ...ury when handling these components before during the installation or when uninstalling the mount B1 B2 OPTIONAL MOUNTING RAIL EXTENSION KIT C C2 C3 C1 BT8390 EXT 6 C1 24 C2 1 C3 PART NAME ITEM JOINING BAR M6 x 8mm GRUB SCREW 3AF HEX KEY QTY PER PACK A A5 A1 A4 A5 BT8390 WFK2 A1 A4 BT8390 WFK1 RAIL MOUNTING BRACKET 1 A1 4 A2 4 A3 4 A4 4 A5 1 A6 WALL FIXING PLATE ST8 x 45mm CSK WOOD SCREW No 10 WALL...

Страница 5: ...MAF Not included with the BT8390 VESA400MAF BT8390 VESA200F or BT8390 VESA400F Only supplied with the BT8390 VESA400MAF Please refer to individual parts list for more information Interface Arm Kit Screen Fixing Kit OPTIONAL INTERFACE ADAPTOR ARMS A B C F E D G H I J K L M N D3 D4 D5 E 2 E1 4 E2 PART NAME ITEM ADAPTOR ARMS M8 x 12mm SCREW QTY PER PACK E2 E1 BT7564 BT7565 BT7566 VESA 600mm VESA 800m...

Страница 6: ...390 WFK1 3 x 3 Videowall installation with VESA 400 Micro Adjustment Arms 2 x 2 Videowall Installation with VESA 400 Micro Adjustment Arms INSTALLATION TOOLS REQUIRED Crosshead screwdriver Level Optional Drill 10mm 7 16 masonry bit or 4mm 5 32 wood bit Pencil Stud Finder Optional ...

Страница 7: ...way into each channel ii a Using BT8390 WFK1 On the back side of item B1 insert 1x item C1 in the second channel and 1 x item C1 in the third channel See Fig 1 ii b Using BT8390 WFK2 On the back side of item B1 insert 1x item C1 in the top channel and 1x item C1 in the third channel See Fig 2 iii Fasten item C2 loosely on each joining bar fixing it to the mounting rail iv Slide the second item B1 ...

Страница 8: ...ach item A1 used insert 2x item A4 into item B1 1 in the top channel and 1 in the bottom channel b i BT8390 WFK2 assembly For each item A1 used insert 4x item A4 into the item B1 2 in the second from top channel and 2 in the bottom channel A2 b BT8390 WFK2 ASSEMBLY BT8390 WFK1 ASSEMBLY B1 B1 A2 A2 A2 B1 ...

Страница 9: ...WFK1 BT8390 WFK2 BT8390 WFK1 BT8390 WFK2 BT8390 WFK1 2pcs for 0 2000mm 0 79 3pcs for 2100mm 3500mm 80 139 4pcs for 3600mm 6000mm 140 239 5pcs for 6100mm 8000mm 240 319 6pcs for 8100mm 10000mm 320 400 Required quantity of Rail Fixing Brackets item A1 Depth 35mm 1 38 A4 A5 A6 BACK A1 B1 A1 BT8390 WFK1 Depth 49mm 1 93 ...

Страница 10: ... the centre for the centre of the rail A2 158mm WALL A3 ii ii Mark and drill two fixing holes for each item A1 assembled Insert item A3 and the top item A2 Do not fully tighten Allow a gap approx 10mm iii Hook item A1 on to item A2 using the keyholes Once the rail is hooked on fasten item A2 into the bottom holes and tighten all fixings iv Fit item B2 to the ends of item B1 WALL LEVEL WALL 10mm A1...

Страница 11: ...ING KIT D2 D1 A I A I J J For BT8390 VESA400MAF assembly see page 12 T O P B O T T O M SCREEN Note Ensure thumbwheels are facing out Tilt arms only D4 Use spacers for screens with recessed fixings BT8390 VESA200T BT8390 VESA400T Use item D3 for a fixed 0º display Quick tilt settings For tilt adjustment use item D4 to loosen the screw and thumbwheel on the interface arms Re tighten screw to fix til...

Страница 12: ...re used on both arms D I N D1 T O P TOP B O T T O M BOTTOM BOTTOM K L M Use spacers for screens with recessed fixings D2 D2 D1 SCREEN SCREEN SCREEN SCREEN SCREEN FIXING KIT OPTIONAL ADAPTOR ARMS i Use item E2 to fix item E1 to items D1 D2 ii Attach item E1 to the screen using the screen fixing kit ASSEMBLY FOR LANDSCAPE ORIENTATION ASSEMBLY FOR PORTRAIT ORIENTATION A I A I D2 D1 E1 E1 D1 D2 E2 E2 ...

Страница 13: ...Z AXIS KNOB Y AXIS KNOB ii Using a level align the screen to the floor using the Y axis adjustment knobs iii Use the Z axis knobs to ensure screen is perpendicular with the floor Note If mounting 3 or more screens across mount the first screen centrally onto the bottom rail Lateral Adjustment X Axis SCREEN LEVEL FLOOR i Hook the first screen onto the centre of the bottom rail and make sure the scr...

Страница 14: ...Y Z axis screen alignment Total Y axis adjustment is 25mm Total Z axis adjustment is 20mm Note Light pressure in the desired direction of travel will assist in the adjustment of knobs when using heavier screens Only available when using the BT8390 VESA400MAF interface arms To level the rows of screens using the fixed or tilt interface arms use the height adjustment screws on top of the arms before...

Страница 15: ...EEN SECURE SCREENS FIXED AND TILT ARMS i If necessary after the first row of screens are mounted use the height adjustment screws on top of items D1 D2 to level the screens ii Secure the screens to the rail by tightening the safety screws on the bottom of items D1 D2 iii Repeat for each row of screens SCREEN D1 D2 D2 WARNING Contact a professional AV installer or other suitably qualified person fo...

Страница 16: ...390 VESA400T BT8390 WFK1 BT8390 48mm BT8390 VESA200F BT8390 WFK1 BT8390 BT8390 WFK2 BT8390 DEPTH OF INSTALL USING FIXED INTERFACE ARMS DEPTH OF INSTALL USING INTERFACE ARMS WITH TILT DEPTH OF INSTALL USING INTERFACE ARMS WITH MIRCO ADJUSTMENT Distance from wall 86 1mm Tolerance 1mm 10mm Depth Adjustment BT8390 WFK1 BT8390 BT8390 VESA400MAF Wall mounted using BT8390 WFK1 Wall mounted using BT8390 W...

Страница 17: ...all Mounting Kit will feature a selection of the following products 10 15 20 400mm 430mm 50mm 140mm 51 1mm 75mm 45 2mm 200mm 260mm 45 2mm 50mm 140mm 51 1mm 20 15 10 75mm 40mm 55mm 140mm 228mm 200mm 28mm 50mm 400mm 28mm 428mm 140mm 40mm 55mm 50mm BT8390 VESA200F INTERFACE ARMS BT8390 VESA400F BT8390 VESA400T BT8390 VESA200T Fixed VESA 200mm Interface Arms VESA 200mm Interface Arms with Tilt Fixed V...

Страница 18: ...E ARMS WALL FIXING KIT BT8390 VESA400MAF Fixed VESA 400mm Interface Arms with Micro Adjustment 454 6mm 426mm 400mm 300mm 200mm 100mm 20mm 40 1mm 8 4mm 6 4mm 432 8mm 50mm 150mm 250mm 350mm 30mm 140mm 8mm 49 7mm Tolerance 1mm 193 6mm 30mm 100 7mm 38 4mm Outer hook width 103 7mm REAR VIEW FRONT VIEW SIDE VIEW SIDE VIEW FRONT VIEW BT8390 WFK1 Rail Fixing Kit Ultra Slim BT8390 WFK2 Rail Fixing Kit 24mm...

Страница 19: ...E INFORMATION CONTAINED IN THIS DOCUMENT Depending on installation requirements the BT8340 Video Wall Mounting Kit will feature a selection of the following products MOUNTING RAILS 500mm 120mm 120mm 120mm 120mm 120mm 120mm 505mm 700mm 705mm 1505mm 1500mm 2000mm 2005mm 30mm 30mm 8 2mm 30mm 30mm 1755mm 1750mm BT8390 050 BT8390 070 BT8390 150 BT8390 175 BT8390 200 ...

Страница 20: ...rnational Design and Manufacturing Ltd B Tech AV Mounts and the B Tech logo are registered trade marks All other brands and product names are trademarks of their respective owners Photographs are for illustrative purposes only E OE Manufactured by B Tech International Ltd Bennett House Long March Daventry Northamptonshire NN11 4NR UK B Tech Pro AV BVBA Brixtonlaan 32 Zaventem 1930 Brussels Belgium...

Отзывы: