background image

Bischoff & Bischoff GmbH |2021-07-27 - Revision: 4

91

90

S-Eco 2 | S-Eco 300

 | Silla de ruedas estándar

S-Eco 300 XL 

| Tamaño especial

Pyro Start

 | Silla de ruedas ligera

Silla de ruedas estándar | 

S-Eco 2 | S-Eco 300

Tamaño especial | 

S-Eco 300 XL

Silla de ruedas ligera | 

Pyro Start

91

90

S-Eco 2 | S-Eco 300

 | Silla de ruedas estándar

S-Eco 300 XL 

| Tamaño especial

Pyro Start

 | Silla de ruedas ligera

Silla de ruedas estándar | 

S-Eco 2 | S-Eco 300

Tamaño especial | 

S-Eco 300 XL

Silla de ruedas ligera | 

Pyro Start

ES

3.4. Generalidades

(véase la Fig. 2)

A

Empuñadura de empuje

B

Cojín del respaldo

C

Rueda directriz

D

Reposabrazos

E

Cojín de asiento

F

Rueda trasera

G

Eje de desmontaje rápido

H

Freno de estacionamiento

I

Aros de empuje

J

Reposapiés con correa para el talón

II

A

A

A

BBB

D

D

D

EEE

FFF

G

G

G

H

H

H

I

JJJ

LLC

2

4. Montaje/Ajustes

Su nueva silla de ruedas B+B se entregará en una caja de cartón 
original de B&B, montada y plegada. 
Para evitar daños en el transporte, los accesorios enchufables se 
entregan por separado con el producto.
Verifique los datos técnicos para ver qué opciones son posibles en su 
silla de ruedas (consulte el Capítulo 7).

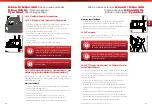
4.1. Plegado y desplegado
 

Desplegado

• 

Coloque la silla de ruedas plegable a su lado. (Fig. 3)

• 

Incline la silla de ruedas hacia adelante, hasta que el peso esté 
fuera de una de las ruedas traseras. 

• 

Separe los tubos del asiento y empújelos hacia abajo con la palma 
de la mano, hasta que encajen en el soporte del cuadro (Fig. 4).

• 

El cojín del asiento debe estar completamente desplegado.

• 

Accione los frenos de estacionamiento izquierdo y derecho de las 
ruedas motrices.

• 

Coloque los reposapiés.

• 

Ahora puede sentarse

Plegado

• 

Coloque la silla de ruedas plegable a su lado. 

• 

Gire las bases del reposapiés hacia arriba (Fig. 5). 

• 

Retire el cojín del asiento, sujete la parte delantera y trasera del 
tapizado de asiento y tire hacia arriba,

Al plegar la silla, tenga cuidado con los dedos, ya 
que existe el riesgo de pellizcarse

3

1

1

2

2

3

3

4

1

2

3

3

5

Содержание 18.50.02.0104

Страница 1: ...Enjoy mobility Enjoy mobility Bedienungsanleitung Instruction manual Manual de instrucciones Mode d emploi S Eco 2 S Eco 300 S Eco 300 XL Pyro Start DE EN ES FR ...

Страница 2: ...ansport 34 8 1 Transport des Rollstuhls 34 8 2 Beförderung in Kraftfahrzeugen 34 9 Pflegehinweise für den Benutzer 35 9 1 Reinigung und Desinfektion 35 9 2 Überprüfung vor Fahrtantritt 35 9 2 1 Überprüfung der Bremsen 35 Inhalt 1 Vorbemerkung 6 1 1 Zeichen und Symbole 7 2 Wichtige Sicherheitshinweise 8 2 1 Allgemeine Sicherheitshinweise 8 2 2 Kippgefahr 9 2 3 Sicherheit in Fahrzeugen 10 2 4 Teilna...

Страница 3: ... Sondergröße Pyro Start Leichtgewichtrollstuhl Standardrollstuhl S Eco 2 S Eco 300 Sondergröße S Eco 300 XL Leichtgewichtrollstuhl Pyro Start 9 2 2 Überprüfung der Bereifung 35 10 Reparatur 36 11 Wartungshinweise 36 12 Weitergabe des Rollstuhls 36 13 Lagerung Versand 36 14 Entsorgung 37 15 Garantie 37 ...

Страница 4: ...esonders nützliche Informationen im jeweiligen Sachzusammenhang Achtung Bezeichnet besonders sicherheitsrelevante Hinweise Bedienungsanleitung beachten 2 Wichtige Sicherheitshinweise 2 1 Allgemeine Sicherheits hinweise Um Stürze und gefährliche Situationen zu vermeiden den Umgang mit Ihrem neuen Rollstuhl erst auf ebenem überschaubarem Gelände üben Eine Begleitperson wird empfohlen Vor Anwendung d...

Страница 5: ...g unverzüglich an die für den Betreiber zuständige Behörde weiter und informiert weiterhin den Hersteller und die für den Hersteller zuständige Behörde Den Rollstuhl vor Sonneneinstrahlung schützen um Verbrennungen durch aufgeheizte Komponenten zu vermeiden 2 2 Kippgefahr Die beidseitig angebrachten Antikipprollen s Kap 4 11 verhindert weitestgehend dass der Rollstuhl nach hinten kippt Beachten Si...

Страница 6: ...nicht an beiden Armen sonstige Erkrankungen 2 7 Kontraindikationen Die Versorgung mit Rollstühlen ist ungeeignet für Personen mit Sitzunfähigkeit Gelenkschäden Gelenkkontrakturen an beiden Armen Wahrnehmungsstörungen starken Gleichgewichtsstörungen Gliedmaßenverlust an beiden Armen verminderter und nicht ausreichender Sehkraft starken Einschränkungen der kognitiven Fähigkeiten 2 8 Konformitätserkl...

Страница 7: ...üfenSiedenInhaltaufVollständigkeit s Kap 3 2 undUnversehrtheit Im Falle von Unregelmäßigkeiten oder Beschädigungen setzen Sie sich mit unserem Kundenservice in Verbindung Tel 49 0 700 6000 7070 3 2 Lieferumfang Nach Erhalt der Ware prüfen Sie bitte umgehend den Inhalt auf Vollständigkeit Der Inhalt besteht aus Umverpackung Rollstuhl vormontiert Beinstützen dieser Bedienungsanleitung ggf Zubehör 3 ...

Страница 8: ...liefert Welche Optionen bei Ihrem Rollstuhl möglich sind können Sie den techenischen Daten s Kap 7 entnehmen 4 1 Falten und Entfalten Entfalten Den Faltrollstuhl neben Ihnen positionieren Abb 3 Den Faltrollstuhl soweit zu Ihnen kippen dass ein Antriebsrad entlastet ist Die Sitzrohre auseinanderschieben und diese mit der flachen Hand nach unten drücken bis sie in der Halterung am Rahmen arretiert s...

Страница 9: ...oben beschrieben Steigen Sie niemals auf die Fußplatte und achten Sie beim Schwenken auf Ihre Finger es besteht Klemmgefahr 4 2 2 Beinstützen einstellen Die Schraube am Klemmhalter lockern dann die Beinstütze auf die gewünschte Länge einstellen und die Schraube anziehen Abb 9 Beachten Sie die geriffelte Markierung für die maximale Einstellung 4 2 3 Waagrecht verstellbare Bein stützen optional Mont...

Страница 10: ...n Abb 13 Der Rollstuhl steht sicher gebremst wenn er sich nicht mehr wegschieben lässt und beide Bremshebel bis zum Anschlag nach vorne gedrückt sind Den Hebel wieder zu Ihnen zurückziehen um die Bremse zu lösen 4 4 Seitenteile 4 4 1 Universalseitenteil Um leichter Ein Aussteigen zu können sind die beiden Seitenteile mit den Armlehnen nach hinten schwenkbar Betätigen Sie den Arretierhebel mit leic...

Страница 11: ...tschrauben wieder fest Vergewissern Sie sich dass die Bremse beim Betätigen des Hebels vollständig einrastet und nicht zurückschnappt 4 5 3 Betätigung der Feststellbrem se mit Bremshebelverlängerung Die Betätigung der Feststellbremse mit Bremshebelverlängerung ist gleich wie die Betätigung der Feststellbremse s Kap 4 5 1 Bremshebelverlängerung einklappen Der Bremshebel kann während der Fahrt oder ...

Страница 12: ...ils in der gleichen Position befinden OBEN MITTE UNTEN Befinden sich das Antreibsrad und das Lenkrad nicht in der gleichen Position besteht Kipp und Sturzgefahr 4 7 1 Steckachse Der Rollstuhl verfügt serienmäßig über Steckachsen Daher können Sie die Antriebsräder leicht an und abbauen Mit dem Daumen auf den Arretierknopf der Steckachse drücken und das Rad abziehen Abb 19 Beim Wiederanbringen einfa...

Страница 13: ...uß auf eine der Ankipphilfen und drücken Sie gleichzeitig mit den Händen nach unten Abb 22 4 11 Antikipprollen optional Die Antikipprollen verhindern das Umkippen des Rollstuhls nach hinten Die Rollen der Antikipprollen müssen dabei einen Abstand von ca 30 50mm vom Boden haben Abb 23 Besonders empfehlenswert sind die Antikipprollen bei ungeübten Rollstuhlfahrern oder bei beinamputierten Rollstuhlf...

Страница 14: ...enung entnehmen Sie gegebenenfalls der Bedienungsanleitung der Togo Schiebehilfe 5 4 Stockhalter optional Stellen Sie den Stock in den Stockhalter und fixieren Sie ihn dann an der Rückenlehne Stehen Sie niemals auf den Stockhalter und nutzen Sie ihn niemals als Ankipphilfe 5 5 Speichenschutz optional Der Speichenschutz wird mit Kabelbindern an den Speichen befestigt 5 6 Greifreifenüberzug optional...

Страница 15: ...r Die Beinstützen abnehmen s Kap 4 2 Den Rollstuhl und die gegenwärtige bzw künftige Sitzgelegenheit möglichst dicht frontal aneinander heranbringen und die Feststellbremsen beidseitig betätigen s Kap 4 5 1 Sollten Sie aus einem anderen Rollstuhl oder Zimmeruntergestell umsteigen wollen auch diesen dieses durch Betätigung der Feststellbremsen sichern Nun durch eine Körperdrehung auf die Sitzfläche...

Страница 16: ... Nach rechts fahren den rechten Greifreifen festhalten und nur den linken weiter anschieben Nach links fahren den Anschub umgekehrt ausführen Drehen auf der Stelle die Greifreifen mit beiden Händen gleichzeitig gegeneinander schieben Abbremsen die Geschwindigkeit des Greifreifens mit den Händen reduzieren Führen Sie die ersten Fahrversuche vorsichtig durch bis Sie sich an den Rollstuhl und sein Fa...

Страница 17: ...5 Armlehnenhöhe ohne Sitzkissen höhen und tiefenverstelbares Seitenteil mm 190 265 in 5 Stufen a 15 mm Armlehnenlänge mm 330 Armlehnenbreite mm 40 Wendebereich mm 1200 S ECO 2 S ECO 300 Pyro Start S Eco 300 XL Statische Stabilität 7 Betätigungskraft Feststellbremse N 60 Reifen Antriebsräder Zoll 24 PU Transiträder 12 PU Lenkräder mm 7 x1 75 PU 8 x 2 PU 8 x 1 25 PU 8 x 2 PU Material Rahmen Stahl Kr...

Страница 18: ...tauen Sie den Rollstuhl im Laderaum Die für den Transport verantwortliche Person sollte mit den aktuellen Vorschriften für den Transport sowie mit der Bedienung des KMP und des Rückhaltesystems vertraut sein Zur Sicherung des Rollstuhls müssen am Fahrzeug verankerte vier Punkt Rückhaltesysteme benutzt werden Bei Rückfragen bezüglich der Sicherung Ihres Produktes im KMP wenden Sie sich bitte an den...

Страница 19: ...ellt Für Fragen steht Ihnen der B B Kundenservice unter der Rufnummer 49 0 700 6000 7070 zur Verfügung Der Rollstuhl muss gemäß Wartungsplan geprüft werden und einwandfrei sein 12 Weitergabe des Rollstuhls Der Rollstuhl ist für einen Wiedereinsatz geeignet Bevor er an einen anderen Nutzer weitergegeben wird ist er durch einen Fachhändler zu warten und hygienisch aufzubereiten Bei der Weitergabe de...

Страница 20: ... als auch der Produkthaftung allgemein 15 Garantie Garantieleistungen beziehen sich auf alle Mängel des Rollstuhls die nachweislich auf Material oder Herstellungsfehler zurückzuführen sind Bei Beanstandungen reichen Sie die vollständig ausgefüllte Garantieurkunde ein Für unsere Produkte übernehmen wir die gesetzliche Garantie von 2 Jahren Für Austauschgeräte Verschleißteile und Reparaturen gilt ei...

Страница 21: ...ptional 55 4 4 Sideguards 56 4 4 1 Universal sideguard 56 4 4 2 Height and depth adjustable sideguards optional 56 4 5 Brakes 57 4 5 1 Operating the parking brake 57 4 5 2 Adjusting the parking brakes 58 4 5 3 Operating the parking brake with the brake lever extension 59 4 6 One hand brake optional 59 4 6 1 Drum brake optional 59 4 7 Wheels and tyres 60 4 7 1 Quick release axle 60 4 7 2 Drive whee...

Страница 22: ...S Eco 300 Special size S Eco 300 XL Lightweight wheelchair Pyro Start EN 9 Maintenance instructions for the user 73 9 1 Cleaning and disinfection 73 9 2 Checks before driving 73 9 2 1 Checking the brakes 73 9 2 2 Checking the tyres 74 10 Repairs 74 11 Maintenance information 74 12 Passing the wheelchair on to another user 74 13 Storage shipping 75 14 Disposal 75 15 Warranty 76 ...

Страница 23: ...nformation in the relevant context Attention Means particular safety related Notes Observe the User manual 2 Important safety information 2 1 General safety information In order to prevent falls and dangerous situations practise with your new wheelchair on level clear ground first An attendant is recommended Before using the wheelchair check that all attached parts are properly fixed Only lift the...

Страница 24: ...ately and will also inform the manufacturer and the authority responsible for the manufacturer Protect the wheelchair from sunlight to avoid burns caused by heated components 2 2 Risk of tipping over The anti tip wheels which are fitted on both sides see Chapter 4 11 will largely prevent the wheelchair from tipping over backwards However please note that driving with anti tip wheels is only possib...

Страница 25: ...ms joint damage not on both arms other illnesses 2 7 Contraindications Provision of wheelchairs is not suitable for individuals who have no capability to sit joint damage contractions on both arms perceptual disorders severe equilibrium disorders loss of limbs on both arms reduced and insufficient vision severe limitations of cognitive abilities 2 8 Declaration of conformity We Bischoff Bischoff G...

Страница 26: ...he delivery is complete and undamaged see Chapter 3 2 In the case of anomalies or damage contact our Customer service Tel 49 0 700 6000 7070 3 2 Scope of delivery On receiving the goods please immediately check that the delivery is complete The delivery consists of packing wheelchair preassembled legrests this user manual any necessary accessories 3 3 Product s identification label and serial numb...

Страница 27: ...achments are delivered separately with the product Refer to the technical data to see which options are possible on your wheelchair see Chapter 7 4 1 Folding and unfolding Unfolding Position the folding wheelchair next to you Fig 3 Tip the wheelchair towards you until the weight is off one of the drive wheels Push the seat tubes apart and push them down with the flat of your hand until they lock i...

Страница 28: ...g off fit the legrests as described above Never stand on the footplate and when swinging it away watch your fingers as there is a risk of pinching 7 1 2 6 1 2 8 4 2 2 Adjusting the legrests Loosen the screw on the clamp mounting then adjust the legrest to the required length and tighten the screw Fig 9 Please note the grooved marking for the maximum adjustment 4 2 3 Horizontally adjustable leg res...

Страница 29: ...he position required then release the lever The lock clicks into place The height has been correctly selected if the upper arm and forearm are approximately at right angles to one another when the forearm is resting on the armrest 1 2 10 1 2 11 Depth adjustment Press the knob on the side of the armrest and push the armrest to the required position Fig 12 Release the knob and move the armrest gentl...

Страница 30: ... socket screws Make sure that the brakes click into place when operating the lever and that they don t snap back 14 4 5 3 Operating the parking brake with the brake lever extension The procedure for operating the parking brake with the brake lever extension is the same as operating the parking brake see Chapter 4 5 1 Folding the brake lever extension in The brake lever can be folded in when drivin...

Страница 31: ...tor must always be located in the same position respectively to each other UPPER MIDDLE LOWER If the drive wheel and castor are not at the same position there is a risk of tipping over and falling 4 7 1 Quick release axle As standard the wheelchair has quick release axles This means you can easily remove and refit the drive wheels Push the lock of the quick release axle using your thumbs and pull ...

Страница 32: ...eelchair firmly with both hands on the push handles Press one foot onto one of the tipping aids and at the same time push the hands down Fig 22 22 4 11 Anti tip wheels optional The anti tip wheels prevent the wheelchair from tipping over backwards There must be a gap between the rollers of the anti tip wheels and the ground of approx 30 50 mm Fig 23 Anti tip wheels are particularly recommended for...

Страница 33: ... pushing braking aid user manual for all relevant information on assembling and use 5 4 Crutch holder optional Put the crutch in the crutch holder and then fix it to the backrest Never stand on the crutch holder and never use it as a tipping aid 5 5 Spokeguard optional The spokeguard is fixed to the spokes using the cable ties 5 6 Handrim cover optional Put the handrim cover over the handrims in o...

Страница 34: ...ay there is a Risk of tipping over Remove the legrests see Chapter 4 2 Make sure that the front of the wheelchair and the current or future seat are as close to each other as possible and apply the parking brakes on both sides see Chapter 4 5 1 If you are transferring from another wheelchair or indoor frame secure these by applying the parking brakes Now slide onto the seat surface by rotating you...

Страница 35: ...with both hands Fig 25 Turning right hold the right handrim tight and only push with the left one Turning left push in the opposite way Turning on the spot push the handrims in opposite directions at the same time Braking reduce the speed of the handrims with your hands Carry out the first test drives carefully until you have got used to the wheelchair and its driving characteristics Wheelchairs o...

Страница 36: ...eguard mm 215 Armrest height without seat cushion height and depth adjustable sideguard mm 190 265 in 5 steps of 15 mm Armrest length mm 330 Armrest width mm 40 Turning area mm 1200 Static stability 7 S ECO 2 S ECO 300 Pyro Start S Eco 300 XL Parking brake operating force N 60 Tyres Drive wheels inch 24 PU Transit wheels 12 PU Castors mm 7 x 1 75 PU 8 x 2 PU 8 x 1 25 PU 8 x 2 PU Material Frame Ste...

Страница 37: ...obility The products must only be fixed to these load nodes for restraint in the vehicle for transporting individuals with impaired mobility If possible use a permanently installed car seat and its belt system Stow the wheelchair in the boot Those individuals responsible for the transportation should be familiar with the current legislation for transport as well as with the operation of the vehicl...

Страница 38: ... any questions B B Customer Service is available to help you on 49 0 700 6000 7070 The wheelchair must be checked in accordance with the maintenance plan and be in proper technical condition 12 Passing the wheelchair on to another user The wheelchair is designed for re use Before it is passed on to another user it must be serviced by a dealer and hygienically cleaned When passing the wheelchair on...

Страница 39: ...rmation Your dealer can provide you with this Note Despite thorough research and editing incorrect information may occur in our User manual We reserve the right to make technical modifications Images may show accessories You can find the current version of the User manuals in the download area of our website www bischoff bischoff com Warranty certificate Product S Eco 2 S Eco 300 Pyro Start Serial...

Страница 40: ...2 4 2 2 Ajuste de los reposapiés 93 4 2 3 Reposapiés ajustables horizontalmente opcional 93 4 3 Reposapiernas para amputados opcional 93 4 4 Protectores laterales 94 4 4 1 Protector lateral universal 94 4 4 2 Reposabrazos ajustables en altura y profundidad opcionales 94 4 5 Frenos 95 4 5 1 Cómo accionar el freno de estacionamiento 95 4 5 2 Ajuste de los frenos de estacionamiento 96 4 5 3 Accionami...

Страница 41: ...tart ES 6 Uso 104 6 1 Transferencia por un lado 104 6 2 Transfererencia por delante 104 6 3 Cómo subir o bajar escaleras o un escalón alto 105 6 4 Conducción de la silla de ruedas 106 7 Especificaciones técnicas 108 8 Transporte 110 8 1 Transporte de la silla de ruedas 110 8 2 Transporte en vehículos 110 9 Instrucciones de cuidado para el usuario 111 9 1 Limpieza y desinfección 111 9 2 Controles a...

Страница 42: ...y útil en un contexto particular Atención Significa que está en relación con la seguridad Notas Preste atención al manual de instrucciones 2 Instrucciones importantes de se guridad 2 1 Información general de seguridad Para evitar caídas y situaciones de peligro practique primero con su nueva silla de ruedas en un terreno llano y despejado Para ello se recomienda contar con un acompañante Antes de ...

Страница 43: ...e a las autoridades estatales competentes en materia de productos médicos Dichas entidades transmitirán inmediatamente el informe a las autoridades responsables del proveedor e informará también al fabricante y a las autoridades responsables de la fabricación Proteja la silla de ruedas de la luz solar directa para evitar quemaduras causadas por los componentes recalentados 2 2 Riesgo de vuelco Las...

Страница 44: ...remidades Defectos deformidades de las extremidades Contracciones articulares no en ambos brazos Daños en las articulaciones no en ambos brazos Otras enfermedades 2 7 Contraindicaciones El suministro de esta silla de ruedas no es adecuado para personas con Incapacidad para sentarse Daños articulares contracciones en ambos brazos Trastornos perceptuales Trastornos graves del equilibrio Pérdida de e...

Страница 45: ...a para comprobar si ha sufrido daños durante el traslado Compruebe que el contenido está completo e intacto véase el Capítulo 3 2 En caso de anomalías o daños póngase en contacto con nuestro servicio de atención al cliente Tel 49 0 700 6000 7070 3 2 Alcance de la entrega Inmediatamente después de recibir el producto compruebe que el contenido esté completo El contenido consiste en Embalaje externo...

Страница 46: ...e cartón original de B B montada y plegada Para evitar daños en el transporte los accesorios enchufables se entregan por separado con el producto Verifique los datos técnicos para ver qué opciones son posibles en su silla de ruedas consulte el Capítulo 7 4 1 Plegado y desplegado Desplegado Coloque la silla de ruedas plegable a su lado Fig 3 Incline la silla de ruedas hacia adelante hasta que el pe...

Страница 47: ...s puede extraerse tirando de él hacia arriba Fig 8 Antes de emprender viaje coloque los reposapiés como se ha descrito anteriormente No se ponga nunca de pie sobre el reposapiés y cuando gire para abrirlo tenga cuidado con los dedos ya que existe el riesgo de pellizcarse 7 1 2 6 1 2 8 4 2 2 Ajuste de los reposapiés Afloje el tornillo del soporte de la abrazadera ajuste el reposapiés a la longitud ...

Страница 48: ...brazos en la posición deseada Fig 11 Cuando haya alcanzado la posición deseada suelte la palanca La traba encaja en su sitio La altura se habrá seleccionado correctamente si la parte superior del brazo y el antebrazo del usuario se encuentran aproximadamente en ángulo recto cuando el antebrazo está 1 2 10 1 2 11 apoyado en el reposabrazos Ajuste de la profundidad Presione el pomo situado en el mul...

Страница 49: ... del freno hasta la posición correcta a lo largo del soporte Por último apriete de nuevo los dos tornillos de cabeza hueca Asegúrese de que los frenos encajen en su sitio al accionar la palanca y de que no se desprendan 14 4 5 3 Accionamiento del freno de estacionamiento con la extensión de la palanca de freno El procedimiento para accionar el freno de estacionamiento con la extensión de la palanc...

Страница 50: ...del asiento puede ajustarse en 3 posiciones para satisfacer las necesidades del usuario excepto con S Eco2 La rueda motriz y la rueda orientable deben estar siempre en la misma posición SUPERIOR MEDIA INFERIOR Si la rueda motriz y la rueda directriz no están en la misma posición existe el riesgo de volcar y caer 4 7 1 Eje de desmontaje rápido La silla de ruedas viene con ejes de desmontaje rápido ...

Страница 51: ...tilizar ayudas para la inclinación de la silla de ruedas Sujete la silla de ruedas firmemente con ambas manos desde las empuñaduras de empuje Presione un pie sobre uno de los dispositivos de inclinación y al mismo tiempo empuje las manos hacia abajo Fig 22 4 11 Ruedas antivuelco opciona les Las ruedas antivuelco evitan que la silla de ruedas vuelque hacia atrás Entre los rodillos de las ruedas ant...

Страница 52: ... puede instalarse un dispositivo eléctrico de empuje Togo Si es necesario consulte el manual de instrucciones del dispositivo de empuje Togo para obtener toda la información pertinente sobre el montaje y el uso 5 4 Soporte para bastones opcio nal Coloque la muleta en el soporte para muletas y fíjela al respaldo No se ponga nunca de pie sobre el soporte de muletas ni lo utilice como ayuda para incl...

Страница 53: ... pie sobre el reposapiés y cuando lo aleje existe el Riesgo de volcar Retire los reposapiés consulte el Capítulo 4 2 Asegúrese de que la parte delantera de la silla de ruedas y el asiento actual o futuro estén lo más cerca posible el uno del otro y accione los frenos de estacionamiento en ambos lados consulte el Capítulo 4 5 1 Si se traslada desde otra silla de ruedas o desde un andador de interio...

Страница 54: ...lados Desde esta posición empuje la silla de ruedas con ambas manos Fig 25 Giro a la derecha sujete bien el aro derecho y empuje sólo con el izquierdo Giro a la izquierda empuje en sentido contrario Giro sobre la marcha empuje los aros en direcciones opuestas al mismo tiempo Frenado reduzca la velocidad de las ruedas presionando a la vez que deslizando las manos sobre los aros Realice las primeras...

Страница 55: ...abrazos universal sin cojín de asiento mm 215 Altura del reposabrazos graduable en altura y profundidad sin cojín del asiento mm 190 265 en 5 pasos de 15 mm Longitud del reposabrazos mm 330 Anchura del reposabrazos mm 40 Radio de giro mm 1200 Estabilidad estática 7 S ECO 2 S ECO 300 Pyro Start S Eco 300 XL Fuerza de accionamiento del freno de estacionamiento N 60 Neumáticos Ruedas traseras pulgada...

Страница 56: ...roductos en el KMP Los productos sólo deben fijarse en estos nodos de carga para su sujeción en el KMP Si es posible utilice un asiento de automóvil instalado permanentemente y su sistema de cinturones Guarde la silla de ruedas en el maletero Las personas responsables del transporte deben estar familiarizadas con la legislación vigente en materia de transporte así como con el funcionamiento del KM...

Страница 57: ...ente Si se solicita se facilitará al distribuidor toda la información y documentos necesarios para la reparación y el mantenimiento de la silla Si tiene alguna duda el servicio de atención al cliente de B B está a su disposición en el número 49 0 700 6000 7070 La silla de ruedas debe revisarse de acuerdo con el plan de mantenimiento y estar en perfecto estado de funcionamiento 12 Transmisión de la...

Страница 58: ...ía es de 1 año Además siga las indicaciones de cuidado garantía higiene y mantenimiento de B B Su distribuidor puede proporcionárselo Nota A pesar de la comprobación y la edición puede que algún tipo de información incorrecta se haya incluido en nuestro Manual de instrucciones Nos reservamos el derecho a realizar modificaciones técnicas Las imágenes pueden mostrar accesorios Puede encontrar la ver...

Страница 59: ...Repose jambes réglables horizontalement en option 131 4 3 Repose jambes en cas d amputation en option 131 4 4 Panneaux latéraux 132 4 4 1 Panneau latéral universel 132 4 4 2 Panneaux latéraux réglables en hauteur et en profondeur en option 132 4 5 Freins 133 4 5 1 Utilisation du frein de stationnement 133 4 5 2 Réglage des freins de stationnement 134 4 5 3 Fonctionnement du frein de stationnement ...

Страница 60: ... 3 Franchir des escaliers ou une marche haute 143 6 4 Conduire un fauteuil roulant 144 7 Spécifications techniques 146 8 Transport 148 8 1 Transport du fauteuil roulant 148 8 2 Transport dans des véhicules à moteur 148 9 Instructions d entretien à l attention de l utilisateur 149 9 1 Nettoyage et désinfection 149 9 2 Vérifications avant de partir 149 9 2 1 Vérifier les freins 149 9 2 2 Vérifier le...

Страница 61: ...s particulièrement utiles dans un contexte particulier Attention Signifie un élément de sécurité particulier Remarques Respectez le manuel d instructions 2 Informations de sécurité impor tantes 2 1 Informations de sécurité générales Pour éviter les chutes et les situations dangereuses entraînez vous d abord à utiliser votre nouveau fauteuil roulant sur un terrain plat et praticable La présence d u...

Страница 62: ...able du fournisseur et en informera également le fabricant et l autorité responsable du fabricant Protégez le fauteuil roulant des rayons du soleil pour éviter les brûlures dues aux composants chauffés 2 2 Risque de basculement Les roulettes anti basculement des deux côtés voir section 4 11 empêchent autant que possible le fauteuil roulant de basculer vers l arrière Néanmoins veuillez noter que la...

Страница 63: ...s aux articulations pas aux deux bras autres maladies 2 7 Contre indications Ce fauteuil roulant n est pas adapté aux individus souffrant de dans l incapacité de s asseoir Dommages aux articulations contractures des articulations des deux bras Atteintes de troubles de la perception troubles sévères de l équilibre Perte des deux bras vision réduite et insuffisante limitations sévères de la capacité...

Страница 64: ...tous les éléments sont intacts et inclus dans le colis voir section 3 2 En cas d anomalies ou de dommages contactez notre service client Tél 49 0 700 6000 7070 3 2 Portée de la livraison Dès réception de la marchandise vérifiez que tout est inclus Le colis contient Emballage extérieur Fauteuil roulant pré monté Repose jambes ce mode d emploi éventuellement des accessoires 3 3 Étiquette d identific...

Страница 65: ...séparément Vous trouverez les options disponibles pour votre fauteuil roulant dans les caractéristiques techniques voir section 7 4 1 Pliage et dépliage Déplier Placez le fauteuil roulant pliant à côté de vous Fig 3 Inclinez le fauteuil roulant pliant vers vous de manière à ce qu une roue motrice soit déchargée Faites glisser les tubes de siège pour les séparer et appuyez dessus avec la paume de l...

Страница 66: ... faites attention à vos doigts lors du pivotement vous risquez de vous faire coincer 4 2 2 Réglage des repose jambes Desserrez la vis de l étrier puis réglez le repose jambes à la longueur souhaitée et serrez la vis Fig 9 Notez la marque rainurée pour le réglage maximum 7 1 2 6 1 2 8 4 2 3 Repose jambes réglables ho rizontalement en option Le montage le démontage et le pivotement s effectuent de l...

Страница 67: ...sition souhaitée relâchez le levier Le mécanisme de verrouillage s enclenche alors La hauteur est correcte lorsque la partie supérieure et inférieure du bras forment un angle droit avec l avant bras qui repose dessus 1 2 10 1 2 11 Réglage de la profondeur Appuyez sur le bouton situé sur le côté de l accoudoir et faites glisser l accoudoir dans la position souhaitée Fig 12 Relâchez le bouton et dép...

Страница 68: ...reux Assurez vous que le frein s enclenche complètement et ne revient pas en arrière lorsque vous actionnez le levier 14 4 5 3 Fonctionnement du frein de stationnement avec extension du levier de frein L actionnement du frein de stationnement avec extension du levier de frein est identique à l actionnement du frein de stationnement voir section 4 5 1 Extension du levier de frein repliable Le levie...

Страница 69: ... le volant doivent chacun être dans la même position HAUTE MOYENNE BASSE Si la roue motrice et le volant ne sont pas dans la même position il y a un risque de basculement et de chute 4 7 1 Axe d emboîtement Le fauteuil roulant est équipé d une série d axes d emboîtement rapides Vous pouvez donc facilement fixer et détacher les roues motrices Appuyez avec le pouce sur le bouton de verrouillage de l...

Страница 70: ...r l une des aides au basculement et appuyez simultanément à l aide de vos mains Fig 22 4 11 Roulettes anti basculement en option Les roulettes anti basculement empêchent le fauteuil roulant de basculer vers l arrière Les rouleaux des roulettes anti basculement doivent être à une distance d environ 30 50 mm du sol Fig 23 Les rouleaux anti basculement sont particulièrement recommandés pour les utili...

Страница 71: ...nentes sur l installation et l utilisation veuillez vous référer au mode d emploi du dispositif de poussée Togo 5 4 Support de béquille en option Placez la canne dans le porte canne puis fixez la au dossier Ne montez jamais sur le porte canne et ne l utilisez jamais comme aide au basculement 5 5 Protège rayon en option Le protège rayon est fixé aux rayons à l aide de serre câbles 5 6 Couvre jante ...

Страница 72: ...sque de Risque de basculement Retirez les repose jambes voir section 4 2 Rapprochez le plus possible le fauteuil roulant et le siège actuel ou futur par l avant et serrez les freins d arrêt des deux côtés voir section 4 5 1 Si vous souhaitez effectuer un transfert à partir d un autre fauteuil roulant ou d un châssis intérieur sécurisez également ce ces derniers en serrant les freins d arrêt Glisse...

Страница 73: ...ite et continuer à pousser la jante gauche uniquement Déplacement vers la gauche inverser la poussée Tourner sur place poussez les jantes de poussée l une contre l autre avec les deux mains en même temps Freinage réduisez la vitesse de la jante de poussée avec vos mains Effectuezlespremièrestentativesdeconduiteavecprécautionjusqu àce que vous vous soyez habitué au fauteuil roulant et à son comport...

Страница 74: ... hauteur et en profondeur mm 190 265 en 5 étapes de 15 mm chacune Longueur de l accoudoir mm 330 Largeur de l accoudoir mm 40 Angle de braquage mm 1200 Stabilité statique 7 S ECO 2 S ECO 300 Pyro Start S Eco 300 XL Force d actionnement du frein de stationnement N 60 Pneus Roues motrices pouces 24 po PU Roues de transport 12 po PU Roues directrices mm 7 po x 1 75 po PU 8 po x 2 po PU 8 po x 1 25 po...

Страница 75: ...lant dans le compartiment de chargement La personne responsable du transport doit être familiarisée avec les réglementations en vigueur en matière de transport et avec le fonctionnement du KMP et du système de retenue Des systèmes de retenue à quatre points arrimés au châssis doivent être utilisés pour fixer le fauteuil roulant Si vous avez des questions concernant la fixation de votre produit dan...

Страница 76: ...lisé Si vous avez des questions veuillez contacter le service clientèle de B B au 49 0 700 6000 7070 Le fauteuil roulant doit être contrôlé conformément au plan de maintenance et être en parfait état de fonctionnement 12 Transfert du fauteuil roulant Le fauteuil roulant peut être réutilisé Avant de le transmettre à un autre utilisateur il doit être entretenu et préparé de manière hygiénique par un...

Страница 77: ...es fournira Remarque Malgré des recherches et des modifications approfondies il se peut que des informations incorrectes se soient glissées dans notre manuel d instructions Nous nous réservons le droit d y apporter des modifications techniques Les figures sont susceptibles d inclure des accessoires Vous trouverez la version actuelle des manuels d instructions dans la zone de téléchargement de notr...

Страница 78: ...Bischoff Bischoff GmbH Becker Göring Straße 13 D 76307 Karlsbad www bischoff bischoff com MOVILIDAD B B IBERIA S L P I Can Mascaró C Ponent Nave 1 A E 08756 La Palma de Cervelló www bbiberia es ...

Отзывы: