background image

Setting up the device

Setting up the device

- When the power supply is connected, the unit will first calibrate the stepping motors of the unit. It is normal 
that this may cause any noise. When the calibration is done, the unit is ready to be used (in the selected 
DMX, automatic or music controlled mode)
- It is possible that the unit may shut off the beam projection when no music or sound is detected. This will 
avoid the projection of a solid, static beam, which may cause injury to eyesight.
- This unit uses an advanced scanset to create variable movements to the laser beam. This way, figures and 
patterns can be made. The unit uses a high-speed 25 kpps scanset to create the moving beams of the laser. 
It is normal that the laser beam and projection may appear ‘flickering’ when projecting very large or very 
complex patterns.
- The projected beams of the unit may appear shivering when projecting very complex or very large patterns 
on surfaces as a wall, ceiling or decorative cloth. 

Selecting a working mode

This laser device has several working modes, which are 

automatic, music-controlled, ILDA

 and 

DMX

. To 

select the right operating mode for your situation, use the dipswitch panel on the rear of the unit.

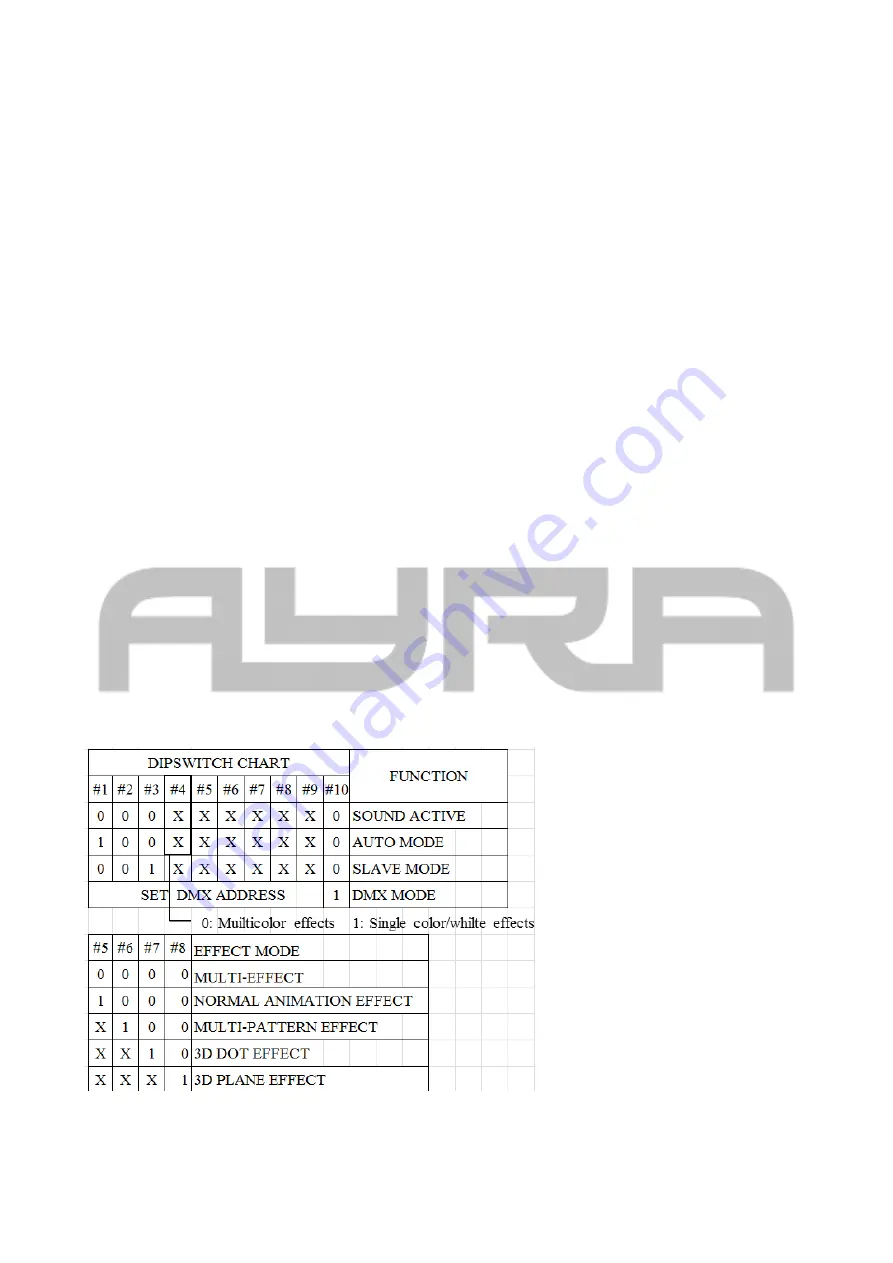
A DMX-dipswitch panel works with a binary character. It sends a 0 or 1 message to the electrical circuit. To 
select a working mode, pay close attention to the information scheduled below. Every DMX dipswitch stands 
for a certain value, which is on or off. The values are stated as below:

1 – 1
2 – 2
3 – 4
4 – 8
5 – 16
6 – 32
7 – 64
8 – 128
9 – 256
10 – mode switch (DMX ON/OFF)


To select the different working modes, pay close attention to the setting of DMX dipswitches below:

NOTE: 

value “X” = not used or not active for this mode

Any information and illustrations shown in this user manual are subject to change without further notice.

User manual version: 2.0

Creation date + author initials: 05-12-2013 RV Revision date + author initials: 18-02-2014 RV

Содержание ITA3D 600

Страница 1: ...wheel User manual Any information and illustrations shown in this user manual are subject to change without further notice User manual version 2 0 Creation date author initials 05 12 2013 RV Revision...

Страница 2: ...nected Do not cover or remove the ground contact Never leave cables lying around Do not open the device and do not modify any hard or software of this unit Do not insert this object into air vents Do...

Страница 3: ...the device while in use Avoid brute force during the installation and operation of this device Familiarize yourself with the functions of the device before use Do not allow operation of the device by...

Страница 4: ...electrical shocks and short circuit Always mount the fuse cover back to the fuse compartment Any information and illustrations shown in this user manual are subject to change without further notice Us...

Страница 5: ...e the laser device running unattended The requirements for laser shows may vary from country to country and even from region to region Contact your local authorities for more information regarding pro...

Страница 6: ...sconnect it from the power supply and store it in a dust free environment Always check the unit for possible damage before use If you suspect that something is wrong with the unit do not connect it to...

Страница 7: ...d for activation of auto sound active mode 11 Microphone sensitivity knob low high 12 Remote interlock connector 13 IEC power inlet 14 ON OFF switch 15 Key lock switch 16 Safety eye 17 Hanging bracket...

Страница 8: ...ear shivering when projecting very complex or very large patterns on surfaces as a wall ceiling or decorative cloth Selecting a working mode This laser device has several working modes which are autom...

Страница 9: ...aser using ILDA lasersoftware you need to connect a DB25 cable to the laser The laser automatically detects the ILDA connection and will override any selected working mode thus switching automatically...

Страница 10: ...kpps max in your laser software is recommended Selecting the wrong scanner speed in your laser software may cause permanent damage to the laser components When creating figures patterns or graphics al...

Страница 11: ...llow Green Blue Purple Fixed color Random single color Random 7 colors Moving 7 colors fixed color 4 Pattern selection 0 255 128 built in patterns 5 Movement Y 0 127 Manual Y positioning 128 191 Autom...

Страница 12: ...our DMX controller Faulty positioning of the DMX polarity switch on the controller flip the polarity switch on your DMX controller No response or DMX activity signal LEDs active Check your DMX cables...

Страница 13: ...he reset program This will reset all values to the original 0 point The fixture does not respond fast enough to the set speed on my DMX controller Moving parts can not keep up with the set speed Decre...

Страница 14: ...practice this device falls under Class 3B Class 3B and Class 4 lasers are able to cause serious injury to your audience when used incorrectly It is therefore strongly recommended that only skilled las...

Отзывы: