Ayce A0012 Скачать руководство пользователя страница 24

47

46

I

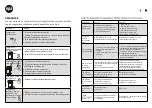
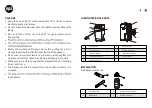
DESCRIZIONE DEI SIMBOLI

Conforme alle direttive europee applicabili a questo prodotto.

Il simbolo del cassonetto barrato indica che il prodotto non può 

riciclato nel rispetto delle norme ambientali locali per lo smaltimento 

estinati agli 

inceneritori o alle discariche, minimizzando così qualsiasi possibile 
impatto negativo sulla salute umana e sull’ambiente.

ISTRUZIONI IMPORTANTI SULLA SICUREZZA

PRIMA  DI  USARE  QUESTO  DISPOSITIVO  LEGGI  TUTTE  LE 
ISTRUZIONI E I SEGNALI DI  SICUREZZA DI QUESTO MANUALE.

AVVERTENZA

Per ridurre il rischio d’incendi, scosse elettriche o infortuni durante 
l’utilizzo del condizionatore, osservare le seguenti precauzioni di 
base:

  Questo dispositivo può essere usato dai bambini dagli 8 anni in su 

e da persone con capacità fisiche, sensoriali o mentali ridotte o 
mancanza di esperienza e conoscenza se ricevono supervi-

     sione o istruzioni sull’uso del dispositivo in modo sicuro e capiscono 

i rischi coinvolti. 

  I bambini non devono giocare con il dispositivo.    

  Pulizia e manutenzione dell’utente non devono essere eseguite da 

bambini senza supervisione.

  Questo dispositivo deve essere installato conformemente alle 

disposizioni nazionali sul cablaggio.

  Se il cavo di alimentazione è danneggiato, deve essere sostituito 

dal produttore, il suo agente di vendite o da persone similmente 

  Assicurati che la ventola sia scollegata dalla corrente elettrica 

prima di rimuovere la protezione.

  Staccare la spina del dispositivo durante il riempimento e la pulizia.

  Collegare a una presa a 3 poli messa a terra.

  Non rimuovere il polo di terra. 

  Non usare una prolunga. 

  Scollegare il condizionatore prima della manutenzione.

  Usare due o più persone per spostare e installare il condizionatore. 

  Il  dispositivo  deve  essere  protettodal  gelo;  l’acqua  di 

condensazione residua può congelarsi e causare danni.

  Evitare l’immissione di aria calda esterna. 


e. 

  Disattivare le fonti di calore non necessarie come 

lampade,stampanti, fotocopiatrici ecc. 
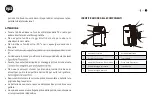
  Prima di iniziare a utilizzare il dispositivo, deve essere mantenuto 

in posizione verticale per un po’ di tempo, in modo tale che il liquido 

richiesto è di 2 ore. L’inosservanza di questo.

Содержание A0012

Страница 1: ...LIMATISSATORE A0012 PORTABLE AIR CONDITIONER A0012 V181018 GEBRAUCHSANWEISUNG I MANUEL D UTILISATION I MANUALE D ISTRUZIONI I ORIGINAL INSTRUCTIONS CH Import Distribution exklusiv durch Jumbo Markt AG...

Страница 2: ...rwendung des Ger tes beaufsichtigt werden oder unterwiesen worden sind und die m glichen Gefahren verstanden haben KindernistdasSpielenmitdemGer tuntersagt Reinigungs und vom Benutzer durchzuf hrende...

Страница 3: ...ne Fl che mit weniger als 5 Neigung Das Ger t arbeitet effzienter an bestimmten Stellen im Raum siehe Entleeren Sie die Ablaufwanne des Kondenswassers vor der Lagerung des Ger ts amEndeder Saison um d...

Страница 4: ...s das andere Ende des Luftschlauchs gen gend Spielraum zum Fenster der T r Veranda Balkont r oder dem Wandloch hat Der Luftein oder auslass darf nicht durch ein Schutzgitter oder irgendein anderes Hin...

Страница 5: ...s zu 5 m auf den Signalempf nger der Klimaanlage gerichtet wird BEDIENFELD Standby Taste Entfeuchtertaste Timer Taste Schlaf Taste Automatik K hlen Entfeuchten Ventilatormodus Geschwindigkeitstaste Mo...

Страница 6: ...h 6 Minuten wieder in Betrieb genommen m i r u t a r e p m e T e t n a t s n o k e n i e f u a h c i s t l l e t s t r e G s a D EntfeuchtungsmoduseinunddieTemperaturanpassungistnicht m glich K hlmodu...

Страница 7: ...eratur und Kann die Luftfeuchte im Raum anpassen Wenn Sie diese Taste dr cken wird das Ger t eingeschaltet solange es mit Strom versorgt wird oder ausgeschaltet wenn es sich gerade in Betrieb befindet...

Страница 8: ...befindet sich eine Recycling Einheit f r Kondenswasser in diesem Ger t Das Kondenswasser wird teilweise recycelt zwischen dem Kondensator und der Wasserplatte Wenn der Wasserspiegel auf das obere Nive...

Страница 9: ...L fter laufen um das Ger t von innen zu trocknen und Schimmelbildung zu verhindern Stoppen Sie das Ger t und ziehen Sie den Netzstecker heraus Entnehmen Sie dann die Batterien der Fernbedienung und l...

Страница 10: ...rgung 1 NichtandieSteckdoseangeschlossen 2 Stecker oder Steckdose ist besch digt 3 Sicherung istdurchgebrannt 1 Stecker einstecken 2 ErsetzenSiedasNetzkabeloderdieSteckdose 3 Tauschen Sie die Sicherun...

Страница 11: ...ngert werden W hrend der Garantiezeit k nnen m ngelaufweisende Ger te in jedem Jumbo Filiale zur ckgegeben werden Wir werden uns die Entscheidung vorbehalten das Ger t gem ss geltenden Garantiebestimm...

Страница 12: ...ATINEF REMPFANGDERFERNBEDIENUNG 51 ABDECKUNGF RELEKTRONISCHESSTEUERGEH USE 18 DOPPEL 8 SIEB 52 GUMMISTOPFEN 19 SCHRITTMOTOR 53 KLEMME 20 ZIER ARTIKEL 54 STROMKABEL STROMSTECKER 21 VERBINDUNGSSTANGE 55...

Страница 13: ...urveillance ou s ils ont t inform s quant l utilisation s re de l appareil et s ils comprennent les risques impliqu s Les enfants ne doivent pas jouer avec l appareil Le nettoyage et l entretien ne do...

Страница 14: ...nvers pendant le transport Placez l appareil sur une surface plane avec moins de 5 d inclinaison L appareil fonctionne de mani re plus efficacedanscertains Vider le bac de drainage de condensation ava...

Страница 15: ...au d air dispose d une distance suffisante entre la fen tre la porte ou la porte fen tre ou le trou du mur La sortie ou l admission d air ne peut pas tre bloqu e par lagrille de protection ou par tout...

Страница 16: ...ani re appropri e Moded emploi Pour utiliser le climatiseur pointez la t l commande sur le r cepteur de signal La t l commande peut tre une distance maximale de 5 m tres quand vous la pointez sur le r...

Страница 17: ...tionne automatiquement le mode Mode Dehumidify d shumidifier Le ventilateur sup rieur fonctionnera basse vitesse et la vitesse ne peut pas tre r gl e Le compresseur et le ventilateur inf rieur s arr t...

Страница 18: ...ement que la derni re fois on n a pas besoin de r initialiser nouveau le mode de fonctionnement Cette fonctionn estpasdisponiblelorsquel appareilestdanslemode automatique T L COMMANDE La t l commande...

Страница 19: ...appareil La condensation est recycl e entre le condensateur et le r servoir Apr s la vidange r installez le bouchon sinon l appareil peut fuir dans votre pi ce Si l appareil est plac dans une position...

Страница 20: ...e ensoleill e pour s cher l appareil l int rieur et l emp cher de moisir piles de la t l commande et stockez l appareil Retirez les tuyaux d air et stockez les correctement et couvrez le trou SP CIFI...

Страница 21: ...hez le 2 Remplacez le cordon d alimentation ou la prise 3 Remplacez le fusible par le fournisseur de service Sp cification 3 15A 250VAC L appareil s arr te automatique ment MINUTERIE l arr te ou la te...

Страница 22: ...ils d fectueux pour les faire r parer Les devis et les r parations en dehors de la p riode de garantie vous seront factur s dans tous les cas Indications compl mentaires service apr s vente Pendant la...

Страница 23: ...DUCIRCUIT LECTRONIQUE HON EN CAOUTCHOUC 18 17 CRAN 8 DOUBLE 52 BORNE 19 MOTEUR PAS PAS 53 CORDOND ALIMENTATION FICHE LECTRIQUE 20 L MENT DE D CORATION 54 TUYAU D AIR FROID 21 TIGE DE RACCORDEMENT 55 F...

Страница 24: ...giocare con il dispositivo Pulizia e manutenzione dell utente non devono essere eseguite da bambini senza supervisione Questo dispositivo deve essere installato conformemente alle disposizioni nazion...

Страница 25: ...ima di conservare Non usare solventi chimici es Benzina lucidanti a base di alcool per pulire la superficie dell unit per evitare di grafare Assicurati di staccare la corrente prima di smontare o inst...

Страница 26: ...sicurarti che l altra estremit del o foro nel muro La presa o uscita d aria non possono essere bloccate da griglie protettive o qualsiasi altra ostruzione INSTALLARE IL TUBO DI SCARICO E L ADATTATORE...

Страница 27: ...nel puntarlo verso il ricevitore PANNELLO DI CONTROLLO Tasto Stand by Pulsante deumidificazione Tasto Timer Tasto Velocit Tasto Sleep Tasto Modalit Modalit Automatica Fredda Deumidificatoree Ventola V...

Страница 28: ...non pu essere regolata Il compressoree la ventola inferiore si fermeranno dopo 8 minuti di funzionamento riparti ranno quindi dopo 6 minuti la regolazione della temperatura non attiva Modalit Rafredda...

Страница 29: ...senza bisogno di reimpostare la modalit operativa Questa funzione non disponibile quando l unit funziona in modalit automatica TELECOMANDO Il telecomando trasmette i segnali al sistema Tasto Tasto Ta...

Страница 30: ...a di condensazione circola in parte tra il condensatore e il piatto dell acqua Quando il livello dell acqua sale al livello superiore il galleggiante si attiva e l indicatore d acqua E4 lampeggia per...

Страница 31: ...dispositivo e prevenire la formazione di mufa Arrestareil dispositivo e scollegare la spina di alimentazione rimuovere quindi le batterie dal telecomando e conservare in modo appropriato Rimuovere i c...

Страница 32: ...ina non si accende Guastoall alimentatore 1 Spina non inserita 2 Spina o presadanneggiata 3 Fusibile rotto 1 Inserisci la spina 2 Sostituisciilcavo dialimentazione o la presa 3 Sostituzione del fusibi...

Страница 33: ...cliente Una volta scaduto il periodo di garanzia sar sempre possibile riportare i prodotti difettosi I costi di riparazione una volta scaduto il periodo di garanzia saranno sempre a carico del cliente...

Страница 34: ...PERTURA SCATOLA DI CONTROLLO TAPPO DI GOMMA 18 17 MOTORE PASSO PASSO 52 TERMINALE 19 ELEMENTO DECORATIVO 53 CAVO DI ALIMENTAZIONE SPINA 20 BIELLA 54 CONDOTTA FREDDA 21 FERITOIA ORIZZONTALE 1 55 FILTRO...

Страница 35: ...azards involved Children shall not play with the appliance Cleaning and user maintenance shall not be made by children without supervision This appliance shall be installed in accordance with national...

Страница 36: ...azer to clean the unit surface to avoid scratching damaging the surface Make sure to cut off the power before disassembling or installing the air inlet fence The battery must be removed from the appli...

Страница 37: ...nnector of air exhaust duct 3 Connect the connector of air exhaust duct to the unit REMOTE CONTROL HOW TO INSTALL BATTERIES Slide the cover to open Be sure the direction is correct 1 Open the back cov...

Страница 38: ...room temperature Adjust Fan Speed Press the button to select a desired fan speed shown below Standby After pressing the button again the unit will emit a di and stop working Automatic mode Once the O...

Страница 39: ...or decrease the time 1 hour by pressing once Sleep mode The operation is effective when the unit is under mode Press the button in mode then the unit will work under sleep mode and the indoor centrifu...

Страница 40: ...15 C Dehumidifying Room temperature is below 15 C If the air conditioner runs in cooling or dry mode with door or window opened for a long time when relative humidity is above 80 dewmay drip down fro...

Страница 41: ...r using it for about 100 hours Clean as follows Stop the appliance and remove the air filter Clean and reinstall the air filter If the dirt is conspicuous wash it with a solution of detergent in lukew...

Страница 42: ...for service Trouble Analysis Doesnotrun 1 Iftheprotectortriporisblown 2 Pleasewaitfor3minutesandstartagain protectordevicemay bepreventingunitfromworking 3 Ifbatteriesintheremotecontrollerareexhausted...

Страница 43: ...all ayce products The warranty certificate is only valid in connection with the receipt Please keep both in a safe place The warranty does not affect your statutory rights The product is guaranteed f...

Страница 44: ...n of your device as accurately as possible This allows us to process your complaint more quickly and efficiently An imprecise description with terms like device is not working or broken device can del...

Страница 45: ...E COLD PIPE DOUBLE 8 SCREEN THREE PASS FILTER STEPPER MOTOR CAPILLARY DECORATIVE ARTICLE CONDENSER CONNECTING ROD COVER OF COMPRESSOR VERTICAL LOUVER 1 OVER LOADING PROTECT VERTICAL LOUVER 2 COMPRESSO...

Отзывы: