


AXSWC
Remapping
REV. 2/17/20
© COPYRIGHT 2020 METRA ELECTRONICS CORPORATION
Integrate •
After the
AXSWC
interface has been programmed and functioning properly, the button assignment for the steering wheel controls may be reassigned. For example,
Seek Down
may be preferred
to be
Mute
instead. This feature can be performed by either following the steps below, through a Windows based computer using the
, or through the
app
available from the Android/Apple mobile devices app store.
Note:
Apple mobile devices will require the use of the
for this feature.
Attention!
If more than 20 seconds elapses between steps, the procedure will abort, and the light in the interface will go out. The interface may not function properly and may need to be
reset and reprogrammed.
1.
Cycle the ignition on and wait until the light flashes
Green
1 time then goes out.
2.
Immediately press and hold the
Volume Up
button on the steering wheel until the light turns solid
Green
, then release. The light will then go out indicating
Volume Up
has now
been programmed.
3.
Press and hold the
Volume Down
button on the steering wheel until the light turns solid
Green
, then release. The light will then go out indicating
Volume Down
has now been
programmed.
4.
Continue from
Seek Up / Next
in the
Button Function Legend
to reference the order in which the steering wheel control buttons must be programmed.
Note:
If a function in the legend is not present on the steering wheel, press the
Volume Up
button on the steering wheel until the light turns solid
Green
, then release. This will
tell the interface to skip that function.
5.
To complete the remapping process, press and hold the
Volume Up
button on the steering wheel until the light turns solid
Green
, then goes out. Release the
Volume Up
button
at this point. The remapping process is now complete.
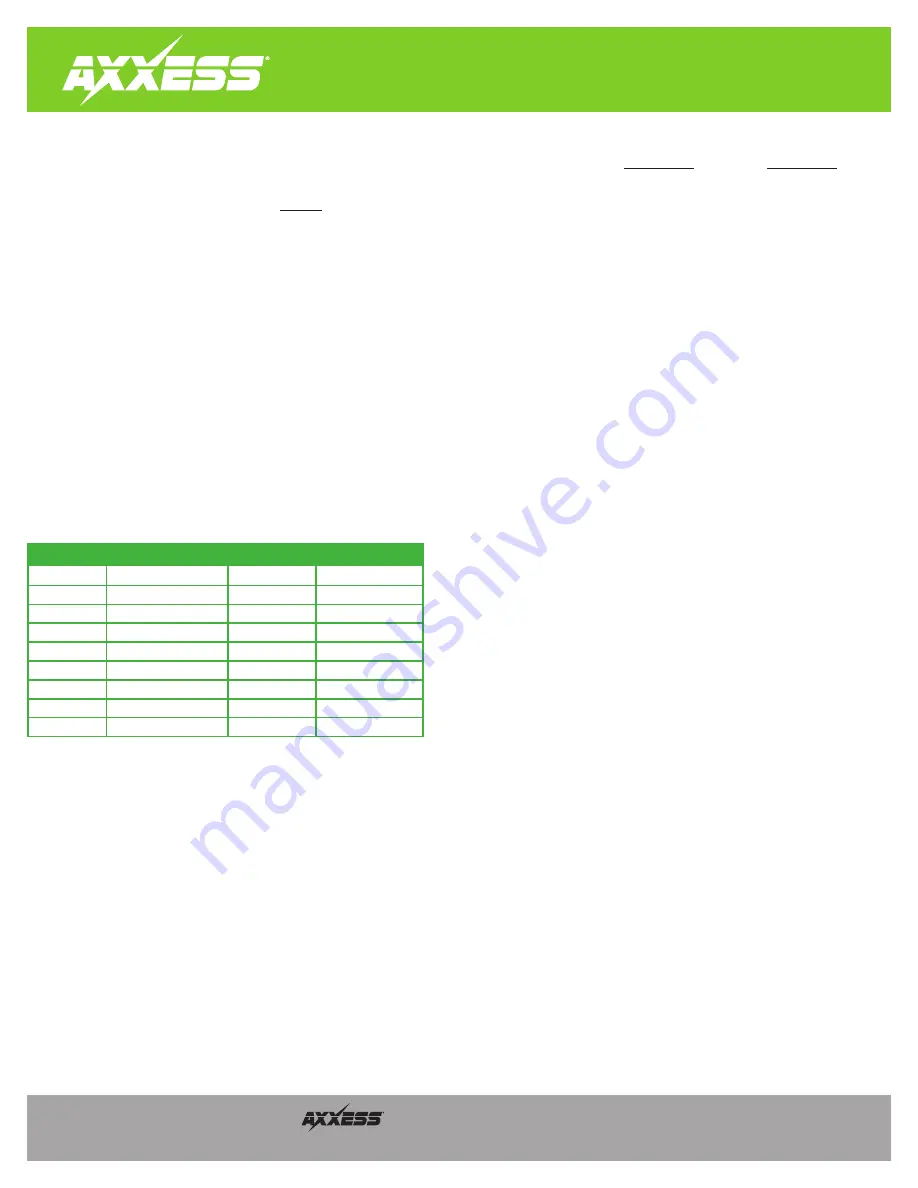
Button Function Legend
Function #
Function
1
Volume Up
2
Volume Down
3
Seek Up / Next
4
Seek Down / Previous
5
Source / Mode
6
Mute
7
Preset Up
8
Preset Down
9
Power
Function #
Function
10
Band
11
Play / Enter
12
PTT (push to talk)
13
On Hook
14
Off Hook
15
Fan Up *
16
Fan Down *
17
Temp Up *
18
Temp Down *
* Not applicable in this application
Note:
Certain radios may not have these commands. Please refer to the manual provided
with the radio, or contact the radio Manufacturer for specific commands recognized by
that particular radio.


