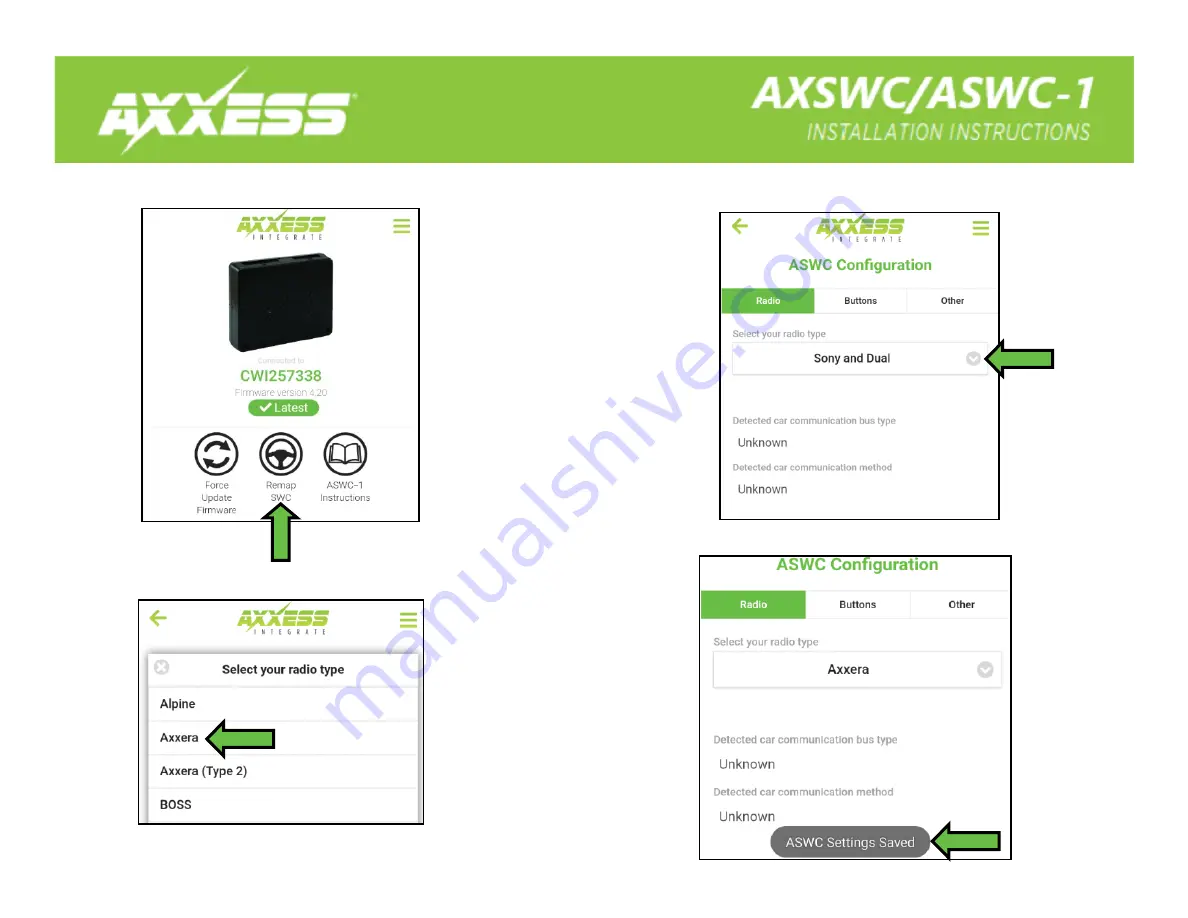
Step 1.) Connect the interface to your device, then click “Remap SWC”.
Step 2.) Click on the drop down arrow.
Step 3.) Select Axxera from the drop down menu.
Step 4.) If successful you should see “ASWC Settings Saved” at the bottom of the app.
Страница 1: ...ip ties TABLE OF CONTENTS Installation Preparation 2 Installation 2 Programming 3 Wire Description 3 AXSWC General Instructions One interface does it all no additional interfaces needed Designed to be...
Страница 2: ...instructions For the radios listed below Connect the 3 5mm adapter to the male 3 5mm SWC jack from the AXSWC harness Any remaining wires tape off and disregard Eclipse Connect the steering wheel cont...
Страница 3: ...CAN HI or Serial Data 2 White Green Negative SWC 3 Yellow Green Positive SWC 4 Green Orange Negative SWC 5 Gray Red Negative SWC 6 Black Chassis Ground 7 Blue Pink CAN LO 8 Black Green Negative SWC 9...
Страница 4: ...A ELECTRONICS CORPORATION REV 2 14 20 INSTAXSWC General Instructions INSTALLATION INSTRUCTIONS AXSWC GENERAL INSTRUCTIONS If you are having difficulties with the installation of this product contact o...
Страница 5: ...Press and hold the Volume Down button on the steering wheel until the light turns solid Green then release The light will then go out indicating Volume Down has now been programmed 4 Continue from See...
Страница 6: ...3 Cycle the key off then back on 4 Wait until the light flashes Green 1 time then goes out 5 Press and hold the desired SWC button for dual assignment for 10 seconds or until the light flashes rapidl...
Страница 7: ...flashes Green one time then goes out 5 Press and hold the Volume Down button on the steering wheel until the light turns solid Red then release The light will then go out indicating the interface is i...
Страница 8: ...ack into the radio Makek sure the steering wheel control jack used is labeled REM Also some Alpine radios have a feature that turns the remote to either the back or the front If the radio has this fea...
Страница 9: ...ifferent trims If it is a non data communication vehicle test the factory steering wheel control wires with a multimeter by applying the negative from the meter to the steering wheel control ground wi...
Страница 10: ...radios use an ISO EURO 1784 shell radio connector Figure A The SWC wire from the radio can be found in the bundle of wires above the main connector labeled REMOTE CONT Figure B This installation step...
Страница 11: ...adapter included with the AXSWC Figure A 2 Proceed with programing the steering wheel controls Once the AXSWC interface shows the correct radio 5 LED flashes remove the resistor 3 Reconnect the Blue...
Страница 12: ...ace is now in Changing Radio Type mode 6 Press and hold the Volume Up button on the steering wheel until the interface s light turns solid Red then release Radio number 1 has now been programmed Repea...
Страница 13: ...eering Wheel Control menu and change it from Preset to Custom then tap the wrench icon Step 6 Push and hold the desired function on the screen for two seconds then release the box should stay illumina...
Страница 14: ...t the interface to your device then click Remap SWC Step 2 Click on the drop down arrow Step 3 Select Axxera from the drop down menu Step 4 If successful you should see ASWC Settings Saved at the bott...
Страница 15: ...ontrol menu and change it from Preset to Custom then tap the wrench icon Step 7 Push and hold the desired function on the screen for two seconds then release the box should stay illuminated in white A...
Страница 16: ...ontrol menu and change it from Preset to Custom then tap the wrench icon Step 7 Push and hold the desired function on the screen for two seconds then release the box should stay illuminated in white A...