background image

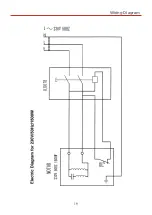
Wiring Diagram

19

Содержание 107697

Страница 1: ...AW153E 2 0HP Dust Extractor Code 107697 Original Instructions AT M 10 02 2022 BOOK VERSION 2 ...

Страница 2: ...chinery Co Ltd at Yutai West Street Laizhou Shandong 261400 China and complies with the relevant essential health and safety requirements 2006 42 EC 06 42 EC Annex I 05 2006 EN 62233 2008 EN 60335 2 69 2012 declares that the machinery described This machine complies with the following directives EU Declaration of Conformity EN 60335 1 2012 A11 Signed Andrew Parkhouse Operations Director Date 08 08...

Страница 3: ...port Panels B 2 Extractor Housing Upright Supports C 1 Filter Bag Hanger Bar D 1 Extractor Housing Cavity E 1 Base F 4 Castor Wheels G 16 Dome Head Screws H 1 Inlet Manifold I 1 Dust Bag J 1 30 Micron Filter Bag K 2 Filter and Bag Retaining Belts L 28 Bolts Flat Washers Nuts M A E B C D 3 F G H ...

Страница 4: ...ur Extractor which will enable you to become familiar with terminology we will use in this manual Keep this Instruction Manual readily accessible for any others who may also be required to use the machine Optional Accessories Quantity Item Part 1 AW153E Filter Cartridge N Code 700345 Air filter cartridge for the AW153E chip extractor Upgrade the performance of these extractors able to handle fine ...

Страница 5: ...r if necessary by a suitably qualified person Do not use when or where it is liable to get wet Workplace Do not use 230V a c powered tools anywhere within a site area that is flooded Keep machine clean Leave machine unplugged until work is about to commence Always disconnect by pulling on the plug body and not the cable Carry out a final check e g check the cutting tool is securely tightened in th...

Страница 6: ...he inlet duct can be particularly irksome in this way as long strand shavings etc can wrap around the grill fret KEEP the particle filter clean The machine relies on its ability to blow air through the filter to generate good suction If the particle filter starts to clog this reduces the air flow and hence the machine becomes less efficient The particle filter can be cleaned by using an M class va...

Страница 7: ...Assembly 7 6 8 3 4 Continues Over 1 F 2 H G 5 M B 7 B C ...

Страница 8: ...mbly 8 14 12 13 9 10 11 Locate the extractor housing cavity E position the outlet housing over the extractor s outlet Place a bolt M through C M A M Secure the extractor A to the support panels B A A E M B ...

Страница 9: ...le and secure with a flat washer nut This will support the extractor housing E while you secure the remaining bolt washers nuts see step 14 15 16 17 18 E Extractor housing E being held by one bolt Mount the remaining bolts and tighten D D M Continues Over ...

Страница 10: ... 29 26 27 28 22 23 24 25 I Filter bag belt pocket L Hook the micro filter bag K over the hanger bar Tuck the filter bag around the extractor housing cavity Secure the micro filter bag K K Secure the inlet manifold ...

Страница 11: ...etaining belt around the extractor housing E and secure the dust bag J in place J L Optional Filter Cartridge Code 700345 Remove the retaining belt L and remove the 30 micron filter bag K place to one side Remove the filter bag hanger bar D and place safely aside D Continues Over ...

Страница 12: ...2 9 7 8 6 5 Locate the filter cartridge N and lower the assembly down over the extractor s housing cavity and secure using the retaining belt L N L Wrap the retaining belt around the filter cartridge N and secure ...

Страница 13: ...13 30 Micron filter bag Filter bag hanger bar Extractor housing upright support Extractor assembly x2 100mm Inlet manifold Handle NVR ON OFF control switch Base Dust collecting bag Castor wheel Extractor support panel Extractor Set Up 1 ...

Страница 14: ...Illustration and Parts Description 14 Filter and bag retaining belts Motor Extractor Set Up 2 Extractor assembly with optional filter cartridge Filter cartridge Shaker paddle ...

Страница 15: ...eck the dust collecting bag and empty if full After a period of time remove the cartridge filter if installed and using a M class vacuum cleaner clean the interior and exterior of the filter IFTHE EXTRACTOR FAILSTO START UP ORTHERE ARE ANY OTHER STRANGE NOISES APART FROMVIBRATION SOUNDS CONTACTTHE TECHNICAL SALES FOR SUPPORT PHONE 03332 406406 EMAIL TECHNICALSUPPORT AXMINSTERTOOLS COM ALWAYSWEAR A...

Страница 16: ... cracks repair as necessary Check the dust collection bag for wear and tear especially around the neck of the retaining belt If wear or fraying is occurring replace the bag Check the motor for dust sawdust shavings etc build up If this has occurred clean with an M class vacuum cleaner Move the shaker paddle handle on top of the filter cartridge assembly if fitted back and forth to remove any built...

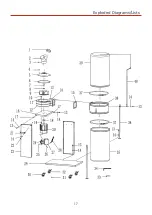
Страница 17: ...Exploded Diagrams Lists 17 ...

Страница 18: ... M8 x16 28 14 WASHER 8 28 15 SEAL PAD 1 16 MOTOR PLATE 1 17 HEX NUT M8 8 18 RUBBER PAD 1 19 PIN A5 x 25 1 20 MOTOR 1 21 HANDLE 2 22 HEXAGON SOCKET SCREW LEFT THREAD M8 x 20 4 23 SUPPORT PLATE 2 24 SWITCH 1 25 SLOTTED PAN HEAD SELF SETTING SCREW ST4 2 x 13 2 26 SLOTTED PAN HEAD SCREW M4 x 60 4 27 SWITCH BOX 1 28 PLUG 1 29 BASE PLATE 1 30 UNIVERSAL CASTER 3 4 31 SLOTTED PAN HEAD SCREW M6 x 10 16 32 ...

Страница 19: ...Wiring Diagram 19 ...

Страница 20: ...ears For more information visit axminstertools com 3years Axminster Tools Axminster Devon EX13 5PH axminstertools com The packaging is suitable for recycling Please dispose of it in a responsible manner Do not dispose of electric tools together with household waste material By law they must be collected and recycled separately EU Countries Only ...

Отзывы: