


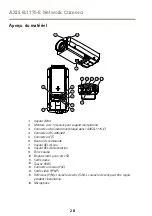


AXIS Q1775-E Network Camera
Note
• The weight of the camera is 3.6 kg (7.9 lb). Check that the material is strong enough to
support this weight.
• Always use a shielded network cable (STP) intended for outdoor use between the
Axis product and the end point and ensure that the end point is properly grounded.
Installations of Axis products using a shielded network cable (STP) and a properly
grounded end point have been tested to comply with industry immunity standard levels
such as surge protection. Any other installation method will void the warranty and
leave the unit at a risk.
• An optional cable with a diameter of 4.0 mm - 5.5 mm should be routed through a
separate cable gland. See
.
1. Use the wall bracket as drill template to prepare for installation of the wall bracket.
2. Route the network cable through the wall bracket, and through the bracket adapter.
Leave approximately 30 cm (11.8”) of cable for connecting to the camera.
3. Install the wall bracket on a wall, ceiling, or pole using screws and plugs appropriate for
the material (e.g. wood, metal, sheet rock, stone).
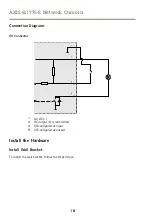
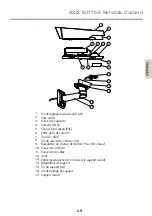
Route the Network and Other Cables
Note
Check against the hardware overview image (see
) while following the steps below.
1. Loosen the cable cover screws; detach the cable cover from the bottom cover.
2. Remove the cap, the plug and the gasket from the cable gland to be used.
3. Route the network cable through the cap.
4. Slide the network cable through the slit in the gasket.
5. Route the network cable through the cable gland.
6. Press the gasket into the cable gland and screw the cap on firmly.
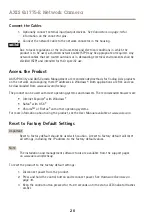
Attach Camera to Wall Bracket
1. Place the camera with the bottom cover on the wall bracket and tighten the bracket
screws.
2. Replace the cable cover and tighten the screws.
3. Connect the cables, see
.
4. Loosen the bracket adjustment screw to point the camera in the right direction. See
for information on how to view the video stream.
5. Attach the safety wire in the top cover to the tab in the bottom cover.
6. Optionally insert an SD memory card (not included) into the SD card slot. A standard or
high capacity SD card is required to store images locally in the camera.
19
E
N
G
L
IS
H
Содержание Q1775-E
Страница 1: ...AXIS Q1775 E Network Camera ENGLISH FRAN AIS DEUTSCH ITALIANO ESPAN L Installation Guide...
Страница 4: ......
Страница 8: ...8...
Страница 22: ...22...
Страница 26: ...26...
Страница 40: ...40...
Страница 44: ...44...
Страница 58: ...58...
Страница 62: ...62...
Страница 76: ...76...
Страница 80: ...80...
Страница 94: ...94...
Страница 95: ...AXIS Q1775 E Network Camera 95...
Страница 96: ...AXIS Q1775 E Network Camera Axis Axis Axis RTC 3 0 V BR CR1220 5 RTC RTC Axis Axis www axis com techsup 96...
Страница 97: ...AXIS Q1775 E Network Camera Axis 97...
Страница 98: ...98...
Страница 103: ...AXIS Q1775 E Network Camera LED LED LED LED LED LED LED LED LED LED 1 2 3 AXIS LED LED LED 105 106 103...
Страница 109: ...AXIS Q1775 E Network Camera 3 6 kg STP STP 4 0 5 5 mm 100 1 2 30 cm 3 100 1 2 3 4 5 6 109...
Страница 112: ...Installation Guide Ver M1 3 AXIS Q1775 E Network Camera Date June 2015 Axis Communications AB 2015 Part No 62889...


