background image


Product Description


AXIS 2130/2130R User’s Manual


Tripod Mounting

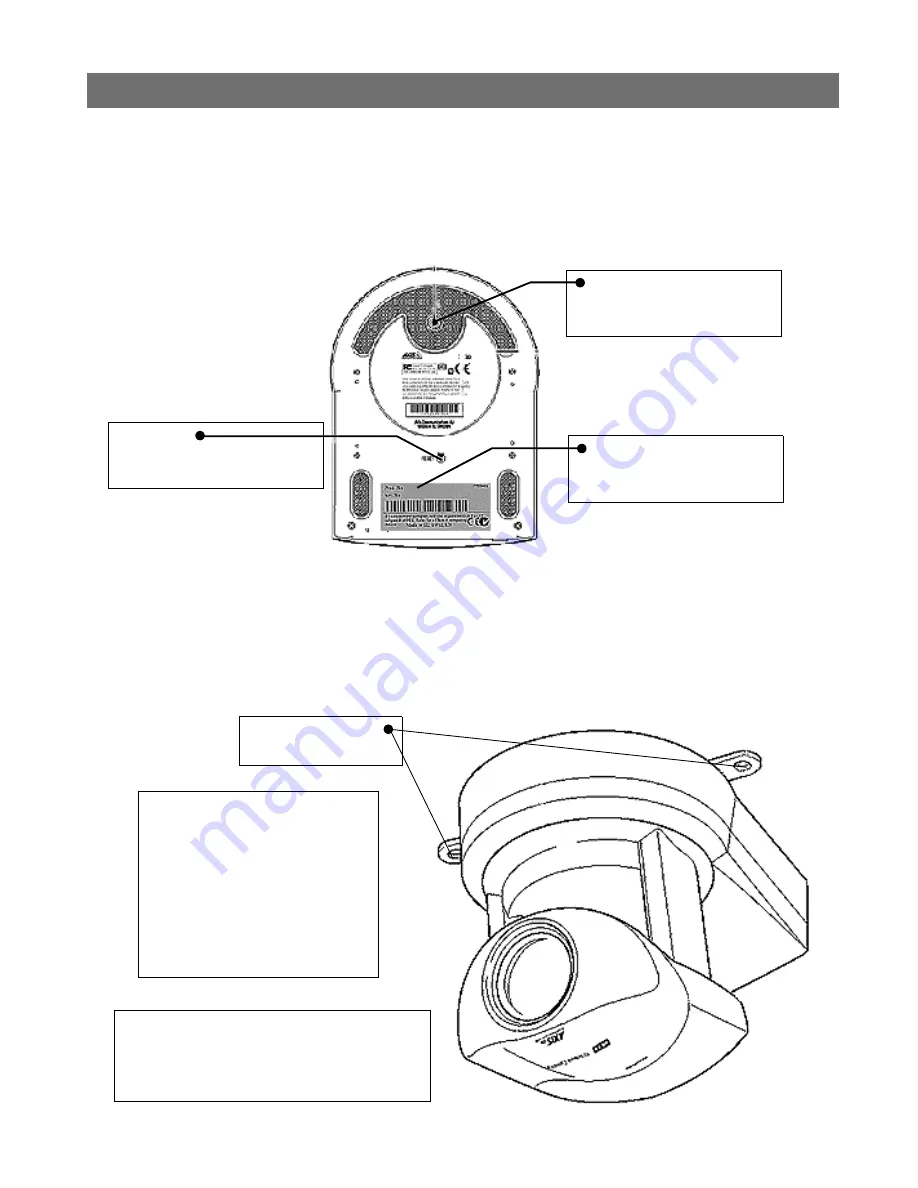
The AXIS 2130 is supplied with a screw hole for tripod mounting. The screw hole is located 

on the base of the unit, as shown below. The base plate of the AXIS 2130R is similar, but is 

supplied with a ceiling mounting plate instead of the tripod screw hole.

Ceiling Mounting the AXIS 2130R

The AXIS 2130R is designed exclusively for ceiling mounting and a special mounting plate 

is supplied for the purpose. Screw the plate (screws not supplied) to the ceiling at the point 

of installation.

Serial Number

The serial number is used for setting 
the product’s IP address.

Tripod Screw Hole

The serial number is used for setting 
the product’s IP address.

Reset Button

Press to restore the factory default 
settings.

Screw holes for ceiling 
mounting 

WARNING!

When installing the AXIS 2130R on the 
ceiling, check that the ceiling is strong 
enough to bear the weight of the cam-
era plus the mounting plate. A weak 
fitting could result in the camera fall-
ing and causing serious injury.

Check for looseness in the camera 
installation mount at least once a year. 

Mounting Plate Information

Distance between screw holes - 120mm (4

18/25

 in.)

Screw hole diameter: 6mm (1/4 in.)
Plate thickness: 1.6 mm (1/16 in.)

Содержание 2130R PTZ

Страница 1: ...AXIS 2130R PTZ Network Camera User s Manual...

Страница 2: ...ed to correct the interference Shielded cables should be used with this unit to ensure compliance with the Class A limits Europe This digital equipment fulfills the requirements for radiated emission...

Страница 3: ...gs 16 Dynamic IP Address Notification Settings 17 Reinstating the Factory Default Settings 20 Using the AXIS 2130 PTZ Network Camera 21 Accessing your Surveillance Images 21 Positional Control of the...

Страница 4: ...AXIS 2130 2130R User s Manual 4 Controlling and Monitoring 35 Appendix F Technical Specifications 37 Index 40...

Страница 5: ...es as the AXIS 2130 but is designed for ceiling mounting only The degree of pan and tilt is different to that of the AXIS 2130 please see the technical specifications on page 37 for full details The W...

Страница 6: ...Mbps networks Wide Range of Applications The AXIS 2130 2130R offers live video over the network for extending and enhancing any traditional CCTV system Use it for verifying intruder alarms for traffic...

Страница 7: ...onnects to the net work via a standard RJ45 connector Supporting NWAY the AXIS 2130 2130R detects the speed of the local network segment and varies the speed of data communication accordingly between...

Страница 8: ...g at the point of installation Serial Number The serial number is used for setting the product s IP address Tripod Screw Hole The serial number is used for setting the product s IP address Reset Butto...

Страница 9: ...rnet connector and attach it to the network 2 Connect the power cable to the power supply connector and connect it to the main power supply 3 Ensure that the Power Indicator on the front panel is perm...

Страница 10: ...ecurity To enable the updating of images in Microsoft Internet Explorer set your browser to allow ActiveX con trols and perform a once only installation of Axis ActiveX component onto your workstation...

Страница 11: ...resolving any queries The help system is stored internally in the unit Accessing the Tools Follow the instructions below to access the Administration Tools from a browser 1 Start your browser and ent...

Страница 12: ...System Security settings Use the Application Wizard for developing the following applications transmitting images to a remote server on your network sending e mails with embedded images or links to re...

Страница 13: ...at automatically adjusts the time for daylight saving Image Settings Display the date and time and your own text in the image Select monochrome or color images and set the resolution and compression f...

Страница 14: ...ther define or edit the Administrator password the Administrator user name is permanently set to root with the default password set to pass configure add or delete user names and passwords Important B...

Страница 15: ...iate URL for any given object Refer to the on line help for more information on personal settings Caution View Parameter List The Parameter List provides a comprehensive list of all of the system para...

Страница 16: ...ow TCP IP Parameters Description DHCP Enable DHCP to allow centralized assignation of IP addresses Requires a DHCP server on the network BOOTP Enable the BOOTP protocol for setting the IP address auto...

Страница 17: ...et it to the factory default settings see page 20 and then perform the installation again see page 9 Parameter Description HTTP Enabling HTTP means the server will send an HTTP GET request to the spec...

Страница 18: ...isplay in the video source Text Enable or disable the display of a text string in the video image Type the text string that you want to display in the adjacent field Image Color Display Color or Black...

Страница 19: ...ns below to create a preset position 1 Click the Preset Position button An image from the camera is displayed in a new window 2 By clicking in the image or by using the Pan Tilt and Zoom control bars...

Страница 20: ...erside of the unit 1 Using a pointed object e g a paper clip press the Reset Button and keep it pressed while you disconnect and reconnect the power 2 Keep the button pressed for at least five seconds...

Страница 21: ...soft Internet Explorer you must set your browser to allow ActiveX controls and perform a once only installation of Axis ActiveX component onto your workstation If your computer prohibits the downloadi...

Страница 22: ...ters the camera through the lens Set to Auto for optimum performance Focus Allows smooth or stepped camera focus between near and far focus Home H Returns the camera to the Home position Pan Allows sm...

Страница 23: ...re required for Windows 95 98 ME or XP Home you will need Administrator privileges for Windows NT 2000 and XP Professional UNIX systems require Root privileges Ethernet Mac Address The AXIS 2130 2130R...

Страница 24: ...staller setup dialog is displayed on the screen 3 Follow the instructions as they appear Click Finish to complete the installation Setting the IP Address with the AXIS IP Installer 1 Run the AXIS IP I...

Страница 25: ...o the AXIS 2130 2130R FAQ you can pass the problem to the AXIS support desk To help us help you resolve your problems expediently please be sure to provide the following information a brief descriptio...

Страница 26: ...an interpretation of the results http servername support messages Log file Events Sep 13 11 30 01 AxisProduct syslogd 1 3 3 restart Sep 13 11 30 02 AxisProduct camd 22 camd Revision 1 66 starting up...

Страница 27: ...rp a to view the ARP table If it is empty you must ping an existing unit on your network before you can download the IP address to the AXIS 2130 2130R using ARP Note The AXIS IP Installer is an easy t...

Страница 28: ...first trigger event may not have been fully executed before the second event starts This scenario is demonstrated in the illustration below This feature has particular significance when using command...

Страница 29: ...rom the Axis website at www axis com or from your local distributor Updating the firmware The AXIS 2130 2130R Flash memory is updated over the network using FTP See the detailed instructions supplied...

Страница 30: ...iguration parameters of your unit can be modified using the File Transfer Protocol FTP FTP is supported by most operating environments and is a useful method for quickly downloading standard pre confi...

Страница 31: ...ure to comply with this notice may render your product unusable All files stored in the etc httpd html directory are available through the product Web server in the virtual directory local The URL to...

Страница 32: ...owing URL in the location Address field Example The images are now updated in your browser 8 Enter bye in the command window to exit the ftp program Note You can change the html files as and when you...

Страница 33: ...dited boa conf in the video server by using the Put command Note As an alternative to the above you might like to edit the line starting with Document Root so that it points directly to the local dire...

Страница 34: ...vier loads If the output is used with an external relay a diode must be connected in parallel with the load for protection against any voltage transients Pins Function OUT A OUT B The two external dev...

Страница 35: ...y Output The relay output can be used to directly drive a maximum load of 50V DC at 100mA By connecting additional relay circuitry it can also drive heavier loads The output relay is controlled using...

Страница 36: ...input it is a relatively simple procedure to send a single image or video stream to a remote imaging library each time the detector is activated Querying the Status of Digital Inputs The status of th...

Страница 37: ...cklight Compensation Automatic Gain Control AGC Automatic White Balance AWB Illumination range min 6 lux Image Compression 5 user controlled compression levels Frame rate Up to 30 frames sec at 352x24...

Страница 38: ...B RAM 4MB FLASH memory I O 1 input and output on a single terminal connector Event triggered actions for remote image storage via FTP or e mail SMTP pre post alarm image storage Pre Post Alarm Buffer...

Страница 39: ...odels Weight 1 41lb 0 64 kg both models Security Multi user password protection Management Remote configuration and status using Web based tools File Sizes The AXIS 2130 2130R delivers the following f...

Страница 40: ...Factory Default Settings 20 Factory default settings 16 Firmware 25 Firmware update 29 Flicker reduction 18 Focus 22 FTP 20 I I O Terminal Block 34 Image settings 18 Input 34 Installation 9 IP addres...

Страница 41: ...tings 16 Specifications 37 Support 25 T TCP IP settings 16 Technical specifications 37 Tilt 22 Triggering images 34 Triggering snapshots 36 Tripod mounting 8 Troubleshooting guide 25 U Unauthorized ac...

Отзывы: