background image

7


PRESET VOLUME LEVELS

  It is possible to preset the volume when unit is powered up. Press the SEL button until unit is in 

DSP mode. To select the volume to remain at the same levels at switch off, press “SEL” until 

VOL LAST is displayed. The volume will resume at the level it was when the unit was turned 

off. To set the volume to a predetermined level at switch on, press SEL again so that VOL ADJ is 

displayed. Then rotate

AUDIO

CONTROL

AUDIO

CONTROL

or

AUDIO

CONTROL

AUDIO

CONTROL

 to select the desired volume levels.

4.  LOUDNESS BUTTON (LD)

  Press this button for bass and treble boost. Push button again to return to normal operation. This 

function is useful when listening at low levels. Loudspeakers are inefficient at low power levels 

and will tend to sound flat. The loudness control will boost the bass and treble response for a more 

lively performance.  While this function is operating, the display shows “LOUD”

5.  LCD DISPLAY

  The Liquid Crystal Display will show the current settings of the unit.

6.  BAND SELECTOR (BAND)

  Press this button to toggle through the preset Radio FM1---FM2---FM3---AM1---AM2. 

7.   AUTOMATIC OR MANUAL TUNING (FREQ UP

OR FREQ DOWN

)

  When pressed for less than 1 second, the unit operates in manual tuning mode.

  When pressed longer than 1 second, the unit operates in automatic tuning mode.

  If the keys are not pressed again within 3 seconds, the unit will return to SEEK mode. 


8.  LOCAL/DISTANT BUTTON (LOC)

  Press Local/Distant (LOC) button for listening to weak stations. “LOC” indicator will appear on 

the display. Press this button again (Distant mode) for normal operation.

9.  DISPLAY BUTTON (Set the Clock)

  Selects radio frequency or clock display.


To set the clock:

  1. With clock display selected, hold down (DISP) button until clock display starts flashing.

  2. Rotate

AUDIO

CONTROL

AUDIO

CONTROL

to change minutes,

AUDIO

CONTROL

AUDIO

CONTROL

to change hours.

  3. Press (DISP) button to start clock.

10. PRESET STATIONS

  Six numbered preset button store and recall stations for each band.


Storing a station:

  1. Select a band (if needed)

  2. Select a station

  3. Hold a preset button longer than one second. Preset number appears in the display when station 

is saved.


Recall a station:

  1. Select band (if needed)

  2. Press a preset button for less than one second to select stored station.

11. ‘SCAN’ AUTOMATIC TUNING CONTROL (SCAN)

  This operation is similar to normal search. It holds the station for only 5 seconds before moving to 

the next station. To store the desired station into preset memory (see point 10)

Содержание AX-900

Страница 1: ...18FM 12AM Station Seek Scan Auto Store Digital Clock Stereo Mono Long Range XTREME Tuner DESIGNED FOR AUSTRALASIAN CONDITIONS AM FM STEREO RECEIVER with FRONT PANEL AUX INPUT Compatible with audio output of iPod and other MP 3 players AUDIO CONTROL Electronic Volume Balance Fader Treble Bass Mute Loud Controls Subwoofer Output 4 Channel RCA Line out 5 Volt Preamp Output 2 RCA Line in Front AUX IN ...

Страница 2: ...riving is not hindered Avoid installing the unit where it would be subject to high temperatures direct sunlight or hot air from the heater or where it would be subject to dust dirt or excessive vibration Only use the supplied mounting hardware for a safe and secure installation Be sure to remove the front panel before installing the unit NOTE Angle for car radio installation must not exceed 30 oth...

Страница 3: ...t is detached from the unit ATTACHING THE FRONT PANEL Apply the left hand side of the front panel to the unit by attaching part B of the front panel to part A of the unit as illustrated and push until it clicks Pay attention not to put pressure on the display or control buttons Notes Make sure that the front panel is the right way up Do not use excessive force Use the front panel case supplied whe...

Страница 4: ...age fuse for each lead Use of a higher amperage fuse may cause serious damage and void the warranty L WHITE SUB W LINE IN R RED L WHITE LINE OUT REAR R RED LINE OUT FRONT L WHITE ANTENNA CONNECTOR ISO CONNECTOR R RED B A GREY GREY BLACK FRONT RIGHT SPEAKER VIOLET VIOLET BLACK REAR RIGHT SPEAKER FRONT LEFT SPEAKER REAR LEFT SPEAKER WHITE WHITE BLACK GREEN GREEN BLACK ISO A B PLUG POWER ANTENNA BLUE...

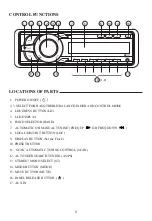
Страница 5: ...ON LD 5 LCD DISPLAY 6 BAND SELECTOR BAND 7 AUTOMATIC OR MANUAL TUNING FREQ UP OR FREQ DOWN 8 LOCAL DISTANT BUTTON LOC 9 DISPLAY BUTTON Set the Clock 10 PRESET BUTTON 11 SCAN AUTOMATIC TUNING CONTROL SCAN 12 AUTO SEEK SEARCH TUNING AS PS 13 STEREO MONO SELECT ST 14 MODE BUTTON MODE 15 MUTE BUTTON MUTE 16 PANEL RELEASE BUTTON 17 AUX IN LOCATIONS OF PARTS ...

Страница 6: ...ROL With SEL in DSP mode press SEL until WOOFER is shown Then rotate AUDIO CONTROL AUDIO CONTROL or AUDIO CONTROL AUDIO CONTROL to select ON or OFF AUDIBLE BEEP FUNCTION WithSELinDSPmode press SEL tocontroltheaudiblebeepfunction Rotate AUDIO CONTROL AUDIO CONTROL or AUDIO CONTROL AUDIO CONTROL to select ON or OFF RADIO SEEK FUNCTION With SEL in DSP mode press SEL until SEEK is shown Then rotate AU...

Страница 7: ...OWN When pressed for less than 1 second the unit operates in manual tuning mode When pressed longer than 1 second the unit operates in automatic tuning mode If the keys are not pressed again within 3 seconds the unit will return to SEEK mode 8 LOCAL DISTANT BUTTON LOC Press Local Distant LOC button for listening to weak stations LOC indicator will appear on the display Press this button again Dist...

Страница 8: ...s in stereo it will now be heard in mono Press this button again for normal reception 14 MODE BUTTON MODE Press this key to select RADIO mode or AUX IN mode 15 MUTE BUTTON MUTE Pressing this button immediately disables the audio output Press again to restore the volume to its previous level 16 PANEL RELEASE BUTTON Press the button and the right hand section of the panel will release 17 FRONT AUX I...

Страница 9: ...ctive antenna SYMPTOM POSSIBLE CAUSE SOLUTION Replace fuse with same amperage CAUTION MAINTENANCE This detachable panel AM FM car radio is an example of superior design and craftsmanship The following suggestions will help you care for the product so that you can have many years of enjoyment 1 Do not touch the contacts on the front panel or the unit body 2 The product can only operate on 12V 14V D...

Страница 10: ...age 12V DC 10 8 15 6V allowable Speaker Impedance 4 8 Ohm Output Power 4 x 40W MAX SUB OUT Frequency Response 20 Hz 50 Hz Sensitivity 300 mV Max Output 4V RCA OUT Frequency Response 20 Hz 20 KHz Sensitivity 200 mV Output Impedance 2 K Max Output 5 Volt max RCA IN AUX IN Frequency Response 20 Hz 20 KHz Sensitivity 775 mV Input Impedance 20 K DIMENSIONS Chassis 178 W x50 H x158 D mm Nose piece 188 W...

Страница 11: ...s product B An invoice or receipt showing full details of original vendor purchase model number and serial number This warranty covers faults through component failure or failure of the product to operate in accordance with published specifications Product failure as a result of unreasonable environ ment conditions accident misuse improper installation unauthorised repair vehicle electrical or wir...

Отзывы: