background image

tBOX510-518-FL-24-110MRDC U

ser’s Manual 


Introduction


10 

2.3 

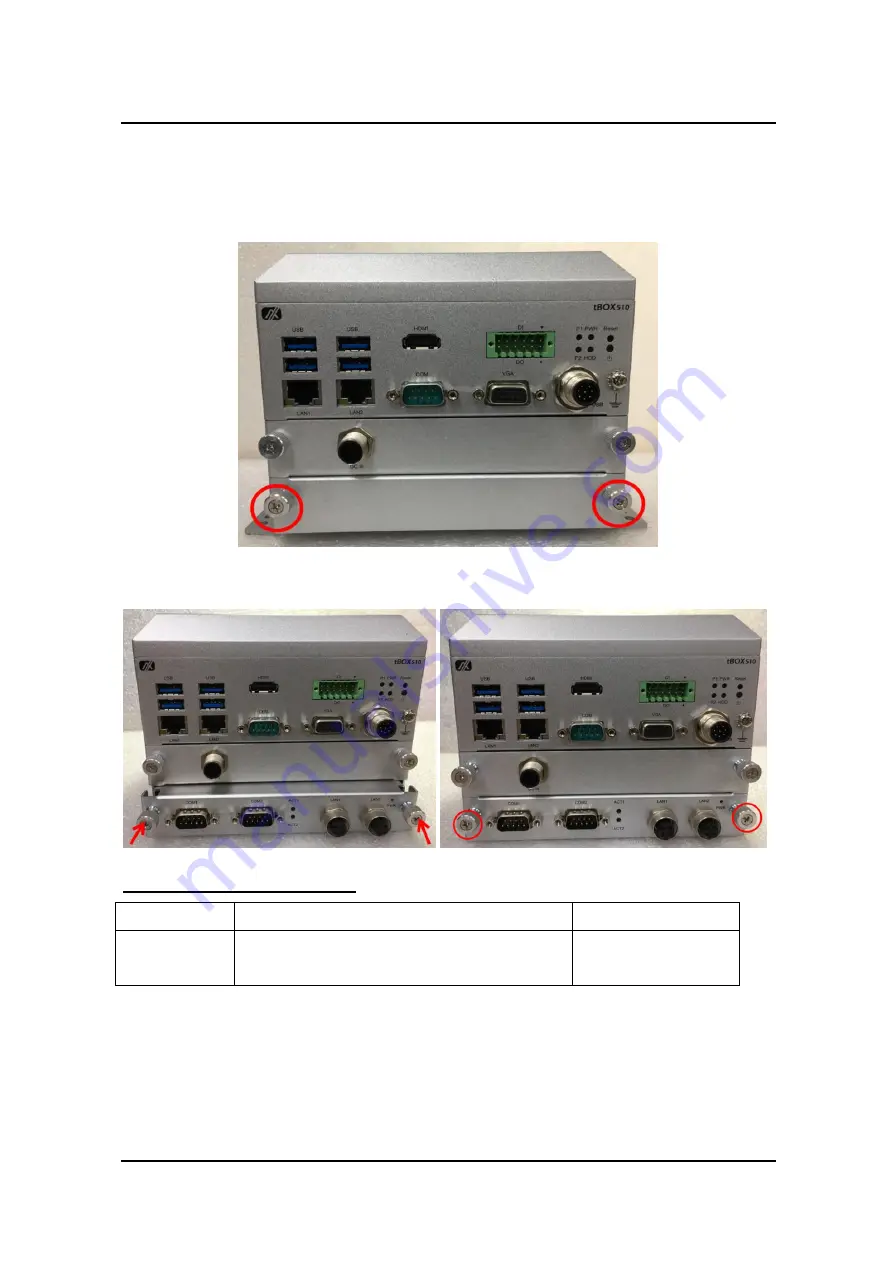
Installing the PIM (Plug-in Module) 


Step 1 

Turn off the system. 

Step 2 

Loosen all cover screws and remove the cover from the system. 


Step 3 

Install the module as shown below, and fasten the screws firmly to complete the 
installation. 


For the Plug-in Module (PIM)s  

Model name 

Specification 

Note 

PIM901T 

2 x M12 D-coded 10/100Mbps Ethernet 

2 x DB9 isolated COM RS-232/422/485 


Содержание tBOX510-518-FL-24-110MRDC

Страница 1: ...tBOX510 518 FL 24 110MRDC Embedded System User s Manual ...

Страница 2: ... usefulness of any information in this document Axiomtek does not make any commitment to update the information in this manual Axiomtek reserves the right to change or revise this document and or product at any time without notice No part of this document may be reproduced stored in a retrieval system or transmitted in any form or by any means electronic mechanical photocopying recording or otherw...

Страница 3: ...ould ruin sensitive components Make sure the tBOX510 518 FL 24 110MRDC is properly grounded 5 Make sure the voltage of the power source is correct before connecting it to any power outlet 6 Turn OFF system power before cleaning Clean the system using a cloth only Do not spray any liquid cleaner directly onto the screen 7 Do not leave equipment in an uncontrolled environment where the storage tempe...

Страница 4: ...nent for the computer please read and understand the details below fully When you need to clean the device please rub it with a piece of dry cloth 1 Be cautious of the tiny removable components when you use a vacuum cleaner to absorb the dirt on the floor 2 Turn the system off before you start to clean up the component or computer 3 Never drop the components inside the computer or get circuit boar...

Страница 5: ...may moisten a piece of cloth a bit with some water or rubbing alcohol and rub it on the computer Unknown solvents may be harmful to the plastics parts Vacuum cleaner Using a vacuum cleaner to suck dust dirt hair cigarette particles and other particles out of a computer can be one of the best methods of cleaning a computer Over time these items can restrict the airflow in a computer and cause the c...

Страница 6: ...ments Axiomtek is a trademark of Axiomtek Co Ltd IBM PC AT PS 2 VGA are trademarks of International Business Machines Corporation Intel and Pentium are registered trademarks of Intel Corporation MS DOS Microsoft C and QuickBasic Windows 10 Windows 8 1 Windows 8 Windows 7 Windows XPE Windows XP Windows CE embedded Linux are trademarks of Microsoft Corporation Other brand names and trademarks are th...

Страница 7: ...2 4 Installing the DIN rail Mounting Kit 11 2 5 Installing the Wall Mounting Kit 12 2 6 Installing the Anti vibration Kit 13 SECTION 3 CONNECTOR 15 3 1 Connectors 15 3 1 1 Display 15 3 1 2 Ethernet Ports 16 3 1 3 Storage 16 3 1 4 Restore BIOS Optimal Defaults CLEAR CMOS 16 3 1 5 Wireless 17 3 1 6 USB 18 3 1 7 USB2 0 M12 Connector 18 3 1 8 COM Port 18 3 1 9 DIO 18 3 1 10 LED 19 3 1 11 Power Reset B...

Страница 8: ...viii This page is intentionally left blank ...

Страница 9: ...5W processor onboard Wide temperature operation of 40 C 70 C with W T accessories DRAM SSD etc Supports 2 RJ 45 Gb Ethernet LAN ports Supports dual display output via 1 VGA and 1 HDMI One COM Port support RS 232 422 485 mode Supports one 2 5 SATA SSD and one CFast with external access Wide range 24 110V DC in with M12 A coded connector Isolated 4DI 4DO 4 USB3 0 2 USB2 0 with M12 A coded 4 LED indi...

Страница 10: ...2133 MHz up to 16GB Graphics Integrated Intel HD Graphics 620 for DVI I 1 2 2 System I O 1 x HDMI connector 1 x D Sub female connector for VGA 2 x RJ 45 10 100 1000 Mbps Ethernet 4 x USB 3 0 1 x DB9 COM port for RS232 422 485 1 x terminal block connectors for DIO 1 x Reset button 1 x Power button 1 x 24 110VDC power input connector with M12 5 Pin 4 x Antenna opening 1 x CFast Optional PIM Plug In ...

Страница 11: ... X Y Z direction random 0 5 Grms w HDD 5 500Hz X Y Z direction random With DIN rail kit 2 Grms w SSD 5 500Hz X Y Z direction random With Anti Vibration Kit 2 Grms w HDD 5 500Hz X Y Z direction random Weight 2 5 kg 5 51lb without package Dimensions 119 8mm 4 72 W x 124 8mm 4 91 D x 155mm 6 10 H without wall mount NOTE All specifications and images are subject to change without notice ...

Страница 12: ...tBOX510 518 FL 24 110MRDC User s Manual Introduction 4 1 3 Dimensions The following diagrams show you the dimensions and outlines of the tBOX510 518 FL 24 110MRDC ...

Страница 13: ...tBOX510 518 FL 24 110MRDC User s Manual Introduction 5 ...

Страница 14: ...ard Optional accessories tBOX510 518 FL 24 110MRDC system unit x 1 SATA drive HDD or SSD Terminal block 6x2 pin x 1 CFast drive Screws pack x 1 Wi Fi Bluetooth module Wall mount bracket kit x 1 Communication 3G 4G GPS etc modules SATA tray x 1 DIN rail kit DRAM thermal pad x 1 Anti Vibration Kit M12 LAN cable M12 power cable M12 USB cable PIM Plug In Module x 1 If you cannot find this package or a...

Страница 15: ... FL 24 110MRDC is flexible for your different hardware configurations such as the hard disk drive and CFast Chapter 2 will show you how to install the hardware parts 2 1 Installing the Memory Wireless Modules Step 1 Turn off the system Step 2 Loosen all cover screws and remove the cover from the system ...

Страница 16: ...le s gold finger into the socket and push the module down to complete memory installation Step 4 Insert the Mini PCIe card into the socket and fasten screws Note the Mini PCIe card with SIM functions should be inserted into Socket 1 Step 5 Put the cover back onto the system and fasten all screws tightly to close the chassis ...

Страница 17: ...the system Be sure to unplug the internal power cable before pulling it out Step 3 Fasten the SSD screws marked by the red arrows below to fix the SSD Then screw the SSD firmly to the tray marked by the yellow circles and install the tray back to the system Step 4 Loosen the screws to open the CFast door and install the SIM and CFast card as illustrated below Then screw the CFast door back to the ...

Страница 18: ...e system Step 2 Loosen all cover screws and remove the cover from the system Step 3 Install the module as shown below and fasten the screws firmly to complete the installation For the Plug in Module PIM s Model name Specification Note PIM901T 2 x M12 D coded 10 100Mbps Ethernet 2 x DB9 isolated COM RS 232 422 485 ...

Страница 19: ...anual Introduction 11 2 4 Installing the DIN rail Mounting Kit Step 1 Prepare the DIN rail mount assembly components screws and the bracket ready Step 2 Assemble the brackets to the bottom of the system unit and fasten all screws tight ...

Страница 20: ...er s Manual Introduction 12 2 5 Installing the Wall Mounting Kit Step 1 Prepare the wall mount assembly components screws and brackets ready Step 2 Assemble the brackets to the bottom of the system unit and fasten all screws tight ...

Страница 21: ...User s Manual Introduction 13 2 6 Installing the Anti vibration Kit Step 1 Prepare the Anti Vibration Kit components screws and brackets ready Step 2 Assemble the brackets to the bottom of the system unit and fasten screws tight ...

Страница 22: ...tBOX510 518 FL 24 110MRDC User s Manual Introduction 14 This page is intentionally left blank ...

Страница 23: ... pin D Sub connector as VGA connector Pin Signal Pin Signal Pin Signal 1 Red 2 Green 3 Blue 4 N C 5 GND 6 GND 7 GND 8 GND 9 VCC 10 GND 11 N C 12 DDC DATA 13 Horizontal sync 14 Vertical sync 15 DDC CLK 1x HDMI Pin Signal Pin Signal 1 TMDS data 2 11 TMDS clock shield 2 TMDS data 2 shield 12 TMDS clock 3 TMDS data 2 13 CEC 4 TMDS data 1 14 Not connected 5 TMDS data 1 shield 15 DDC clock 6 TMDS data 1...

Страница 24: ...al N C BI_DC 6 Receive data or bidirectional RX BI_DB 7 Not connected or bidirectional N C BI_DD 8 Not connected or bidirectional N C BI_DD A Speed LED OFF Green Orange B Activity link LED OFF No link Blinking Data activity detected Yellow 3 1 3 Storage 1 x 2 5 external SATA drive bay 1 x SATA CFast Pin Signal Pin Signal 1 GND 13 N C 2 SATA_TX 14 GND 3 SATA_TX 15 N C 4 GND 16 N C 5 SATA_RX 17 N C ...

Страница 25: ..._DATA N C 11 REFCLK 12 SIM_CLK N C 13 REFCLK 14 SIM_REST N C 15 GND 16 SIM_VPP N C 17 N C 18 GND 19 N C 20 3 3VSB 21 GND 22 PERST 23 PE_RXN 24 3 3VSB 25 PE_RXP 26 GND 27 GND 28 1 5V 29 GND 30 SMB_CLK 31 PE_TXN 32 SMB_DATA 33 PE_TXP 34 GND 35 GND 36 USB_D3 37 GND 38 USB_D3 39 3 3VSB 40 GND 41 3 3VSB 42 LED_WWAN 43 GND 44 LED_WLAN 45 N C 46 LED_WPAN 47 N C 48 1 5V 49 N C 50 GND 51 N C 52 3 3VSB 1 x ...

Страница 26: ...rts RS 232 Serial port 2 supports RS422 485 which can be selected by BIOS Supports Auto Flow Control in RS485 mode Pin RS 232 RS 422 RS 485 1 DCD Data carrier detect RX NC 2 RXD Receive data RX NC 3 TXD Transmit data TX Data 4 DTR Data terminal ready TX Data 5 GND ground GND GND 6 DSR Data set ready NC NC 7 RTS Request to send NC NC 8 CTS Clear to send NC NC 9 NC NC NC 10 NC NC NC 3 1 9 DIO 1 Term...

Страница 27: ...reen Programmable 3 1 11 Power Reset Button Power button settings for software must be set up first Pin Description 1 Reset button 2 Power button Note Refer to APPENDIX A for instructions on power button settings for Windows 3 1 12 Power The DC in power input connector is an M12 A code Male 5 pin connector Pin Signal 1 VCC 2 VCC 3 System GND 4 System GND 5 Chassis GND 1 2 4 3 5 ...

Страница 28: ...tBOX510 518 FL 24 110MRDC User s Manual Connectors 20 This page is intentionally left blank ...

Страница 29: ...ured parameters are stored in a flash backup that saves the setup information whenever the power is turned off 3 1 Entering Setup To enter the setup screens follow the steps below 1 Turn on the computer and press the Del key immediately 2 After you press the Del key the main BIOS setup menu displays You can access the other setup screens from the main BIOS setup menu such as the Advanced and Chips...

Страница 30: ...nd a couple of Exit options for your selection Use Select Screen Keys or Move Keys to select the setup page you intend to configure and then press Enter to accept or enter its sub menu System Date The date format is day month date year System Time This item shows current time of your system with the format hour minute second The time is calculated based on the 24 hour military time clock For examp...

Страница 31: ...ion of the CPU and other system devices Users can select any items in the left frame of the screen to go to sub menus Hardware Monitor F81803 Super IO Configuration CPU Configuration SATA Configuration PCH FW Configuration Trusted Computing Utility Configuration Device Configuration For items marked with please press Enter for more options ...

Страница 32: ...tBOX510 518 FL 24 110MRDC User s Manual AMI UEFI BIOS Utility 24 Hardware Monitor This screen displays the temperatures of CPU and system as well as system voltages 3 3V 12V and 5V etc ...

Страница 33: ...elect options for the F81803 Super IO Configuration and change the value of the selected option A description of the selected item appears on the right side of the screen For items marked with please press Enter for more options The serial port 2 setting is preset for the internal MCU so it cannot be set by the user ...

Страница 34: ...FL 24 110MRDC User s Manual AMI UEFI BIOS Utility 26 Serial Port 1 Configuration Use these items to set parameters related to serial port 1 Serial Port 1 Select Mode Use this option to set RS 232 RS 422 RS 485 mode ...

Страница 35: ...tBOX510 518 FL 24 110MRDC User s Manual AMI UEFI BIOS Utility 27 CPU Configuration This screen shows the CPU version and its detailed information ...

Страница 36: ...ser s Manual AMI UEFI BIOS Utility 28 SATA Configuration SATA Mode Selection The AHCI Advanced Host Controller Interface mode is how SATA controller s operate Serial ATA Port 0 1 It shows the device installed in connector SATA0 1 ...

Страница 37: ...tBOX510 518 FL 24 110MRDC User s Manual AMI UEFI BIOS Utility 29 PCH FW Configuration This screen shows ME Firmware information ...

Страница 38: ...tBOX510 518 FL 24 110MRDC User s Manual AMI UEFI BIOS Utility 30 Trusted Computing Select the Security Device Support to enable or disable the TPM function ...

Страница 39: ...tup menu Follow the steps to flash BIOS 1 Create a folder and rename it to Axiomtek on the root of USB storage Ex X Axiomtek 2 Copy the BIOS file to the Axiomtek folder Ex X Axiomtek SBC87518X 005 Note The BIOS file name must contain the word SBC87518 3 Enter the BIOS flash utility and locate the BIOS file 4 Push Start to flash system BIOS ...

Страница 40: ...tBOX510 518 FL 24 110MRDC User s Manual AMI UEFI BIOS Utility 32 ...

Страница 41: ...tBOX510 518 FL 24 110MRDC User s Manual AMI UEFI BIOS Utility 33 ...

Страница 42: ...evice configuration divides into two parts one part is onboard device the other is module device The Module Device Configuration menu would dynamically appear when a module device is plugged into the slot When no module is plugged in the screen would only show Onboard Device Configuration ...

Страница 43: ...tBOX510 518 FL 24 110MRDC User s Manual AMI UEFI BIOS Utility 35 Onboard DIO Configuration In the onboard DIO configuration the screen displays DIO information and set I O Please refer below graphics ...

Страница 44: ...tBOX510 518 FL 24 110MRDC User s Manual AMI UEFI BIOS Utility 36 ...

Страница 45: ...tBOX510 518 FL 24 110MRDC User s Manual AMI UEFI BIOS Utility 37 ...

Страница 46: ...the module has COM port functions the module COM configuration menu would show The default setting for all serial ports is RS232 You can change the setting by selecting the value you want in each COM port type The system supports RS422 RS485 modes as well as high speed mode Please refer below graphics ...

Страница 47: ...3 4 Chipset Feature The Chipset menu allows users to change the advanced chipset settings Users can select any of the items in the left frame of the screen to go to the sub menus System Agent SA Configuration For items marked with please press Enter for more options ...

Страница 48: ...tBOX510 518 FL 24 110MRDC User s Manual AMI UEFI BIOS Utility 40 Memory Configuration This screen shows the system memory information ...

Страница 49: ...the default setting Please refer below graphics Administrator Password This item indicates whether an administrator password has been set installed or uninstalled User Password This item indicates whether a user password has been set installed or uninstalled Note The BIOS default has no password The user must remember the password after creating it If the user forgets the password the RMA is the o...

Страница 50: ...Prompt Timeout Use this item to set up number of seconds to wait for setup activation key where 65535 0xFFFF means indefinite waiting Bootup NumLock State Use this item to select the power on state for the keyboard NumLock Boot Option Priorities These are settings for boot priority Specify the boot device priority sequence from the available devices ...

Страница 51: ...nges to the system configurations and return to Main Menu Select Discard Changes and Exit from the Save Exit menu and press Enter Select Yes to discard changes and exit Save Changes and Reset After completing the system configuration changes select this option to leave Setup and reboot the computer so the new system configurations will take effect Select Save Changes and Reset from the Save Exit m...

Страница 52: ... Restore Defaults It automatically sets all Setup options to a complete set of default settings when users select this option Select Restore Defaults from the Save Exit menu and press Enter Save as User Defaults Select this option to save system configuration changes done so far as User Defaults Select Save as User Defaults from the Save Exit menu and press Enter Restore User Defaults It automatic...

Страница 53: ...0MRDC User s Manual Power Button Setting For Windows 45 APPENDIX A POWER BUTTON SETTING FOR WINDOWS To define how the power button operates go to the console of the PC and then follow below figures to complete the setting ...

Страница 54: ...tBOX510 518 FL 24 110MRDC User s Manual Power Button Setting For Windows 46 ...

Страница 55: ...tBOX510 518 FL 24 110MRDC User s Manual Power Button Setting For Windows 47 ...

Страница 56: ...tBOX510 518 FL 24 110MRDC User s Manual Power Button Setting For Windows 48 This page is intentionally left blank ...

Страница 57: ...Logic level 0 close Logic level 1 open Input level for wet contacts Logic level 1 3VDC max Logic level 0 10VDC min to 30VDC max source to digital input Digital output COM Power Input Voltage 30Vdc Max On state voltage 12 24VDC nominal Output channels 4 sink type Output current 200mA max per channel Digital I O Software Programming I2C to GPIO PCA9554PW GPIO Group0 3 0 is Output Group0 7 4 is Input...

Страница 58: ...tBOX510 518 FL 24 110MRDC User s Manual Digital I O 50 Digital Input Wiring Dry Contact 1 With external power Dry Contact 2 Without external power ...

Страница 59: ...tBOX510 518 FL 24 110MRDC User s Manual Digital I O 51 Wet Contact 1 Wet Contact 2 Digital Output Wiring DO drive high x_OUT equal to COM up to 200mA DO drive low High impedance ...

Отзывы: