


GOT3156T-832
User’s Manual
AMI BIOS Setup Utility
23
Chapter 3
AMI BIOS Setup Utility
This chapter provides users with detailed description how to set up basic system
configuration through the AMIBIOS BIOS setup utility.
3.1
Starting
To enter the setup screens, follow the steps below:
Turn on the computer and press the <Del> key immediately.
After you press the <Delete> key, the main BIOS setup menu displays. You can access the
other setup screens from the main BIOS setup menu, such as the Chipset and Power
menus.
3.2
Navigation Keys
The BIOS setup/utility uses a key-based navigation system called hot keys. Most of the
BIOS setup utility hot keys can be used at any time during the setup navigation process.
These keys include <F1>, <F2>, <Enter>, <ESC>, <Arrow> keys, and so on.
Note: Some of the navigation keys differ from one screen to another.
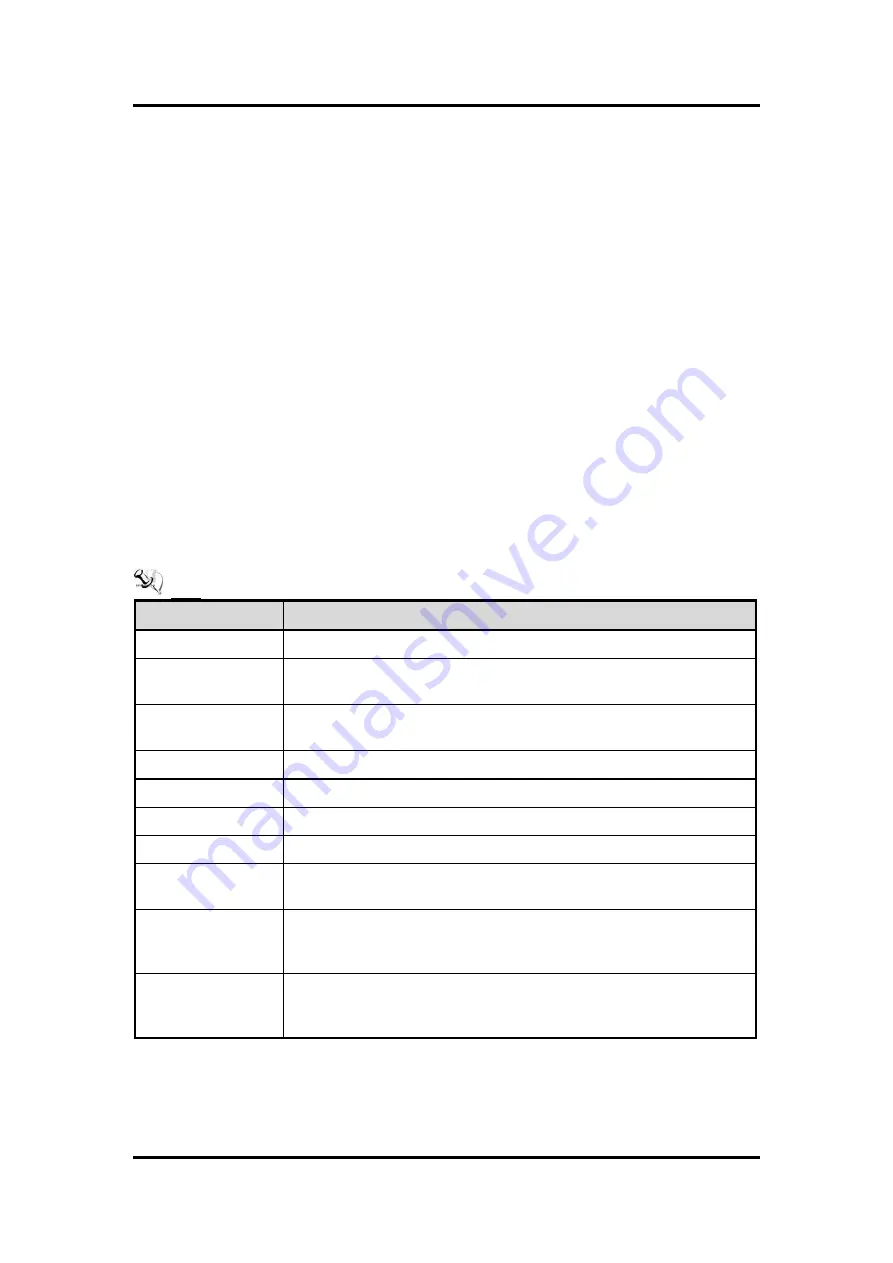
Hot Keys
Description
Left/Right
The Left and Right <Arrow> keys allow you to select a setup screen.
Up/Down
The Up and Down <Arrow> keys allow you to select a setup screen or
sub-screen.
+
Plus/Minus
The Plus and Minus <Arrow> keys allow you to change the field value of a
particular setup item.
Tab
The <Tab> key allows you to select setup fields.
F1
The <F1> key allows you to display the general help screen.
F2
The <F2> key allows you to load previous values.
F3
The <F3> key allows you to load optimized defaults.
F4
The <F4> key allows you to save any changes you have made and exit
setup. Press the <F4> key to save your changes.
Esc
The <Esc> key allows you to discard any changes you have made and exit
the setup. Press the <Esc> key to exit the setup without saving your
changes.
Enter
The <Enter> key allows you to display or change the setup option listed for a
particular setup item. The <Enter> key can also allow you to display the
setup sub- screens.
Содержание GOT3156T-832
Страница 1: ...GOT3156T 832 All in One 15 XGA TFT Fanless Compact Size PANEL PC User s Manual...
Страница 5: ...v This page is intentionally left blank...
Страница 6: ......
Страница 20: ...GOT3156T 832 User s Manual 14 Hardware and Installation Back VESA mount...
Страница 22: ...GOT3156T 832 User s Manual 16 Hardware and Installation Back Step 3 Fix the HDD on bracket by 4 screws...
Страница 28: ...GOT3156T 832 User s Manual 22 Hardware and Installation Back This page is intentionally left blank...
Страница 44: ...GOT3156T 832 User s Manual 38 AMI BIOS Setup Utility Back This page is intentionally left blank...


