


AX030-0090 Turntable
AX030-0090-MANUAL | 5
III. Installation and Start-Up
Inspect the equipment for possible damage in shipment or unpacking. Please contact
Axial if there is any damage to the unit that may hinder the operation.
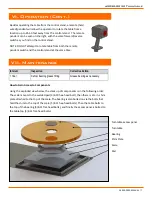
In order to move the system around, you must attach a lifting device to the four lifting
lugs located on the base plate and welded inside the tubes (see below).
Place the unit in the desired location on a clean, level, flat floor.
Sweep the floor area to remove dirt and debris.
The floor must be a concrete surface or equivalent that is capable of supporting the
load of the turntable plus the load of the product.
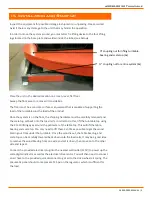
Once the system is on the floor, the shipping hardware must be carefully removed and
the scale top set back onto the load cells. In order to do this, lift the turntable top using
the 3 ¾-10 lifting eyes around the perimeter of the table top. This will lift the table,
bearing and scale top. You only need to lift these as little as possible to get the wood
bracing out from under the turntable. Once the wood is out, the table bearing, and
scale top can be carefully lowered back down onto the load cells. It may be a good idea
to remove the wood bracing from one side and set it down, then move on to the other
side and repeat.
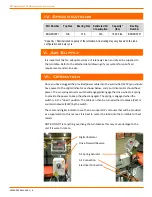
Connect the provided electrical plug into the nearest wall outlet (120V) to power up the
scale digital indicator as well as the electrical drive motor. You will then need to connect
an air hose to the provided quick disconnect to get air to the drive-wheel air spring. The
pneumatic panel should come preset at 25 psi on the regulator, which is sufficient for
the load.
¾” coupling nut for lifting turntable,
bearing and scale top (3x)
¾” coupling nut for entire system (4x)


