background image

(3)   NOTICE OF INSTALLATION 


The following rules must be strictly followed to obtain optimal air extraction: 


Do not install above a cooker with a high level grill. 


Important! Always switch off the electricity supply at the mains during 
installation and maintenance. 


The range hood must be installed in accordance with the installation 
instructions and all measurements followed. 


Please dispose of the packing material carefully. It may be a risk to 
children. 


Pay attention to the sharp edges inside the range hood especially during 
installation and cleaning. 


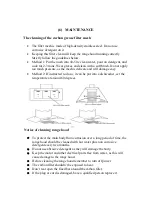
When the range hood is located above a gas appliance, the minimum 
distance between the supporting surface for the cooking vessels on the hob 
and the lowest part of the range hood that distance must be: 
Gas cookers:  

          65cm 

Electric cookers: 

          65 cm 

Coal or oil cookers:           75 cm 


Make sure the ducting has no bends less than 120º as this will reduce the 
efficiency of the range hood. 


Warning: Failure to install the screws or fixing device in accordance with 
these instructions may result in electrical hazards 


If the supply cord is damaged, it must be replaced by the manufacturer, its 
service agent or similarly qualified persons in order to avoid a hazard. 


Warning: Before obtaining access to terminals, all supply circuits must be 
disconnected. 


For safety reason, please use only the same size of fixing or mounting 
screw which are recommended in this instruction manual. 


When the range hood and appliances supplied with energy other than 
electricity are simultaneously in operation, the negative pressure in the 
room must not exceed 4 Pa (4 x 10-5 bar). 


Keep ducting pipe short and straight. 


Do not reduce the size or restrict ducting pipe. 


When using ducting pipe always install the pipe pulled taut to minimize 
pressure loss. 


Failure to observe these basic instructions will reduce the performance and 
increase noise levels of the range hood. 


Any installation work must be carried out by a qualified electrician or 
competent person. 


Do not connect the ducting system of the hood to any existing ventilation 
system which is being used for any other appliance, such as warmer tube, 
gas tube, hot wind tube. 

Содержание CHO83-900

Страница 1: ...CHO83 900 Range hood Instruction Manual ...

Страница 2: ...CONTENT 1 Notice 2 Installation 3 Notice of installation 4 Safety Warning 5 Use 6 Maintenance 7 Trouble shooting ...

Страница 3: ...lly before use The installation work must be undertaken by a qualified and competent person The manufacturer disclaims all liability for any damage or injury caused as a result of not following instructions for installation contained in the following text The range hood operates on 220 240V 50Hz ...

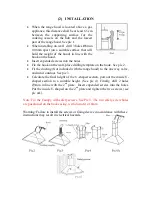
Страница 4: ...he hook See pic 2 Fit the ducting Not included with the range hood to the one way valve and run it outdoor See pic 3 Calculate the final height of the U shaped section pull out the inside U shaped section to a suitable height See pic 4 Finally drill 2 holes Ø8mm in line with the 2nd plate Insert expended screws into the holes Put the inside U shaped on the 2nd plate and tighten the two screws see ...

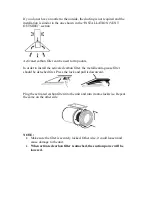
Страница 5: ...der to install the activated carbon filter the metallic anti grease filter should be detached first Press the lock and pull it downward Plug the activated carbon filter into the unit and turn it anti clockwise Repeat the same on the other side NOTE Make sure the filter is securely locked Otherwise it could loosen and cause damage to the unit When activated carbon filter is attached the suction pow...

Страница 6: ...xing device in accordance with these instructions may result in electrical hazards If the supply cord is damaged it must be replaced by the manufacturer its service agent or similarly qualified persons in order to avoid a hazard Warning Before obtaining access to terminals all supply circuits must be disconnected For safety reason please use only the same size of fixing or mounting screw which are...

Страница 7: ...ase switch the power off at the main supply Clean the range hood according to the instruction manual to keep the range hood safe from fats that may cause ignition If there is any fault with the range hood please call an authorised Award service company to arrange a service Do not try to use the range hood without the grease filters or if the filters are excessively greasy Do not leave frying pans ...

Страница 8: ... have to be fulfilled Clean your range hood periodically by following the method given in the chapter MAINTENANCE Regarding the details about the method and frequency of cleaning please refer to maintenance and cleaning section in the instruction manual Cleaning and user maintenance shall not be made by children without supervision ...

Страница 9: ...t will turn on Hood is on low speed Press again the related indicator light will turn on the hood is on mid speed Press again the related indicator light will turn on the hood is on high speed Turn off and Speed control Press speed decrease the hood will reduce speed When the hood is on low speed press again the hood and indicator light will turn off Low speed mid speed and high speed cannot work ...

Страница 10: ...If instructed to do so it can be put into a dishwasher set the temperature at around 60 degrees Notice of cleaning range hood To protect the main body from corrosion over a long period of time the range hood should be cleaned with hot water plus non corrosive detergent every two months Do not use abrasive detergent as they will damage the body Keep the motor and other electrical parts free from wa...

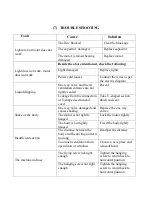
Страница 11: ...he connection of U shaped section and cover Take U shaped section down and seal Shake of the body One way valve damaged and causes shaking Replace the one way valves The motor is not tightly hanged Lock the motor tightly The body is not tightly hanged Fixed the body tightly Insufficient suction The distance between the body and the ducting outlet is too long Readjust the distance Too much ventilat...

Страница 12: ......

Отзывы: