background image

7

6

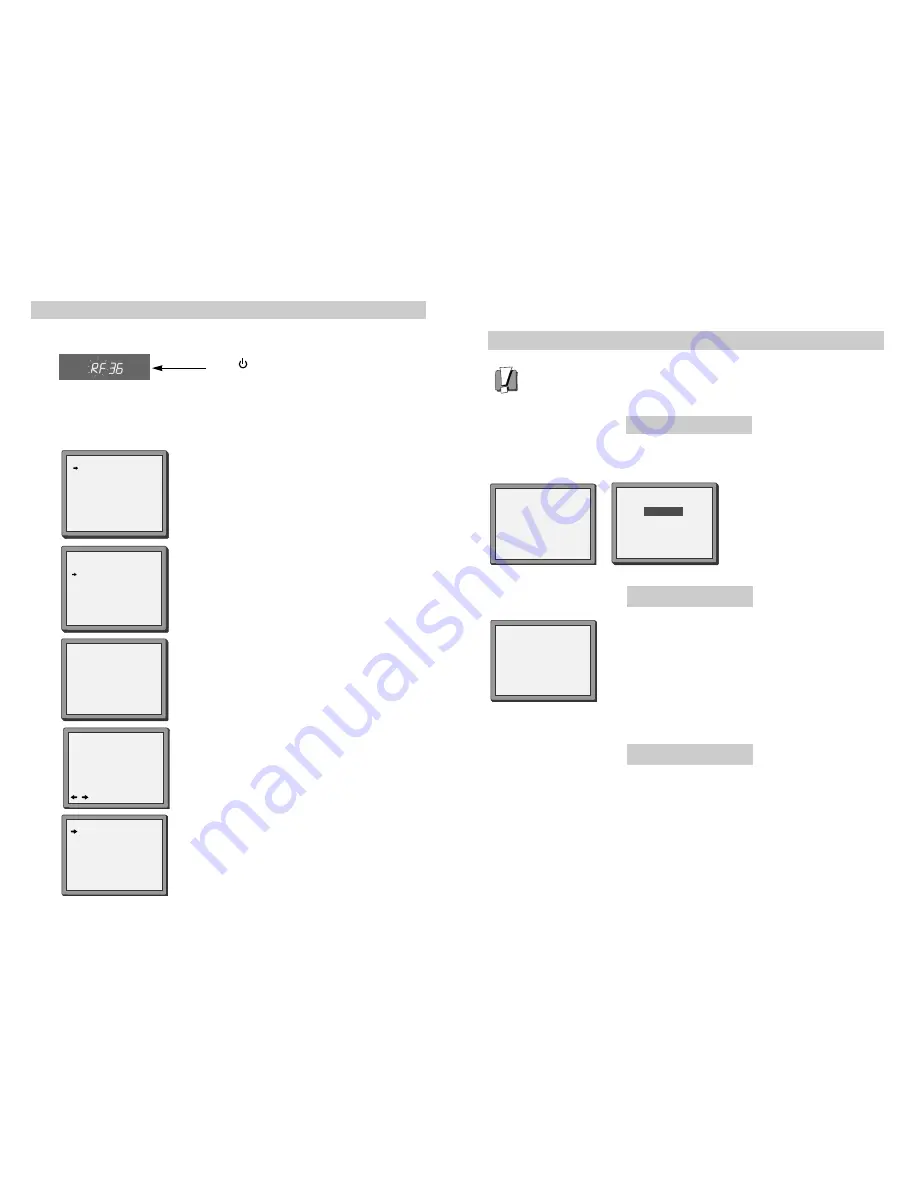
Tuning to the TV 

Once you have carried out the steps in ‘Setting up your video’ (diagram 1 on page 2), switch on  your TV.

Press 

on the remote control and RF36 will be

displayed on the front of your video.

1

2

LANGUAGE SET

ENGLISH
DEUTSCH
ITALIANO
ESPAÑOL
FRANÇAIS
NEDERLANDS
SVENSKA
SUOMI

PR+/-:SELECT
OK:CONFIRM         MENU:END

COUNTRY SET

Australia
New Zealand

PR+/-:SELECT
OK:CONFIRM          MENU:END

Select the wanted language and country with 

PR+

or 

PR-

button. Press 

OK

to confirm.

What to do if you get picture interference when using RF lead

Option 1

If other stations are positioned on or near the current RF OUTPUT CH, the following guide message
appears automatically.

The RF output can be adjusted from 27 to 69, this video is defaulted to RF36. If other
broadcasts are close to RF36 they may cause picture interference, you can change the RF
output until your television has a noise-free channel for your video.

Change the RF output from36 using the remote control.
Press 

MENU

. Select ‘VCR Set Up’ by pressing 

PR-

twice then 

OK

Select ‘RF Output Set Up’ by pressing 

PR-

twice then 

OK

.

Change the channel number using buttons 

0-9

.

Press 

OK

to confirm. Press 

MENU

to end.

Option 3

Buy a RCA cable from your local electrical shop. Connect the RCA cable as shown on page
3, diagram 2.

If you want to change the RF output in the future due to new broadcasting stations or equipment and so on,
press and hold the 

OK

button on the remote control until RF 36 is displayed on the front of the video. Then go

to option 2 above.

PLEASE CHANGE THE TV 

CH TO 38.

IMPORTANT!

Press 

OK

to confirm.

Press 

MENU

to end.

Option 2

RF OUTPUT SET

0-9:SET UP (27-69)
OK:CONFIRM      MENU:END

CH                   36

If there is still picture interference repeat option2.

RF OUTPUT SET

OK:CONFIRM      MENU:END

CURRENT

CH 36

RECOMMENDED CH 

38

If you have connected your video through the RCA connection (diagram 2 on page 3), go to step 2.
If you have connected it through RF cable (as shown in diagram 1 on page 2)

Select a free channel on your TV and manual tune the channel until the blue screen as shown in step
2 appears. Refer to the TV manual for more details.

MENU:END

PLEASE WAIT...

CH 25

Press 

OK

to confirm.

Unless you are living in an area with poor reception, ‘ Auto
Search’ tunes in all the stations you can receive in your country
and sorts them in a common order, for example,  P-01 on
programme 1, P-02 on programme 2 and so on.

See page 10 and page 11 if you need to change any of the
automatic settings. You should finish the auto search before you
go to page 10 or page 11.

In case of the auto search is not able to receive some CH’s, you
can receive the CH using the manual tuning. (see on page 9)

If  the clock has not been set, the clock setting screen will
appear.

Please see “ Setting time and date” on page 8.

If you want to change the station names, see page 10.
If you want to change the programme locations see page 11.
You need to change programme locations if the stations are
not in order, for example, P-01 on programme 1, P-02 on
programme 2 and so on.

Press 

MENU

to end.

MANUAL SET

PR01 P-01

PR08 P-08

PR02 P-02

PR09 P-09

PR03 P-03

PR10 P-10

PR04 P-04

PR11 P-11

PR05 P-05

PR12 P-12

PR06 P-06

PR13 P-13

PR07 P-07

PR14 ----

PR+/-:SELECT
OK:CONFIRM      MENU:END

CLOCK SET

0-9:SETUP(HOUR)

/    :CORRECT  MENU:END

TIME  - - : - -

DATE  - -/- -/- - - - 

Содержание W700

Страница 1: ...Instruction Manual Instruction Manual GB English Video recorder W700 ...

Страница 2: ...r Only allow a qualified engineer to repair or service your video This video recorder is designed to work continuously Switching it off onto stand by does not disconnect it from the mains To disconnect it from the mains you have to unplug it Contents Before you do anything with the video please read the chapter Setting up the video On the following pages the pictures show the buttons you need to p...

Страница 3: ...ealer for an appropriate cable if you do not have one Without a RCA cable you need to follow the steps described under If you are not using a RCA cable See page 4 Make sure the rating of the household mains supply matches the rating shown on the back of the video Now plug in the mains lead The display of the video should now light AC 240V 50Hz Setting up your video Option 1 Connecting your video t...

Страница 4: ...o can transmit pictures and sound to the TV via the coax aerial cable Just tune the TV to the video s transmitting channel factory set to UHF CH 36 Tune the TV carefully to ensure the best pictures and sound Once you have carried out the steps in Setting up your video previous page switch on your TV When you install your VCR first time Press button of the video s remote control Tune the TV to the ...

Страница 5: ...E TV CH TO 38 IMPORTANT Press OK to confirm Press MENU to end Option 2 RF OUTPUT SET 0 9 SET UP 27 69 OK CONFIRM MENU END CH 36 If there is still picture interference repeat option2 RF OUTPUT SET OK CONFIRM MENU END CURRENT CH 36 RECOMMENDED CH 38 If you have connected your video through the RCA connection diagram 2 on page 3 go to step 2 If you have connected it through RF cable as shown in diagr...

Страница 6: ...NU END PR 04 RECEPTION AERIAL AUTOSEARCH CH__ FINE TUNING NAME ____ MANUAL SET PR UP DOWN SELECT OK CONFIRM MENU END PR 03 RECEPTION AERIAL AUTOSEARCH CH 03 FINE TUNING NAME ____ MANUAL SET PR UP DOWN 0 1 CHANGE CREATE OK CONFIRM MENU END PR 03 RECEPTION AERIAL AUTOSEARCH CH__ FINE TUNING NAME ____ Press OK to store the picture you want Tune in other stations by following step 3 onwards or press M...

Страница 7: ...uttons are used on the following two pages If you want to erase the station press OK Press MENU to end If you don t want to erase the station press MENU Station names If your video is showing no station name or is showing a station name incorrectly you can change this 1 Press MENU Choose PR Preset by pressing PR then OK Choose Manual Set by pressing PR then OK Select the channel to be renamed by p...

Страница 8: ... play cassettes which have been recorded on the NTSC colour system as used in the USA you can watch the pictures on most PAL TVs On older TVs some black lines may appear at the top and bottom of the screen The picture may also roll up or down To prevent these problems adjust the V HOLD knob on your television NTSC National Television Systems Committee This video can also play MESECAM middle east s...

Страница 9: ...ton to switch back to normal playback Variable picture search VCR VCR Keep pressing to vary the forward search speed Keep pressing to vary the rewind search speed Pressing the above buttons will vary the search speed in two speeds Press to switch back to normal playback Variable slow motion VCR Starting from playback you can keep pressing to control slow motion speed in six steps Press to switch b...

Страница 10: ...ages VCR SETUP CLOCK SET LANGUAGE SET RF OUTPUT SET 16 9 SET OSD ON OFF PR SELECT OK CONFIRM MENU END OSD ON OFF ON OFF PR SELECT OK CONFIRM MENU END OSD On Screen Display ON OFF This VCR is set to OSD On Screen Display ON mode at the factory but you can change it to OFF mode When a function is changed at the front display or remote control the change will be displayed on the screen Press MENU Cho...

Страница 11: ... details Move to the details you want to change using the and buttons Change the setting using the PR or PR or number buttons 0 to 9 These buttons are used on the following two pages HOW OFTEN DO YOU WANT TO RECORD THIS PROGRAM PR SELECT OK CONFIRM MENU END ONCE WEEKLY ONCE A WEEK DAILY MON FRI DAILY MON SAT DAILY MON SUN TIMER PROGRAM ONCE PR 01 START TIME 18 10 END TIME 20 30 START DATE 15 04 FR...

Страница 12: ...to confirm Press MENU twice to end 3b 4 5 If all the settings are correct press OK to confirm The on screen display will remind you to enter a cassette and turn the video off Switch your video off by pressing the button You can switch your video on again if you want to set the timer to record another programme Remember to switch the video off when you have finished The video will warn you if you h...

Страница 13: ... beginning of the cassette The counter does not count unrecorded parts of the cassette If you rewind the cassette the counter will count backwards if you rewind beyond the zero position the counter counts in negative values for example 0 01 15 This display will only appear when there is a cassette in the video STOP SP PR01 P 01 14 00 07 04 STEREO ON Press once to display the time and date Press tw...

Страница 14: ...ensions Width x height x depth 360 x 91 x 280 mm Weight 3 3 kg Power supply Voltage AC 240V 50Hz Power consumption 14W System Video PAL B G Channel range VHF 0 14 UHF 27 69 CATV S1 S41 x y z Hyperband Channel locations 99 AUX RF Out UHF CH 27 69 36 Video System VHS Speeds Short play and long play General Temperature range 5 C to 35 C Humidity range 80 Timer 8 events 1 month These technical details...

Страница 15: ...27 26 MEMO MEMO ...

Страница 16: ...g the TV and video TV VCR button is not available for this set The television will not change channel when the video is turned on If the television will not change channel while the video is on check whether a scart lead has been connected See page 3 option 2 If a scart lead has been connected you need to press the TV VCR button on the video remote control When the small VCR symbol appears on the ...

Страница 17: ...s OK B The video is now tuning all the television stations available in your area C If Clock Set appears on the TV screen please enter the time and date Use the number buttons 0 to 9 on the remote control Press OK to confirm D When Manual Set appears on the TV screen press MENU to end F Your video is now set up If you want to change station names or the programmes they are stored on see pages 10 a...

Отзывы: