AWA TFTD94G Скачать руководство пользователя страница 12

OWNERÕS MANUAL

Remote Control Key Functions

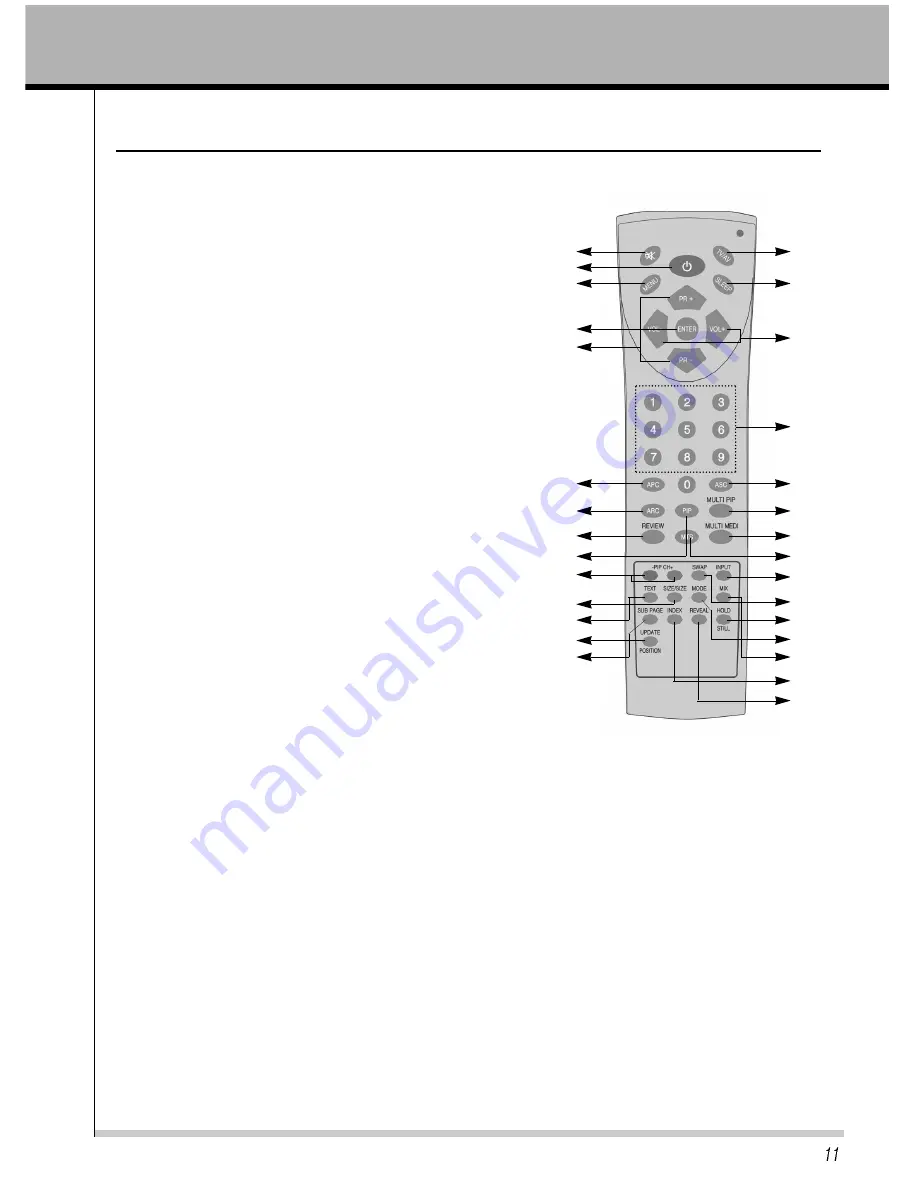
- When using the remote control aim it at the remote control sensor on the TV

1. POWER 

Turns the TV on from standby or off to standby mode.

2. MUTE 

Turns the sound on and off.

3. NUMBER 

Selects programme numbers.

4. MENU

Displays a main menu.

5. TV/AV

Selects TV, AV1, AV2, S-VIDEO, COMPONENT, RGB-DTV,
RGB-PC, RGB-DVl mode.

6. SLEEP 

Sets the sleep timer.

7. ENTER

Accepts your selection or displays the current mode.

8. VOL+/- 

Adjusts the sound level./ Adjusts the menu settings.

9. PR +/- 

Selects next programme or menu items.  

10. APC 

Recalls your prefered picture settings.  

11. ASC 

Recalls your prefered sound settings.  

12. ARC 

Selects a screen mode- 16:9, 4:3, ZOOM, panorama

13. REVIEW 

Returns to the previously viewed programme.

14. PIP 

Displays a PIP(Picture In Picture) screen. 

15. MULTI PIP 

Displays a still picture of TV signal on main screen.  

16. MULTI MEDI 

Selects component, RGB-DTV, RGB-PC, RGB-DVI.  

17. MTS 

Selects the language during dual language broadcast, selects the sound output.  

18. PIP CH+/-

Selects a programme when RF signal is displayed in PIP mode.  

19. SWAP

Switches a main picture for sub picture in PIP mode.  

20. INPUT

Selects the AV source of sub picture in PIP mode. 

21. SIZE

Selects the size of sub picture(Double Window or Small Window).  

22. POSITION / UPDATE

Selects a position of PIP screen. / Displays the updated teletext page.

23. STILL / HOLD

In case of non PIP mode, Displays the still main picture.
In case of PIP mode, Displays the still sub picture.
/ Stops the automatic page change.

24. TEXT

Switchs to teletext.

25. MODE

Change LIST and FLOF.

26. MIX

Displays the teletext pages superimposed on the TV picture.

27. SUB PAGE

Selects sub page in teletext mode.

28. INDEX

Selects the index page.

29. REVEAL

Displays the concealed information.

1

2

4

7

10

12

5

8

11

6

9

13

3

14

15

16
17

18

20

23

26

25

19

21

22

24

27

28
29

Содержание TFTD94G

Страница 1: ......

Страница 2: ...ore operating your set Retain it for future reference Record model number and serial number of the set See the label attached on the back of the set and quote this information to your dealer when you require service OWNERÕS MANUAL TFTD94G ...

Страница 3: ......

Страница 4: ...djusting picture appearance Auto Sound Control Adjusting Sound Balance Setting up TV stations Auto programme tuning Manual programme tuning Programme edit CANAL SET TOP Box use only Teletext Teletext Special teletext functions Selecting CLOCK for the menus Special Features Selecting language for the menus Selecting COLOR TEMP for the menus Selecting PC CONTROL for the menus Setting picture format ...

Страница 5: ...lightning storms or when unused for long periods of time 14 Refer all servicing to qualified service personnel Servicing is required when the apparatus has been damaged in any way such as power supply cord or plug is damaged liquid has been moisture does not operate normally or has been dropped 15 The apparatus shall not be exposed to dripping or splashing and that no objects filled with liquids s...

Страница 6: ...ore moving Only use the TV on a level and stable surface It may fall down or be upset Safety instructions have two kinds of information as illustrated below When installing the monitor on a table be careful not to place it near the edge This may cause the monitor to fall causing serious injury to a child or adult and serious damage to the monitor Surely use a fitting table or rack Do not place the...

Страница 7: ... the current leakage If grounding methods are not possible a separate circuit breaker should be employed and installed by a qualified electrician Do not connect ground to telephone wires lightning rods or gas pipe The main plug should be inserted fully into the power outlet to avoid a fire hazard This may cause a fire hazard Outdoor Installation Power In case of using a receiver VCR Digital Set To...

Страница 8: ...r Cord option Power Outlet NOTES WARNING WARNING Power Using Do not place anything containing liquid on top of the TV such as flowerpot cup cosmetics or candle This may cause a fire hazard Dispose of used batteries carefully and safely In the case of a battery being swallowed by a child please consult a doctor immediately If water is spilt into the monitor unplug it from the main supply outlet imm...

Страница 9: ... your Service Centre This may cause a fire or an electric shock hazard WARNING In the unlikely event of smoke or a strange smell from the TV switch it off unplug it from the wall outlet and contact your dealer or service centre This may cause a fire or an electric shock hazard Do not use water while cleaning the TV This may damage to the TV or an electric shock hazard In the event of a lightning o...

Страница 10: ... a child or adult The distance between eyes and the screen should be about 1 5m If not eyes will strain Unplug the TV from the wall outlet when it is left unattended and unused for long periods of time Accumulated dust may cause a fire or an electric shock from deterioration or electric leakage Only use the specified batteries This make cause damaged the TV or could give an electric shock Others ...

Страница 11: ...EO or COMPONENT mode SCART RCA 5 Y Pb Pr Component video signal input 6 S VIDEO Connect the output of the A V Source to the S VIDEO input 7 AV2 Composite input of A V Source 8 AV1 Composite input of A V Source 9 TUNER RF ANTENNA INPUT 10 A C POWER POWER CORD INPUT 1 POWER button switches TV set on or off 2 MENU button Displays a menu 3 SELECT button Selects the A V source 4 VOLUME Adjusts the volu...

Страница 12: ...a still picture of TV signal on main screen 16 MULTI MEDI Selects component RGB DTV RGB PC RGB DVI 17 MTS Selects the language during dual language broadcast selects the sound output 18 PIP CH Selects a programme when RF signal is displayed in PIP mode 19 SWAP Switches a main picture for sub picture in PIP mode 20 INPUT Selects the AV source of sub picture in PIP mode 21 SIZE Selects the size of s...

Страница 13: ...5V ÒAAAÓ alkaline batteries DonÕt mix used batteries with new batteries Using the remote control TV AV select button on the remote control Each press of this button changes the mode as shown below MULTI MEDI select button on the remote control Each press of this button changes the mode as belows Remote Control Key Functions AV1 TV RGB DVI AV2 RGB PC S VIDEO COMPONENT RGB DTV COMPONENT RGB DVI RGB ...

Страница 14: ...DonÕt place the remote control near a heater or damp place Strong impact on the remote control may cause operation failure Signal from the remote control may be disturbed by sun light or other strong light In this case turn the set to other direction Notes for using the remote control Accesories Option Accesories ...

Страница 15: ...t Connect the audio cable from the S VIDEO VCR to the AUDIO sockets of the set Select the S VIDEO by pressing the TV AV button repeatedly Press the PLAY button on the VCR The VCR playback picture appears on the screen To avoid picture noise interference leave an adequate distance 20 inches or more between the VCR and TV VCR Setup T i p s 2 Insert a video tape into the VCR and press the PLAY button...

Страница 16: ...gle RGB DTV PC INPUT for video connections depending on your Set Top Box connectors Then make the corresponding Audio connections DTV input is available to 480 576i 480 576p 720p 1080i mode Connection of external equipment 2 Tune to the digital SET TOP BOX Refer to the ownerÕs manual for the digital SET TOP BOX 1 Press TV AV button on the remote control to select COMPONENT or RGB DTV To watch SET ...

Страница 17: ...nnect DVD player jacks to TV Component input jacks as indicated below PC Setup You can easily connect the LCD TV to your PC for outstanding image and sound Setup Instructions to Connect a PC to your TV To setup this TV in your PC window environment select Normal Standard or Default TV This TV does not support Plug and Play function The screen does not display when the resolution is over UXGA Conne...

Страница 18: ... input source Set the resolution output of the PC to WXGA or under 1360 x 768 60Hz DVI Setup Under PC mode Only You can easily connect the LCD TV to your PC for outstanding image and sound Setup Instructions to Connect a PC to your TV To setup this TV in your PC window environment select Normal Standard or Default TV This TV does not support Plug and Play function The screen does not display when ...

Страница 19: ... TV screen for a long period of time The fixed image may become permanently imprinted on the screen use a screen saver when possible Change the resolution of PC to displayable mode and connect to DVI D Input jacks of the TV T i p s PC Setup First turn on the PC computer and press the ON OFF button on the TV to apply power to it Second turn on the display by pressing the button on the TV or by pres...

Страница 20: ...Press the POWER button on the TV or press the POWER Button or associated with TV button on the remote control and then the TV will be turn on 1 If the TV is turned off with the remote control button or POWER ON OFF button on the TV Press the POWER button on the TV or press the POWER button on the remote control and then the TV will be turn on 2 Press the VOL button Each press will cycle through th...

Страница 21: ...e SLEEP button just once If you turn the TV off after setting the sleep timer the setting is erased The sleep timer will then have to be set again Sleep Timer turns the TV off after a preset time To release sleep time setting press the SLEEP button repeatedly to select Press the SLEEP button to set sleep time Each time you press SLEEP button the next preset setting time is changed as follows 240 1...

Страница 22: ...anges the screen display as shown below STANDARD SOFT STRONG CUSTOM 1 Press the APC button CUSTOM Press the MENU button and then press the VOL button to select PICTURE menu Press the PR button Adjusting picture appearance Adjust BRIGHTNESS COLOR and SHARPNESS TINT in the same way 1 Press the PR button to select Contrast and then press the VOL button 2 Use the VOL buttons to make appropriate adjust...

Страница 23: ...nd Control 1 Press the MENU button and then VOL button to select a SOUND setup Each press of ASC or PR button changes the screen display as shown below Press the MENU button and then press the VOL button to select SOUND menu Press the PR button Manual Settings Adjusting Sound 1 Press the PR button to select BALANCE and then press the VOL button 2 Use the VOL buttons to make appropriate adjustments...

Страница 24: ... be received are stored by this method It is recommended That you use auto programme during installation of this set 1 Repeatedly press the MENU button and then press VOL button to select the TUNING menu 2 Press the PR button to select AUTO 3 Press the VOL button to begin auto programming 4 Press the VOL button Select a TV system with the PR button on the SYSTEM pull down menu BG Asia New Zealand ...

Страница 25: ...stored To stop auto programming press the MENU button When auto programming is completed the Programme edit menu appears on the screen See the Programme edit section to edit the stored programme MANUAL programme tuning Manual programme lets you manually tune and arrange the stations in whatever order you desire Also you can assign a station name with five characters to Each programme number 1 Repe...

Страница 26: ... button on the SYSTEM pull down menu BG Asia New Zealand M East Africa Australia I Hong Kong South Africa option DK East Europe China Africa CIS L France Monaco 9 Press the ENTER button Press the PR button to select CHANNEL On the Channel pull down menu if possible select the channel number directly with the number buttons Any number under 10 is entered with a numeric Ô0Õ or Ô00Õ in front of it ie...

Страница 27: ...aracter and so on Press the ENTER button OWNERÕS MANUAL Setting up TV stations Programme edit This function enable you to delete or skip the stored programmes Also you can move some stations to other programme numbers or insert a blank station data into the selected programme number Deleting a programme Repeatedly press the MENU button to select the Station menu Press the VOL button and then PR bu...

Страница 28: ...rogramme number to be skipped with the PR or VOL button Press the BLUE button The skipped programme turns to blue Press the BLUE button again to release the skipped programme When a programme number is skipped it means that you will be unable to select it using the PR button during normal TV viewing If you want to select the skipped programme directly enter the programme number with NUMBER buttons...

Страница 29: ...ween CANAL SET TOP and TV SCART jack Setting up TV stations CANAL SET TOP Box use only Press the MENU button and then press the VOL button to select ETC menu Press the PR button If you directly connect the ANTENNA or coaxial cable to ANT jack of TV You must select ÒOFFÓ states of the ÒAUTO AVÓ on OSD MENU T i p s 1 Press the PR button to select AUTO AV and then press the VOL button 2 Press the PR ...

Страница 30: ...e previous mode reappears Enter the desired page number as a three digit number with the NUMBER buttons If during selection you press a wrong number you must complete the three digit number and then reenter the correct page number The PR button can be used to select the preceding or following page SIMPLE text Page selection The user guide displays four fields red green yellow and blue at the botto...

Страница 31: ... while waiting for the new teletext page The display UPDATE will appear at the top left hand corner of the screen When the updated page is available then display UPDATE will change to the page number Press this button to view the updated teletext page HOLD Stops the automatic page change which will occur of a teletext page consists of 2 or more sub page displayed is usually shown on the screen bel...

Страница 32: ...o select ETC menu Press the PR button 1 Press the PR button to select Language and then press the VOL button 2 Press the PR button to select the desired language 3 Press the ENTER button Press the PR button to select ON TIME and then press the VOL button Press the PR button to select time and PR VOL ON OFF Press the ENTER button 2 Press the PR button to select OFF TIME and then press the VOL butto...

Страница 33: ...ress the ENTER button 3 Press the PR button to select other items Selecting COLOR TEMP for the menus Press the MENU button and then press the VOL button to select ETC menu Press the PR button 1 Press the PR button to select COLOR TEMP and then press the VOL button 2 Press the PR button to select the desired COLOR TEMP 3 Press the ENTER button The OSD function for this PC control becomes activated ...

Страница 34: ...button in PIP Each time you press the POSITION button sub picture Position is changed as follows Moving the sub picture Press the PIP button It you press the PIP button again the function is off How to use the PIP PIP PICTURE will let you view two seperate inputs on your TV screen at the same time Color of main picture may be different from PIPÕs in PIP PICTURE When the main picture is TV AV1 AV2 ...

Страница 35: ... picture Input select of the sub picture Press the SIZE button to select twin picture Each time you press SIZE button you can select TWIN or PIP alternatively TWIN PICTURE let you view different inputs on your TV screen at the same time Color of main picture may be different from PIP s in PIP TWIN PICTURE When the main picture is TV AV1 AV2 SVIDEO the sub picture input is TV AV1 AV2 S VIDEO Press ...

Страница 36: ...gnal and displaying the still picture from first sub screen it is moving to other sub screen consequently and displays the still picture of live signal in the same way Multi PIP 1 Tuner Twin picture function Changing the picture of main and sub picture PIP TWIN PICTURE let you view different inputs on your TV screen at the same time Color of main picture may be different from PIPÕs in PIP TWIN PIC...

Страница 37: ...OWNERÕS MANUAL Troubleshooting ...

Страница 38: ...IDEO S VIDEO SCART COMPONENT DVD DTV DVI Digital PC Analog Input Sound Video Sound Low CH E2 S10 High CH E5 S41 CH E21 E 69 1 0Vp p 75 1 0Vp p 75 Y 1 0Vp p 75 C 0 3Vp p 75 R 0 7Vp p 75 G 0 7Vp p 75 B 0 7Vp p 75 SCART CVBS 1 0Vp p 75 DVI I 29 Pin But the Analog input is not supported Mini D SUB 15 Pin Stereo RCA S VIDEO Component SCART Stereo Jack X1 DVI PC SCART Y Pb Pr Y Cb Cr Y 1 0Vp p 75 Pb 0 7...

Страница 39: ...OWNERÕS MANUAL ...

Страница 40: ...OWNERÕS MANUAL ...

Страница 41: ......

Отзывы: