background image

19

1

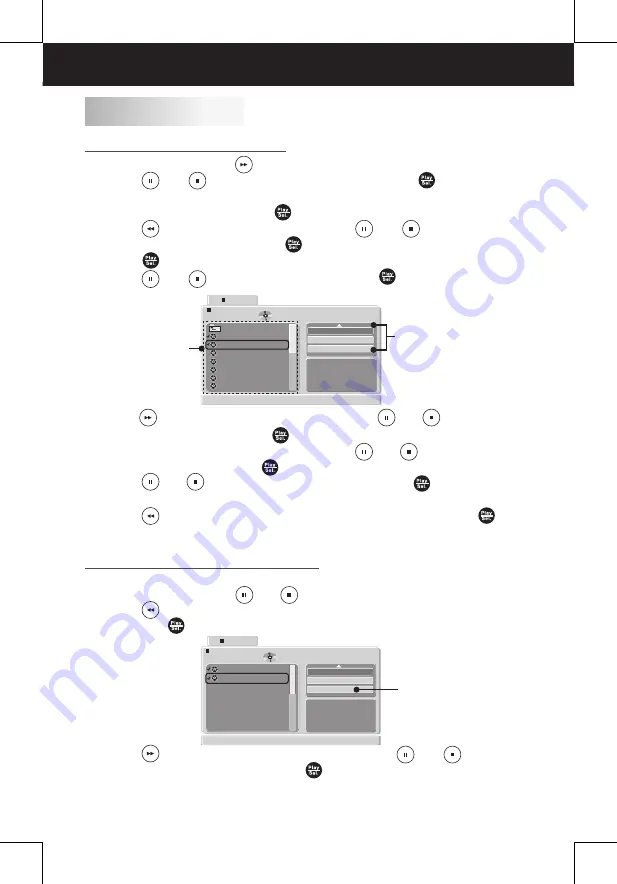
  In full stop mode, press 


Right

 to enter the right screen of the navigator.

2

 Press   

Up 


Down

 to select 

Edit mode

, then press 


Play/Sel.

 to 

highlight the 

Edit mode

.

• 

To leave the 

Edit Mode

, press 


Play/Sel.

 again to cancel the highlight.

3

 Press   

Left

 to skip to the left screen. Press 


Up 


Down

 to select a 

fi

 le in the preview list, then press 


Play/Sel.

 to tick the 

fi

 le.

• Press   

Play/Sel.

 again to cancel the tick.

• Press   

Up 


Down

 to select a 

fi

 le and press 


Play/Sel.

 repeatedly to 

tick more 

fi

 les.

4

  Press 


Right

 to skip to the right screen, then press 


Up 


Down

 to select 

Add to program

 and then press 


Play/Sel.

. Now the ticked 

fi

 les have been 

programmed in the 

Browser view

, you can press 


Up 


Down

 to select 

Program view

 and then press 


Play/Sel.

 to view the ticked 

fi

 les in 

Browser view

.

5

 Press   

Up 


Down

 to select 

Edit mode

, then press 


Play/Sel.

 to cancel 

the highlight to leave the Edit Mode.

6

 Press   

Left

 to skip to the left screen to select a 

fi

 le and then press 


Play/Sel.

 to play the 

fi

 les in the program list

.

1

  Repeat step 1 and step 2 as description in “Adding 

fi

 les to Program List” 

section. And then press 


Up 


Down

 to select 

Browser view

.

2

 Press   

Left

 to skip to the left screen to select a 

fi

 le in 

Browser view

, and 

then press 


Play/Sel.

 to tick the 

fi

 le.

Adding 

fi

 les to Program List

Deleting 

fi

 les in the Program List

3

 Press   

Right

 to skip to the right screen, then press 


Up 


Down

 to 

select 

Clear program

 and then press 


Play/Sel.

 to delete the ticked 

fi

 les in 

Browser view

 mode.

MP3, MPEG-4, JPEG FILES PLAYBACK

Program Playback

Edit mode

Browser view

Clear program

JPEG Preview

STOP

Video 01

Video 02

/Video 02.AVI

2    / 2

Clear program

Edit mode

Program view

Add to program

//

JPEG Preview

Video 01

Video 02

Video 03

Video 04

Video 05

Video 06

Video 07

/mpeg/Video 02.AVI

3    / 16

Program playback 
settings

Preview list

STOP

Содержание MVP932

Страница 1: ...ct operate or adjust this product please save and read the User Guide completely The style of the product shown in the User Guide may be different from the actual unit due to various models User Guide 9 Portable DVD Player MVP932 ...

Страница 2: ...tting to External Equipment 11 Connecting to Other Equipment 12 Using in a Car For 12V Input Only 12 CHARGING THE BATTERY 13 DVD PLAYBACK 14 Basic DVD Playback 14 MP3 MPEG 4 JPEG FILES PLAYBACK 15 Playing an Audio CD MP3 Music 15 Playing MPEG 4 Videos 16 Playing JPEG Pictures 17 The Playback Navigator and Settings 18 Program Playback 19 OSD SETUP 20 VIEW MODE SETUP 23 Aspect Ratio Setting 23 Back ...

Страница 3: ...zed by Rovi Corporation and is intended for home and other limited viewing uses only unless otherwise authorized by Rovi Corporation Reverse engineering or disassembly is prohibited For the DVD Player with Progressive scan output Consumers should note that not all high definition television sets are fully compatible with this product and may cause artifacts to be displayed in the picture In case o...

Страница 4: ...has been exposed to rain or moisture does not operate normally or has been dropped 13 Ambient Temperature 0 40 C 14 Use only with a cart stand tripod bracket or table specified by the manufacturer or sold with the apparatus When a cart is used use caution when moving the cart apparatus combination to avoid injury from tip over Important battery information z Rechargeable batteries are only to be c...

Страница 5: ...he household AC outlet No fingers or other objects inside z Touching internal parts of the unit is dangerous and may cause serious damage to the unit Do not attempt to disassemble the unit z Do not put any foreign object on the disc tray Keep away from water magnet z Keep the unit away from flower vases tubs sinks etc If liquids are spilled into the unit serious damage could occur z Never bring a ...

Страница 6: ...sor 11 LED Indicator 12 SETUP Button 13 MENU Button 14 PLAY SEL Button 15 F FWD RIGHT Button 16 STOP DOWN Button 17 NEXT Button 18 DC IN 12V Jack 19 Volume Dial 20 PHONE Jack 21 AV OUT Jack 22 Power ON OFF Switch 18 Right Side Panel Back Panel 19 2021 22 Top Panel 1 10 4 5 6 7 2 3 11 16 12 13 14 15 17 9 8 Press MODE button to change TV system among NTSC PAL and Auto ...

Страница 7: ... playback the photo music or video files Press to confirm the setting or function 6 LEFT Fast Backward Button Press to move left in the menus Press to fast backward through a music or movie clip at 2x 4x 8x and 16x times the speed of normal play Press to rotate the photo by 90 anticlockwise 7 DOWN STOP Button Press to move down in the menus Press to stop the photo music or video playback Press to ...

Страница 8: ...through a music or movie clip at 2x 4x 8x and 16x times the speed of normal play Press to rotate the photo by 90 clockwise 15 AUDIO Button Press to change the audio soundtrack language if the soundtrack language is available on the DVD disc 16 NEXT Button Press to return to the next photo music or video Press to return the next page on thumbnail mode 17 A B REPEAT A B Button Press to repeat the pl...

Страница 9: ...pends on how often and for what operations the Remote Control is used Use a 3V lithium battery No CR2025 or equivalent Be careful when you press the slot of the battery compartment with your fingernails only as this might break them Remember that small button cell batteries such as used in some hearing aids toys games and other appliances are easily swallowed by young children and this can be dang...

Страница 10: ...IN 12V jack 2 Power adapter 3 Wall outlet After the power adapter is connected to wall outlet the LED indicator will be illuminated in red Slide the power switch to ON position on the right panel and the LED indicator will be illuminated in green Right Side Back Side 3 1 2 Connecting to the Power Turning on the Power ...

Страница 11: ...ayer to the Audio In and Video In of your TV with an AV cable As default the player will automatically output the audio video signals to TV when connected to TV Ensure your TV is in AV IN mode VIDEO IN AUDIO IN R L Outputting to External Equipment ...

Страница 12: ...tte adapter 1 DC IN 12V jack 2 Cigarette lighter adapter 3 Car s DC12V cigarette lighter socket 2 3 1 ATTENTION Do not operate the unit or watch the video while driving a car for the driving safety Make sure that inside of the 12V cigarette lighter socket is clean before use Otherwise the plug section may become hot due to poor contact if the inside of the 12V cigarette lighter socket is covered w...

Страница 13: ...e it is recommended to empty completely drain the battery before the battery s first recharge A warning reminder will be displayed on the screen when the battery is low Please recharge or turn off the device Battery will not charge when the DVD player is in use The normal play time for the full charged battery is 2 hours The lifetime of the battery pack is limited Power is slowly drained when not ...

Страница 14: ... to put it in the disc tray with the printed side up 3 Close disc cover Close the disc cover and the portable DVD player starts playback if the disc does not have any menus recorded on it If the disc has one or more titles recorded on it a menu screen will appear on the screen 4 To play a title press Up Down Left Right or Number Button s to highlight it and then press Play Sel Basic DVD Playback ...

Страница 15: ...y Sel to play If the files are inside a folder press Play Sel to enter into the folder In stop mode press Up button to select the Root folder and press Play Sel to return the upper menu 2 To stop the playback press Stop MP3 MPEG 4 JPEG FILES PLAYBACK Repeat Off Mode Normal Edit mode Music Playing Track 01 Track 02 Track 03 Track 04 Track 05 Track 06 Track 07 Track 08 Track 02 CDA 2 16 00 00 20 00 ...

Страница 16: ...er In stop mode press Up button to select the Root folder and press Play Sel to return the upper level 2 Press Stop to stop the playback and return to the upper level Filter Repeat Off Mode Normal JPEG Preview Video 01 Video 02 Video 03 Video 04 Video 05 Video 06 Video 07 mpeg Video 01 AVI 2 16 STOP MP3 MPEG 4 JPEG FILES PLAYBACK Playing MPEG 4 Videos ...

Страница 17: ...Right button to select the preferred picture and then press Play Sel to play in a full screen 5 Press Left Right to rotate the photo during playback Press Left to rotate the photo by 900 anticlockwise and press Right to rotate the photo by 900 clockwise All the rotation effects will be cancelled after exiting the slideshow mode Filter Repeat Off Mode Normal W 800 H 600 JPEG Preview Picture 01 Pict...

Страница 18: ...e selected files in the program list Refer to Program playback section in the next page Add to Program Add to program Clear program Add or delete the selected files in the program list Refer to Program playback section in the next page 1 In stop mode press Right to enter the right screen of the navigator 2 Press Up Down to select the menu and the option Always confirm by pressing Play Sel For Filt...

Страница 19: ...it mode then press Play Sel to cancel the highlight to leave the Edit Mode 6 Press Left to skip to the left screen to select a file and then press Play Sel to play the files in the program list 1 Repeat step 1 and step 2 as description in Adding files to Program List section And then press Up Down to select Browser view 2 Press Left to skip to the left screen to select a file in Browser view and t...

Страница 20: ...ound tracks DVD Menu English Select the DVD menu language you wish to play on the screen If the language selected is not recorded on the disc the player will play the top priority language of the disc 1 Press Setup Setup to bring up the Setup Menu Language Video Rating Misc Language English Subtitle English Audio English DVD Menu English 2 Press Up Down to select a setting from the Main menus 3 Pr...

Страница 21: ...o in its original size without any resize Auto Fit When widescreen video is played in this mode on a conventional screen black bands appear at the top and bottom of the screen Pan Scan When widescreen video is played the images will be cropped on the right and left sides of the image so that it can be viewed on a conventional screen Some DVD may not support this feature TV System NTSC PAL Select t...

Страница 22: ...r the age of 13 5 PG R Parental Guidance restricted recommended that parents restrict children under age 17 from viewing or allow children to view only when supervised by a parent or adult guardian 6 R Restricted children under 17 would not be admitted without an accompanying parent or adult guardian 7 NC 17 No children under the age of 17 not recommended viewing for children under age 17 8 Adult ...

Страница 23: ...o 4 3 Note Select Aspect Ratio 4 3 to play the 4 3 aspect ratio videos Black bands might appear if you play non 4 3 ratio video Select Aspect Ratio 16 9 to play the 16 9 aspect ratio videos Black bands might appear if you play non 16 9 ratio video 4 To leave View Mode window press LCD 2 Press Up Down to select Back Light 3 Press Left Right Play Sel to choose On or Off Note Press LCD again to turn ...

Страница 24: ...or The disc format is not according to the TV set used PAL NTSC in picture Picture is distorted during rapid The picture will be somewhat distorted at times this is normal advance or rapid reverse No rapid advance or rapid reverse Some discs may have sections which prohibit rapid advance or playback rapid reverse No Normal Wide picture Choose the correct setup TV Aspect item No operations perform ...

Страница 25: ...lar scratches are likely to occur which will cause noise If the disc is brought from a cold to a warm environment moisture may form on the disc Wipe the moisture off with a soft dry lint free cloth before using the disc Improper disc storage You can damage discs if you store them in the following places Areas exposed to direct sunlight Humid or dusty areas Areas directly exposed to a heat outlet o...

Страница 26: ...2 Channel Analogue Yes Speaker 2 Built in stereo speaker Terminals DVD Player AV OUT Socket x 1 Headphone Socketx 1 Power Adapter Power Supply Power Consumption AC 100 240V 50 60Hz Mains Adapter 12V Car Cigarette Lighter Adapter Approx 10W Remote Control Infra red with one CR2025 3V battery for the DVD Player use only Weight 1010g Dimensions 226mm L x 158mm W x 46 5mm H Specifications are subject ...

Отзывы: