background image

BASIC OPERATION

Press the VOL+/- or 

t

/

u

 button to increase or decrease the volume.

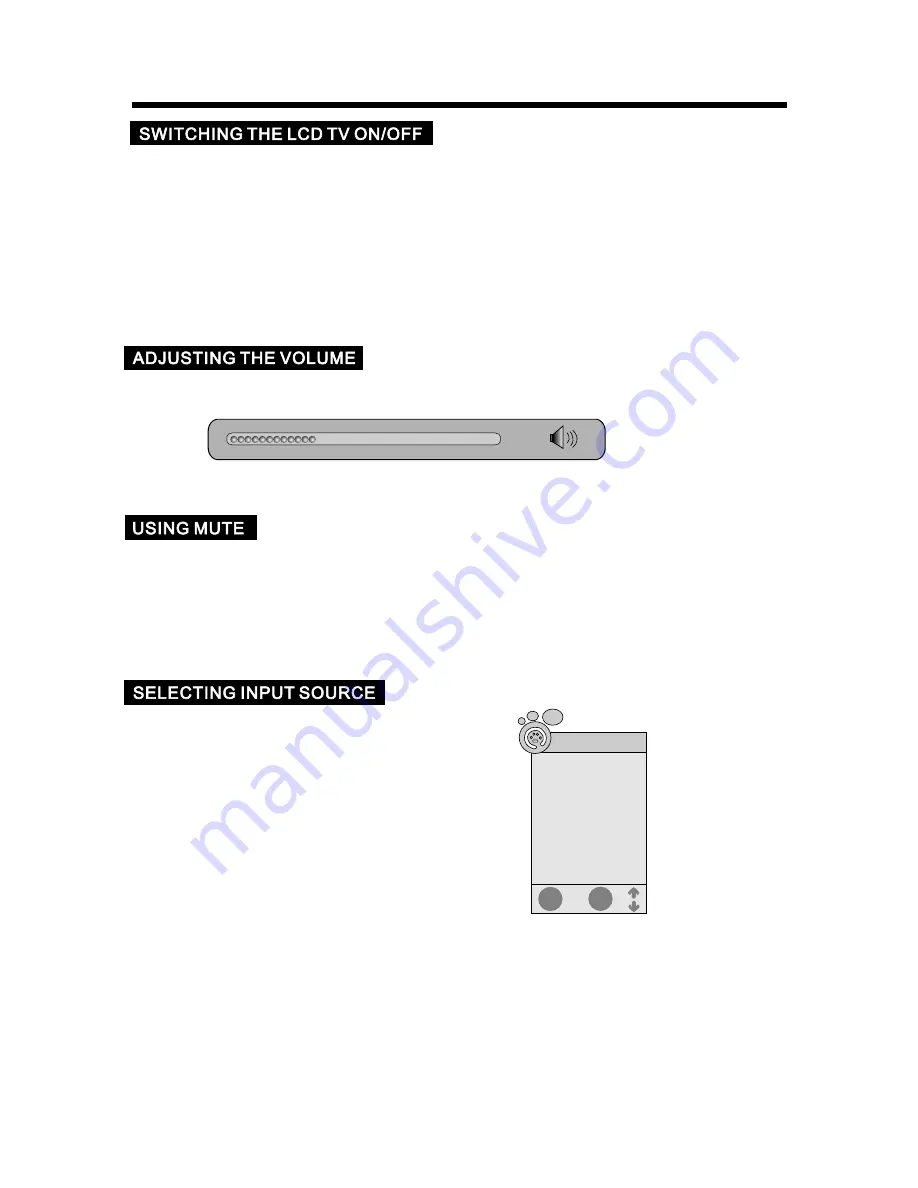
1. Press the SOURCE button on the remote control or 
    press INPUT button on the rear panel of the LCD TV 
    to display the “ Input Source” menu.
2. Press the 

p

/

q

button to select the input signal.

3. Press the 

t

/

u

button to confirm your selection.


At any time, you can temporarily cut off the sound using the MUTE button.
1. Press the MUTE button and the sound cuts off.
2. Press the MUTE button again or press VOL+/- or

t

/

u

 button to turn mute off.


11

36

EXIT

ENTER

Input Source

DTV

TV

AV

S-Video

YPbPr

PC

HDMI

1. Press the POWER button or the STANDBY button to switch the unit on or to standby mode.
2. If the unit is in standby mode, press the POWER button or the STANDBY button to switch
    it on.
3. Press the POWER button or the STANDBY button, the unit will revert to standby mode.

Note

:

If, while the unit is switched on, the mains plug is disconnected, the unit will switch to standby
when the mains plug is replaced in the mains power socket again.

DVD

Содержание JTM19T212-TD

Страница 1: ...JTM19T212 TD ...

Страница 2: ...ABLE OF CONTENTS IMPORTANT SAFETY INSTRUCTIONS 3 PACKAGE CONTENTS 5 CONTROL BUTTONS AND TERMINALS FRONT PANEL REAR PANEL REMOTE CONTROLLER 6 6 7 8 BASIC CONNECTIONS BATTERY INSTALLATION 10 10 BASIC OPERATION SWITCHING THE LCD TV ON OFF ADJUSTING THE VOLUME USING MUTE SELECTING INPUT SOURCE CHOOSING A TV CHANNEL 11 11 11 11 11 12 USING THE MENUS CHANNEL SETUP PICTURE SETUP SOUND SETUP TIME SETUP OP...

Страница 3: ...K BASIC PLAYBACK 21 STOP PLAYBACK 21 FAST FORWARD AND FAST REVERSE 21 PREVIOUS AND NEXT 21 PAUSE PLAYBACK 21 SIDE VIEW 20 24 SYSTEM SETUP 22 ADVANCED PLAYBACK 23 SPECIAL FUNCTION PLAYBACK AUDIO CD PLAYBACK 23 JPEG DISC PLAYBACK 23 20 CONTROL BUTTONS 19 ABOUT THE DISC DISC HANDING 19 DVD OPERATION 19 2 ...

Страница 4: ...that children do not hang on the LCD TV Do not subject the LCD TV to any shocks or impact If the LCD TV should be dropped and or broken it could result in an injury and continued use could result in fire or electrical shock If the glass panel is broken or damaged immediately turn off the power switch disconnect the power plug from the AC power outlet and contact qualified service personnel Ensure ...

Страница 5: ...dry cloth to clean the power plug The AC power cord should be routed so that it is not likely to be walked on or pinched by items placed upon or against it Also do not put any heavy objects on the AC power cord Do not touch the AC power cord with a wet hand Pull out the AC power cord by the plug Do not pull on the power cord Insert the power plug into a power outlet firmly Avoid using a loose or d...

Страница 6: ...dition Other notices Sometimes the image may have some tiny red green blue white or black spots This is normal and does not affect the performance of the LCD TV The advanced technology of this LCD TV gives you detailed pictures Occasionally a few non active pixels may appear on the screen as a fixed point of blue green or red Please note that this does not affect the performance of your LCD TV If ...

Страница 7: ...tem in the OSD menu 3 Button Name Button Name Description Description Item Item Power Indicator Remote Sensor Switch on the LCD TV when at standby mode or vice versa Illuminates red in standby mode Illuminates green when the LCD TV is switched on Infrared sensor for the remote control 7 8 6 INPUT 1 MENU 2 Enter or exit from the menu 9 8 8 7 7 4 4 6 6 1 1 2 2 3 3 AC Input Socket 5 5 CH w w When you...

Страница 8: ... to receive cable aerial signal 3 Headphone jack connect to your headphone 4 Audio input for VGA mode connect to your PC audio output 5 Audio Channel input for Composite video S video mode 6 CVBS Composite video inputs connect your AV system 7 S VIDEO input connect video input from external device here 8 YPbPr Component Video Input Terminals connect them to the video output terminal of DVD or othe...

Страница 9: ... In DVD mode repeat play from A to B 11 TEXT AUDIO Teletext text TV Teletext select In DVD mode to select DVD Audio channel 12 GREEN button ZOOM In DVD mode enlarge the picture of views In DVB mode summon some DVB functions 13 RED button REPEAT In DVD mode Select repeat mode In DVB mode summon some DVB functions 14 SIZE Teletext size selection Double height rendering In DVD mode press to stop the ...

Страница 10: ...e the on screen scroll down menu for edit In DVB mode summon some DVB functions 32 REVEAL Teletext reveal button Reveal any hidden text In DVD mode press to play or pause movies and music 33 SUBPAGE Teletext sub page Come into subpage and again to cancel In DVD mode For select the next chapter or song 34 PAGE In DVB mode press to decrease the program which you favourite In DVD mode press to select...

Страница 11: ...assemble heat or throw the batteries into fire Do not splash the remote control with water or put it on a wet object Do not drop step on or cause any impact to the remote control unit This may damage it resulting in malfunction Do not mix old and new batteries If the remote control unit is not going to be used for a long time remove the batteries Strong light such as direct sunlight falling on the...

Страница 12: ...E button and the sound cuts off 2 Press the MUTE button again or press VOL ort u button to turn mute off 11 36 EXIT ENTER Input Source DTV TV AV S Video YPbPr PC HDMI 1 Press the POWER button or the STANDBY button to switch the unit on or to standby mode 2 If the unit is in standby mode press the POWER button or the STANDBY button to switch it on 3 Press the POWER button or the STANDBY button the ...

Страница 13: ...button to increase channel number Press the CHq or CH q button to decrease channel number Using 0 9 digital buttons You can select the channel number directly by pressing 0 to 9 buttons Example To select 1 digit channel e g Channel 5 Press the 5 button To select 2 digit channel e g Channel 20 Press the 2 button follow by 0 12 ...

Страница 14: ...nnel which you want to delete 2 Press the RED button twice to perform the deletion function Rename Channel 1 Press the p q button to select a channel which you want to rename 2 Press GREEN button to perform the rename function 3 Press the p q button to select the character 4 Press the t u button to move the cursor position Move Channel 1 In Program Edit move the p q button to select a channel whic...

Страница 15: ...andard Mild and User Dynamic Standard and Mild are the factory preset picture mode and the parameter of those modes can not be changed If you want to adjust any items e g Contrast Brightness Clour and sharpness etc please select User and the settings will be stored in User mode C You may select the picture mode directly by pressing the PMODE button on the remote control Contrast Adjust the color b...

Страница 16: ...u button to select a time zone where you are TIME SETUP 1 Press the MENU button on the remote controller to display the OSD main menu 2 Press t u button to select the SOUND menu 3 Press p q button to select each item 4 Press the MENU or EXIT button to exit from the menu Sound Mode Press t u button to select a sound mode among Standard Music Movie Sports and User Treble Adjusts the level of higher ...

Страница 17: ... for the audio Note If your unit does not support multi language this item may not be selected by pressing t u button Subtitle Language for DTV Selects your desired language for the subtitle Note If your unit does not support multi language this item may not be selected by pressing t u button Hearing Impaired for DTV For Hearing Impaired people The program can be displayed with recorded explanator...

Страница 18: ...ck some program Parental Guidance for DTV mode only Press t u button to select the different block rating or select no block item to ignore this function Please enter password New Confirm 1 Enter a new 4 digital number as a code using 0 9 2 Enter the same 4 digital number to confirm EXIT MENU LOCK Block Program TV 31 S 26 TV 32 S 27 TV 33 S 28 TV 34 X 30 TV 35 S 31 TV 36 S 32 TV 37 S 35 TV 38 S 38...

Страница 19: ...is button again to release the page INDEX Press the INDEX button to enter the main index page directly You may enter the main index page number directly using the number buttons Enlarging Text When a page is displayed you can double the size of the text to make it easier to read 1 Press the SIZE button to enlarge the top half of the page 2 Press the SIZE button again to enlarge the bottom half of ...

Страница 20: ...toward the outer edge If you wipe using a circular motion circular scratches can occur which will cause noise If the disc is brought from a cold to a warm environment moisture may form on the disc Wipe with a soft dry lint free cloth before using the disc DVD OPERATION 19 Playback side This produce can play the following format of DVD Disc Note Also support DVD R DVD RW CD R CD RW playback Disc Ty...

Страница 21: ...3 2 6 Press to stop the play when the DVD is playing DVD slit Insert and exit the disc place 7 Press to pause the play when the DVD is playing Press to play when the DVD is stopped 7 1 2 3 4 5 6 To select the next chapter or song To select the anterior chapter or song To eject the disc 20 ...

Страница 22: ...ntinue AS some disc the player can recall the location where stopped such as DVD 2 Press PLAY PAUSE to playback to resume playback from the location where playback is stipped or from the beginning of the disc 3 Press STOP button twice to stop completely For CD disc press STOP button to go to stop mode press PLAY PAUSE to playback to resume playback FAST FORWARD AND FAST REVERSE 1 Press button to f...

Страница 23: ...ing REPEAT Repeat the current chapter title track or all of the disc ANGLE For discs with this feature press this key to view action from different angles Note Only for DVD with multi angle press ANGLE button to select your favorite playback angle Selectable playback angle depends on the availability of the DVD contents MENU Press this button and the screen will display Root Menu select item accor...

Страница 24: ...he previous or next file when playing and you also can select the previous or next page when stop When playing JPEG disc a navigation menu will be displayed automatically if the disc is loaded in succession In the menu use button in the cursors to select a file then press ENTER the file will be play with a slide show press PREVIOUS or NEXT to select the previous or the next picture Press PLAY PAUS...

Страница 25: ...the TV is a standard 4 3 screen horizontal compression of the image will result Some DVD titles may be recorded in special formats In such cases the DVD titles will always appear on the screen in their original format regardless of which TV display format you select Osd Lang Osd Language Users can select the whole setup menu and on screen display language Spdif Output There are 3 modes Spdif Off S...

Страница 26: ...tive even the DVD is removed from the player Last Memory may not work reliably with some VCD that feature PBC 25 PREFERENCE SETUP PAGE The preference setting is only active with no disc and these setting is effective on each time power on till exchanging the saved setting Tv Type This player supports different TV output including Auto NTSC and PAL systems 1 If your TV support only NTSC or PAL and ...

Страница 27: ...s in conjunction with the different censorship classes assigned to DVDs These classes help tp control the types of DVDs that the family watches there are up to 8 censorship classes for DVDs Note If you change this set you must input password Initial password 136900 Password Change You can change the password please type 6 numerals as new password Note Initial password 136900 Be sure remember new p...

Страница 28: ...MPONENT VIDEO YPbPr INPUT RGB INPUT 720p 60 720 44 96 60 00 576i 576 15 63 50 00 480i 480 15 73 60 00 576p 576 31 26 50 00 480p 480 31 47 60 00 1080i 50 1080 28 13 50 00 1080i 60 1080 33 75 60 00 Mode Resolution Horizontal Frequency KHz Vertical Frequency Hz 1080i 60 1920X1080 33 75 60 00 60 00 576p 720X576 31 25 50 00 50 00 1080i 50 1920X1080 28 13 Mode Resolution Horizontal Frequency KHz Vertica...

Страница 29: ...ery may be improperly installed Check that there is no obstruction between the remote control and the remote infrared sensor Ensure that there is no strong light shining on the remote control s infrared sensor Sound and picture interference Blurred or snowy picture distorted sound Remote control does not work The LCD TV does not turn on The image is too light or too dark Adjust the Phase Adjust th...

Страница 30: ...orrectly due to the effects of lightning or static electricity etc Even with a DVD switching cannot be done at points where multi angle is not stored Have you inserted a disc other than a DVD video CD or music CD If the disc is dirty wipe it clean Insert correctly with the label surface on the near side Subtitles appear only with discs which contain them The DVD does not have multiple language Pro...

Страница 31: ...eight Kg Net Weight Audio Input Frequency Response Audio Input PC Note Design and specifications are subject to change without notice Weight and dimensions shown are approximate values only Gross Weight Without Stand With Stand H V separate TTL P or N 1Vp p 75 ohm 0 7 Vp p 75 ohm PAL BG DK I AC 100 240V 50 60Hz 10 40 50 F 104 F 10 80 RCA Jack L R 0 5Vrms 9dB RF 100Hz 12KHz at 3dB A V 100Hz 13KHz a...

Отзывы: