background image

48

TODOWNLOADMUSICFROMIPOD/IPHONETOCOMPUTER

1.PressthePOWERswitchtoturntheuniton. 
2.DocktheiPod/iPhoneonthecradlethenpresstheiPODbutton.Playbackwill
automaticallybegin.
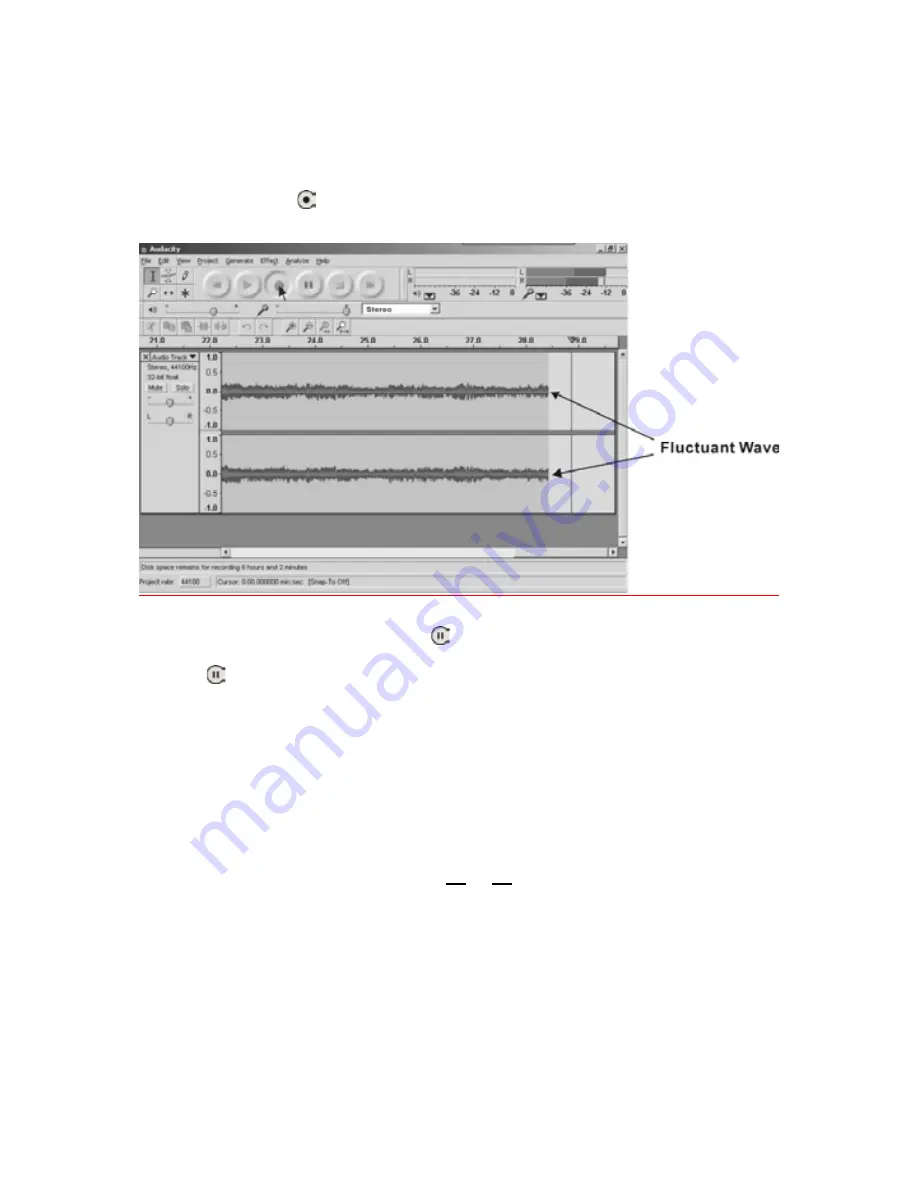
3.ClicktheRecord(

)buttontostartrecording.

Thewaves(leftandrighttracks)willshowontheinterface.


4. At end of a song, click ‘pause’ (

) button on computer and press PAUSE

button on the iPod/iPhone. When a next song is ready, immediately press
‘pause’(

)buttononcomputeranddownloadingwillcontinue.


5.Repeatsteps3and4untilyouhavefinisheddownloading.

NOTE:

Donotclick

‘STOP’

buttononcomputerwhilecontinuouslydownloading

songs.Remembertoclick

‘PAUSE’

buttoninbetweenyourdesiredsongs.Press

‘STOP’

 button on computer only when all your desired songs have been

downloaded.


Todivide,exportandsavetherecordedmusic
ToMP3,WAVorOggreferfrompages40to45.

Содержание E-E07H

Страница 1: ...AWA iPhone Docking Turntable E E07H USER S MANUAL Thank you for purchasing this product Please read this manual thoroughly before operating the unit and keep it for future reference ...

Страница 2: ...FROM IPOD IPHONE TO A CD 28 RECORD FROM EXTERNAL AUDIO SOURCE 28 SOFTWARE RECORD AND UPLOAD TO A COMPUTER 29 AUDACITY SOFTWARE 29 AUDACITY INSTALLATION AND USB CONNECTION 29 AUDACITY FOR WINDOWS USERS 30 INSTALLING THE AUDACITY SOFTWARE 31 CONFIGURING AUDACITY FOR MICROSOFT WINDOWS 34 AUDACITY CONTROL BUTTONS 34 AUDACITY PREFERENCES 35 PREPARING TO EXPORT AND SAVE FOR MP3 FORMAT 37 RECORDING OPERA...

Страница 3: ...RATIONS FOR WINDOWS 66 SETUP FOR MAC OS X 70 RECORDING OPERATIONS FOR MAC 75 COPYING THE MUSIC FILE TO AN MP3 PLAYER 79 GENERAL PROBLEMS FOR ALL WINDOWS VERSIONS 80 ADJUSTMENT FOR WINDOWS 7 AND SOME VISTA SYSTEMS ONLY 84 TROUBLESHOOTING GUIDE 87 FOR USB PC RECORDING 87 FOR NORMAL OPERATION OF THE TURNTABLE 89 SPECIFICATIONS 90 ...

Страница 4: ...hould use a mounting accessory recommended by the manufacturer 9 Transporting This product should be moved with care to avoid damage or injury 10 Ventilation Slots and openings in the cabinet are provided for ventilation to ensure reliable operation of the product and to protect it from overheating These openings must not be blocked or covered The openings should never be blocked by placing the pr...

Страница 5: ... outlet and refer servicing to qualified service personnel under the following conditions a If the power supply cord or plug is damaged b If liquid has spilled or objects have fallen into the product c If the product has been exposed to rain or water d If the product does not operate normally by following the operating instructions Adjust only those controls that are covered by the operating instr...

Страница 6: ...efer servicing to qualified service personnel The lightning flash with arrowhead symbol within an equilateral triangle is intended to alert user to the presence of non insulated dangerous voltage within the product s enclosure that may be of sufficient magnitude to constitute risk of electric shock to persons The exclamation point within an equilateral triangle is intended to alert user to the pre...

Страница 7: ... forget to close the disc tray 6 Do not attempt to clean the unit with chemical solvents as this might damage the finish Use a clean dry cloth 7 In order to shut off the power to this product completely unplug the power cord from the wall outlet Be sure to unplug the unit if you do not intend to use it for an extended period of time such as while on vacation 8 Keep this manual in a safe place for ...

Страница 8: ...rd cleaning fluid not included is required To Clean on the turntable 1 Lock the tone arm on the tone arm rest 2 Wash your hands 3 Place a record on the turntable handling the record by edges and labeled area 4 Dry clean the record if it is not very dusty and has been cleaned regularly 5 Follow the manufacturer s instructions for applying fluid if you decide to wet clean Be sure no fluid drips onto...

Страница 9: ...ard towards the outer edge with a soft dry cloth y Never use such chemicals as record spray antistatic sprays or fluid benzine or thinner to clean the discs Such chemicals will do irreparable damage to the disc s plastic surface y Discs should be returned to their cases after use to avoid dust and scratches that could cause the laser pick up to skip y Do not expose discs to direct sunlight or high...

Страница 10: ... batteries not included observing the correct polarities 4 Re fit the cover Battery Replacement If the distance required between the remote control unit and main unit decreases the batteries are exhausted In this case please replace the batteries with new ones Precautions concerning batteries x Be sure to insert the batteries with correct positive and negative polarities x Use batteries of the sam...

Страница 11: ...11 REMOTE CONTROL ...

Страница 12: ...enu on iPod iPhone 14 iPOD iPHONE SHUFFLE Set a shuffle playback on iPod iPhone 15 iPOD iPHONE REPEAT Set a repeat playback mode on iPod iPhone 16 TV Switch a video playback between iPod iPhone and TV set 17 iPOD iPHONE PLAY PAUSE Act as Play Pause on iPod iPhone 18 PLAY PAUSE For disc only Start or pause a playing recording or activate the finalizing erasing process 19 FR For disc only Press to s...

Страница 13: ...k is programmed and P 03 shows on the display 6 Repeat step 2 and 5 to program more tracks You can program up to 32 tracks TO START A PROGRAM PLAY Press the PLAY PAUSE button TO PAUSE OR STOP PLAYING Press the PLAY PAUSE button or STOP button TO RESTRAT THE PLAY Press the PLAY PAUSE button again TO CHECK THE PROGRAMMED ORDER Stop the programmed playing then press the or button repeatedly TO ADD A ...

Страница 14: ...play 1st press 4 39 Total time of the track it will track time down 2nd press 00 01 It will track time up 3rd press 72 39 Total time from all tracks it will track time down It will show the balance of time on the CD R RW disc i e 80 min on blank CD Press display button on remote it will show the balance of time on a partially recorded disc It will show the recording time Press display button on re...

Страница 15: ...ress one of the following buttons OPEN CLOSE PHONO AUX or iPOD NOTE Repeat playback works with finalized discs only SHUFFLE PLAYBACK The tracks can be played randomly in shuffle mode Press the SHUFFLE then PLAY button or during playback press the SHUFFLE button CLEAR THE SHUFFLE PLAYBACK Press one of the following buttons OPEN CLOSE PHONO AUX or iPOD NOTES When all tracks have been played randomly...

Страница 16: ...RM REST 15 LIFT HANDLE 16 BALANCE WEIGHT 17 REMOTE SENSOR 18 OPEN CLOSE BUTTON 19 SKIP BUTTON 20 SKIP BUTTON 21 PLAY PAUSE BUTTON 22 STOP BUTTON 23 REC BUTTON 24 REC LEVEL BUTTON 25 REC LEVEL BUTTON 26 VOL BUTTON 27 VOL BUTTON 28 ERASE BUTTON 29 FINALIZE BUTTON 30 iPOD FUNCTION 31 AUX FUNCTION 32 PHONO FUNCTION 33 CD FUNCTION 34 CD RECORDER COMPARTMENT 35 DISPLAY 36 LINE OUT CABLE 37 USB JACK 38 S...

Страница 17: ... appliance that has loudspeakers 1 Plug the Line Out cable located at the rear of the unit into the auxiliary input AUX on your TV home entertainment receiver or other music system again being sure that the correct color coded jacks are used 2 Press the POWER button to turn on the player Turn the volume to the minimum level 3 Turn on your TV or home entertainment receiver and adjust the volume If ...

Страница 18: ...ht clockwise or counter clockwise per instructions below x Put the balance weight into scale mark of the tone arm then rotate it to the designated position of the scale mark x Rotate the balance weight counter clockwise so that it moves outward towards position if track skipping occurs x Rotate the balance weight clockwise so that it moves inward towards position if the sound is distorted or the b...

Страница 19: ...ecord and automatically return to the arm rest 8 When the music plays to its end the tone arm will return to the arm rest automatically PLEASE NOTE It could take approximately 20 seconds for the tone arm to return to the arm rest when playing records at 78 rpm TIPS You can cover the turntable lid during the play to prevent the dust NOTES x Do not put any object on top of the turntable lid especial...

Страница 20: ...n iPhone 4 iPod classic iPhone 3GS iPod with video iPhone 3G iPod nano 2nd 3rd 4th and 5thgeneration iPhone iPod mini iPod Through the use of interchangeable inserts called Dock Adaptors you can dock your iPod iPhone on this appliance Before docking your iPod iPhone you must first check your iPod iPhone has a dock connector The docking connector is located on the base of the iPod iPhone Also you m...

Страница 21: ...s this may damage the unit As the song is tracking quickly forward or backward you will hear your selection playing at a distorted speed Simply release the depressed button to continue playing at normal speed at the desired position in the selected song CHARGING YOUR iPOD iPHONE When your iPod iPhone is docked it will be charged automatically until the battery is full The follow functions can be a...

Страница 22: ...n the tray with the printed label facing up 4 Press the OPEN CLOSE button to close the tray 5 Press the Play Pause button to play CD The CD disc will start playing from the first track 6 Press the button once to skip to the next track 7 Press the button to skip to the previous track SEARCH FOR A PORTION OF A TRACK Press either the or button the track will tracking at high speed When the desired po...

Страница 23: ...y If the disc is not correctly loaded it may not be possible to open the tray again once it has closed so you should ensure the disc is always centered on the tray x Do not force the tray by hand during opening and closing operations x Do not switch the unit off while playing a CD as this will damage the unit ...

Страница 24: ...st and Adjust Recording Level Select Play To Start Recording Select Track Increment For Track Division If No Auto Manual Selection Finalizing Recorded Disc Please refer to the following detailed operation instructions For CD R or CD RW if it is recorded and finalized it is possible to play the disc on most CD players If it is recorded but not finalized it will not be possible to play the disc on m...

Страница 25: ...ed label facing upward Then press OPEN CLOSE button to close the disc tray The display will show BUSY CD and the disc is reading Wait until the reading is complete before going to next step NOTE Make sure NO TOC and CD R or CD RW indicators are lit up on the left side of the display Otherwise the RECORD function will not work 2 Select the mode of track number assignment on your REMOTE CONTROL x AU...

Страница 26: ...xternal source x To record from the docked iPod iPhone press the iPOD button and dock the device on the iPod cradle NOTE For recording you must use PLAY PAUSE button on the front of cabinet NOT the button on top TO RECORD FROM A RECORD TO CD 1 Press the PHONO button 2 Press the RECORD button REC will appear on the display No button will work while BUSY is displayed Wait a few seconds until BUSY di...

Страница 27: ... works only with CD RW disc FINALIZING In order for a disc to become a standard CD it must have a Table of Contents TOC written to it This process is known as finalizing THE CD MUST BE FINALIZED 1 Press the FINALIZE button in the stop mode FINALIZE appears on the display 2 Press the PLAY button to start finalizing The display will show Busy during finalization Wait until the BUSY disappears to com...

Страница 28: ...UX button to select the AUX function 3 Plug one end of cable included into the AUX IN jack at rear of the unit 4 Plug the other end of the cable into the headphone or LINE OUT socket of the external source 5 Turn the audio source on and adjust volume level 6 Press REC button to activate recording 7 Press PLAY button on the audio source 8 Press PLAY button on the record player to start recording No...

Страница 29: ...ect the cable to the AUX IN socket at the back of the unit And then connect the other end into HEADPHONE or LINE OUT socket of the external device Play the external device in the normal way AUDACITY SOFTWARE The Audacity folder contains the following software 1 audacity src 1 2 6 For source codes 2 Audacity_for_MAC For Macintosh 3 Audacity_for_WIN For Windows 4 AUTORUN INF 5 The GNU General Public...

Страница 30: ...CD ROM Drive x Normally the CD will run automatically 2 Double click Audacity disk There are five files in the Audacity disk x Audacity_for_WIN for Windows system x Audacity_for_MAC for Macintosh system 3 Double click the Audacity_for_WIN for Windows system and double click the audacity win 1 2 6 to install the audacity software ...

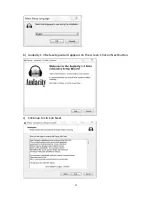
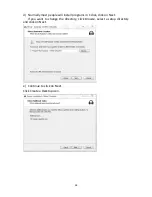
Страница 31: ...31 INSTALLING THE AUDACITY SOFTWARE 1 The Audacity Setup Wizard will appear Click on Next to install the software 2 Click on I accept the agreement and click on Next ...

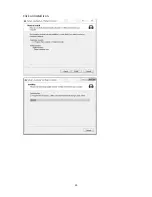
Страница 32: ...32 3 Continue to click on the Next buttons ...

Страница 33: ...n Finish to complete installation 6 You can now open the Audacity software and start recording your files NOTE Once you set up Audacity you do not need to re set it with each use For additional information visit the Audacity website at http audacity sourceforge net ...

Страница 34: ... Pause Stop and End Use the File Edit View Project Generate Effect and Analyze menus to Save Export and edit the music 1 Click the button to skip to start 2 Adjust the output volume 3 Click the button to play 4 Click the button to record 5 Click the button to pause the recording 6 Click the button to stop the recording 7 Adjust the input volume 8 Click the button to skip to end ...

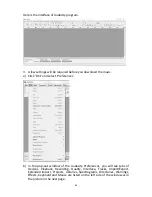
Страница 35: ...the Audacity preference interface 2 Select the recording device microphone USB Audio Controller x Click the Audio I O at the Audacity Preferences interface x Click the Recording Device arrow and select microphone USB Audio Controller x Click the Channels arrow and select 2 stereo x Click OK NOTE If you couldn t find the microphone USB Audio Controller from the Recording Device list close the Audac...

Страница 36: ...versions Windows Vista is recommended to ensure the input volume control working properly x For more information on setup please see Setting up Audacity on the website below http wiki audacityteam org index php title Transferring_tapes_and_records_ to_computer_or_CD x And for any query on Mixer Toolbar please see http wiki audacityteam org index php title Mixer_Toolbar_Issues ...

Страница 37: ...ware lame_enc dll needs to be installed 1 Please make sure that the software disc is still inserted in your computer 2 Click the Edit Tab on the Audacity interface select Preferences 3 Select the File Formats Tab and click on the Find Library Button 4 A dialog box will appear Click Yes ...

Страница 38: ...then double click on Audacity For Win you will find the lame_enc dll software Click the software then click Open x For Windows Vista double click computer and find CD ROM Double click CD ROM and find lame_enc dll 6 Click on the OK Button Now the MP3 software set up is complete and you may proceed with the exporting to MP3 format ...

Страница 39: ...song replace the album or move tone arm to another desired song Press PLAY PAUSE button on turntable to start playing the next song Immediately press pause button on computer and downloading will continue 5 Repeat steps 3 and 4 until you have finished downloading NOTE Do not click STOP button on computer while continuously downloading songs Remember to click PAUSE button in between your desired so...

Страница 40: ...k the STOP button when you have finished downloading into computer When your downloading is completed 1 Press skip to start button to return to the beginning of the first song x For example You have 2 songs downloaded before exporting The duration of the first song is from 0 00 1 45 the duration of the second song is from 1 45 4 00 See time bar directly above waves in interface below Suggestion Yo...

Страница 41: ... the highlighted time bar has reached 1 45 end of first song Highlighted 3 Click File tab then select EXPORT SELECTION AS Ogg or MP3 4 The window will pop up a dialog box for you to put the song title File name where you want to save it Save in and file format Save as type 5 Click Save and the first song from 0 00 1 45 is saved on the computer See save interface on the next page ...

Страница 42: ... the music needs to be saved and converted to MP3 formats before exporting x You may play back the song through your computer Simply click skip to start button then play button x NOTE You may visit the Audacity website at http audacity source forge net for more detailed information and operation etc See interface example below saved as MP3 format Complete box below ...

Страница 43: ...ge 40 to export save and divide the songs one by one TO CHANGE THE TITLES FOR MP3 FORMAT ONLY DURING EXPORT SELECTION AS MP3 the software only provides one time to title the song being saved All subsequent songs being divided from the same track are with the same title To change the titles follow the steps below 1 Right click on the Music file which will show all its contents 2 Select Properties t...

Страница 44: ...gg or MP3 formats before exporting x You may play back the song through your computer Simply click the to play and turn on your computer speaker x NOTE You may visit the Audacity website at http audacity source forge net for more detailed information and operation etc 1 Click the file tab on the audacity interface Select Export Selection as WAV or Export Selection as Ogg To Export Selection AS WAV...

Страница 45: ...have chosen to which file format recording should be exported the interface below appears Here you may provide the file name and the location where it will be saved i e desktop Then click Save Save as WAV Save as Ogg ...

Страница 46: ...ick pause button on computer and press STOP button on CD Replace the CD or press skip button to select another desired song Press PLAY PAUSE button to start playing the next song Immediately press pause button on computer and downloading will continue 7 Repeat steps 5 and 6 until you have finished downloading NOTE Do not click STOP button on computer while continuously downloading songs Remember t...

Страница 47: ...erface 6 To skip to another song click pause button on computer and press STOP button on external device Press skip button on external device to select another desired song Press PLAY button on external device to start playing the next song Immediately press pause button on computer and downloading will continue 7 Repeat steps 5 and 6 until you have finished downloading NOTE Do not click STOP butt...

Страница 48: ...utton on computer and press PAUSE button on the iPod iPhone When a next song is ready immediately press pause button on computer and downloading will continue 5 Repeat steps 3 and 4 until you have finished downloading NOTE Do not click STOP button on computer while continuously downloading songs Remember to click PAUSE button in between your desired songs Press STOP button on computer only when al...

Страница 49: ... OS 9 folder to install the audacity software NOTE Audacity does not support the latest upgraded MAC OS9 y If your computer is Mac OS X system Power PC CPU please enter the PPC folder to install the audacity software 3 Double click on the setup file according to your system supported for instance audacity dmg icon the software files will now open in a folder Select all the files in the folder and ...

Страница 50: ...f the play control buttons you will see the input and output level meters labeled L and R Under the output level meter is an icon that looks like a microphone Next to the microphone is a black arrow that points down Click this arrow and select Start Monitor If you don t see the input and output level meters open your Preferences again as described above ...

Страница 51: ...lyze menus to Save Export and edit the music 1 Click the button to skip to start 2 Click the button to play 3 Click the button to record 4 Click the button to pause the recording 5 Click the button to stop the recording 6 Click the button to skip to end 7 Adjust the output volume 8 Adjust the input volume AUDACITY PREFERENCES 1 Click the Audacity on the Audacity interface select Preferences ...

Страница 52: ...ore Audio USB Audio Controller y Click the Audio I O at the Audacity Preferences interface y Click the Recording Device and select Core Audio USB Audio Controller y Click the Channels and select 2 stereo y Click the OK NOTE If you couldn t find the Core Audio USB Audio Controller from the Device list close the Audacity Software and re open then try again or insure the turntable is connect to the c...

Страница 53: ...mple Format to 16 bit Select OK to save your setting and close the preferences window 3 To set the Smart Recording To select the Smart Recording in the Audacity Preferences interface and set the Sound Activation Level dB to 36 and then click OK ...

Страница 54: ...stems the input volume control may not work on some individual Windows versions Windows Vista is recommended to ensure the input volume control working properly IMPROVE RECORDING QUALITY If you find the recording sounds unsatisfied you may adjust the Input Volume meter in both the system and Audacity software 1 Adjust the Input Volume meter to maximum 2 Click System Preferences and double click on...

Страница 55: ...computer y Simply click the to play NOTE You may visit the Audacity website at http audacity source forge net for more detailed information and operation etc 1 Click the file tab on the audacity interface Select Export to save the file 2 A window will pop up after clicking Export It will default the MP3 format but you also can select other formats You only need to click the arrow located at the ri...

Страница 56: ...erent directories x System Requirements Download Windows 2000 XP Vista and provisional support for Windows 7 Windows 98 Me Mac OS X 10 4 or later x Get your cassette player and your computer connected with the provided USB cable Go to the Audacity official website to download the latest program The instructions for Audacity are similar Here is an example of Audacity 1 3 13 Beta version SETUP FOR W...

Страница 57: ...57 b Audacity 1 3 Beta setup wizard appears on the screen Click on Next button c Continue to click on Next ...

Страница 58: ...ally most people will install programs in C disk click on Next If you want to change the directory click Browse select a setup directory and click on Next e Continue to click on Next Click Create a Desktop icon ...

Страница 59: ...59 Click on Install icon ...

Страница 60: ... to complete the installation NOTE You do not need to install the program in every use g Then the program will be opened if the checkbox beside the Launch Audacity is selected Or you can open Audacity software and start recording your files ...

Страница 61: ...elect Preferences b In the pop out window of the Audacity Preferences you will see tabs of Devices Playback Recording Quality Interface Tracks Import Export Extended Import Projects Libraries Spectrograms Directories Warnings Effects Keyboard and Mouse are listed on the left side of the window as in the picture in the next page ...

Страница 62: ... 2 Stereo Do NOT click OK until you finish all the settings d Click Recording on the left side you will see the detail contents on the right side Click the checkbox beside Software Playthrough Listen while recording or monitoring new track e Before exporting an MP3 file you need to find lame first If the program does not show the MP3 Library make sure the Audacity driver disc is inside your comput...

Страница 63: ...or DVDR Audacity D Double click on it Then double click on Audacity for Win then left click on lame_enc dll to highlight it Clip Open then click OK Or if you cannot find it or the lame file you found is not compitible a window appears to prompt you to download the latest version Click OK to close the pop up window Click Locate then in the Locate Lame window click Download button and a website will...

Страница 64: ...dacity LAME is free so you can click libmp3lam 3 98 2 zip under ZIP OPTION to download Click Save select the Folder you want to save it in then click Save again to save it Close the Webpage then click OK to close the Audacity preference Minimize Audacity interface then open the Folder where you waved the libmp3lam 3 98 2 Double click on it then double click on it again to open Now click on lame_en...

Страница 65: ...es in MP3 library Click on Locate then click on Browse Click on Desktop then click on Lame_enc dll to highlight it Then click Open f Click on OK on Locate Lame box Click OK on Audacity Preferences to close and to complete your settings Now you can Record Export and Save your favorite music g For detailed information about how to run this program please click Help and click Manual in web browser ...

Страница 66: ...eft to right these button controls are Skip to Start Play x Record Pause Stop Skip to End Output and input monitors x Output level meter x Input level meter Output and input control x Output volume and output level slider x Input volume and input level slider ...

Страница 67: ...evel to 5 see the section of ADJUSTMENT FOR WINDOWS 7 AND SOME VISTA SYSTEMS ONLY 2 Press pause in between each song Only press the stop button when all desired songs have been recorded TIPS If you press the stop button by accident you can click Transport and click Append Record Then you can continue to record in the same track For example the stop button has been pressed by accident at the end of...

Страница 68: ...ong and left clicking Then hold and drag the cursor Release the cursor when your selected section is highlighted 5 Click File and select export section to export the song 6 Another window appears Select a location as well as the format most people prefer to save audios as MP3 format MP3 format is most common in My Music and put the title in the file name then click Save NOTE The most common format...

Страница 69: ... supported on both your computer and the exported devices Note that according to your selection the Edit Metadata window may not appear 7 Then another window will show up Fill in the information in the window titled with Edit Metadata Then click OK Wait a few seconds before exporting the selected audio Now you can copy the audio files to your MP3 player ...

Страница 70: ...gram 1 Double click on the Audacity 1 3 13 hardware you just downloaded then a window will be opened Select all the files in the folder and drag them into a suitable location on the hard drive Applications etc Double click on the Audacity icon to start the software running alternatively drag the orange ball wearing headphones icon down onto the desktop toolbar Click on this icon to run Audacity Au...

Страница 71: ... Audacity menu bar Click Audacity and select Preferences Then another window will appear on the screen b In the window of Audacity Preferences click Devices on the left hand side Then on the right side within the Recording Device column set Device to USB Audio Controller Channels to 2 Stereo ...

Страница 72: ...x beside the Software PLaythrough Listen while recording or monitoring new track In the Sound Activated Recording column slide the meter to 36 db d Click Quality on the left then on the right side in Sampling column select 44100 Hz in Default Sample Rate and select 16 bit in Default Sample Format ...

Страница 73: ...brary not found you need to find the LAME Click Locate button then a window named Locate Lame appears to find where the LAME is Click the Browse button to find it Or if you cannot find it or the LAME file you found is not compatible click the Download button and a website will show automatically Scroll down the webpage to find a title named MAC OS X Click the LAME download page and another website...

Страница 74: ...AME for all version systems Find a title named For Audacity 1 3 3 or later on Mac OS X Intel or PPC and then click Lame Library v3 98 2 for Audacity on OSX dmg to download the file Then locate the LAME and click OK f Then click OK to close the Preferences interface ...

Страница 75: ...tor does not exceed 0 If you find the recording is distorted for example the input level indicator exceeds 0 or the waveform is clipped or the recording sound is distorted you can adjust the sound level of the original music To set the input volume go back to the desktop window and click System Preferences Double click the Sound icon and in the Sound window set the input volume slider to 5 Then cl...

Страница 76: ...rd Then you can continue to record in the same track 3 Before exporting press skip to start button and then press play button to play the recording then press Stop button 4 Then select a section you want to export by moving the cursor to the beginning then click hold and drag it Release the cursor until your selected section is highlighted 5 Click File and select export section to export the song ...

Страница 77: ...s Select the save as location as well as the format and fill in the save as name then click Save 7 In the coming up window named Edit Metadata fill in the information then click OK Wait a few seconds to export the selected audio ...

Страница 78: ...e it is completed you can copy the audio to your portable MP3 player 8 If you have any doubts or need some advanced instructions please click HELP and select QUICK HELP IN WEB BROWSER or MANUAL IN WEB BROWSER ...

Страница 79: ...n their MY MUSIC folder 7 Once your music folder MP3 file folder is open click once to highlight the song you want to send to your MP3 player One of the following steps will copy the MP3 file A Right click on the highlighted song and a box will come up Move cursor to SEND TO and another box will come up If you have the option REMOVABLE DISK click on it This will send copy of MP3 file to MP3 player...

Страница 80: ...in the left corner of the computer select Programs Accessories Entertainment Sound Recorder to enter Sound Recorder interface x In SOUND RECORDER interface Select Edit and click Audio Properties in the bottom of the menu to enter Audio Properties interface x In AUDIO PROPERTIES interface Select sound recording default device and click Microphone USB Audio Controller then click VOLUME to enter WAVE...

Страница 81: ...81 x In WAVE IN interface Adjust the recording volume to the middle first then set to lower or higher The fluctuant wave will show on the interface when recording ...

Страница 82: ... change the playback device e g Speakers then click Set Default And click OK The sound should come out x For Other Windows versions users i e Windows XP You may click Start and find Programs Accessories Entertainment Click Sound Recorder Then in the Sound Recorder click Edit tab and select Audio Properties Or find and click into Control Panel Find and select Sound and audio device and choose Audio...

Страница 83: ...nterface Click Edit and select Preference Click on Software Play Through Click OK to confirm For more information please see Set up Audacity to record from the turntable in website below http wiki audacityteam org index php title USB_turntables Set_up_Audacity _to_record_from_the_turntable ...

Страница 84: ...luctuant wave on the Audacity interface or the sound is low or distorted during recording adjust the recording level as follows x Click Start at the lower left corner go to the Control Panel x Click All Control Panel Items to access your computer settings x Click on the Sound icon ...

Страница 85: ...ume Reading The reading is from 0 to 100 Normally it should be 5 However you may refer to the Input Level Indicator from the Audacity panel that doesn t exceed 0 Then click OK on the Microphone properties interface and sound interface Close the Control Panel Please note that there is no Levels tab in Sound panel in some operating systems such as Windows 98 Windows 2000 For Windows 7 users and Vist...

Страница 86: ...86 x For more information on Windows Vista http wiki audacityteam org wiki Windows_Vista_OS x For more information on Windows 7 http wiki audacityteam org wiki Windows_7_OS ...

Страница 87: ...itor Input This will enable you to hear the audio from the turntable even if you have not record enabled the Audacity application If you are not seeing the microphone slider please go to the Preferences menu in Audacity click on the Interface tab and make sure that the Enable Mixer Toolbar and Enable Meter Toolbar options are checked If they are not please check them and then press OK Check the mi...

Страница 88: ... re run the Audacity If you experience any odd sounds coming from the recording try closing all applications restarting the computer and only run Audacity while recording Make sure that you have properly installed and calibrated the tone arm of the turntable UNSATISFIED RECORDING SOUND QUALITY Set the record level to 00 position to make sure the L R indicator does not exceed OVER Set the record le...

Страница 89: ...all power supply devices then re plug in the unit after one minute CD PLAYER CD stops immediately after starting or unit pauses or stops during play The CD is inserted upside down Insert the CD with the printed side right side up The CD is dusty or there is condensation on the CD Carefully clean and dry the CD No sound The CD player is paused Press the PLAY PAUSE button Specific CD is noisy or pla...

Страница 90: ...ving Magne c Cartridge Stylus MG 2801 GENERAL Power Requirements AC 240 V 50 Hz Power Consump 35 W Dimensions W x D x H 440x372 x131mm approx Weight 29 1 lbs approx Standard Accessories Opera on Inst Booklet 45 rpm Adaptor Balance Weight Remote Control CD Disk of Audacity driver USB Cable RCA to RCA Cable EXTERNAL SPEAKER SYSTEM se Type 1 way Impedance 8 ohm Input Power Max 5 W Dimensions W x D x ...

Страница 91: ... 01 2 3 4 4 5 5 1 5 6 3 7180 00 11 9 ...

Отзывы: